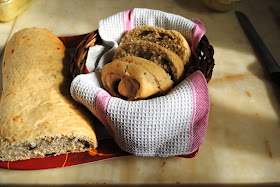
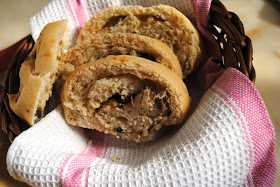
 One of my friends spent last weekend with us - she was in Delhi for an important meeting (which went well - YAAY!!) and we had a great time sitting down in the evenings and chatting on every topic under the sun. She is a friend I made quite recently, but we share a lot in common, including our love for food and cooking. She had very generously sent me a few packets of fast action yeast which one of her friends had sent her. And though it came a couple of months back, I coincidentally used it for the first time, that very week.
What a difference from the active dried yeast that I have always used! No more coddling the dough and waiting with bated breath wondering whether it will rise. The dough just rose so beautifully - twice!!! Thats it - I know whats going to be on the shopping list of everyone who goes abroad now ;) I am never going to go back to active dried yeast if I can help it.
I chose to bake a mushroom and garlic stuffed baguette from Sara Lewis's - The Bread Book. I have previously made an Olive and Feta Cheese bread, Carrot & Mustard Bread and Rapid Light Wholemeal Loaf from this book which was a gift I got two years back. Didnt have a problem with any of them so I can definitely recommend her recipes.
The filling was very simple and since there was no worrying about the dough, it took me just half an hour of kitchen time to get this together. I did this after coming back from work and my daughter had great fun adding all the ingredients into the dough. Of course, as soon as she saw the mushroom filling going in, she became very suspicious (she can't stand bits and pieces which come into her mouth without her knowledge and permission LOL) and her enthusiasm waned a bit. The dough proved by the time she was done with her dinner and I shaped it and left it to prove again for half an hour and then it went into the oven. By the time we finished our dinner, I had some beautiful bread ready for next day's breakfast.
Since the baguette was too big to go into my oven, I broke off the ends and shaped them into rolls - which is why the baguette doesn't taper off at the ends like it should. Also, I think it could have baked for a little bit longer than the specified 30 minutes - it was a softer and paler than usual. Next time I am also going to try an egg wash on top for a better crust. The bread itself was really nice and I enjoyed having it with a hunk of cheese and some mint chutney. It wasn't as thin as a baguette though, since it kept rising - reminded me of The Magic Pot! Thanks Nina!
Stuffed Mushroom and Garlic Baguette


Refined flour (maida) - 475g or 4 1/3 cups
1 1/2 tsp sugar
1 tsp salt
1 tsp chilli flakes
2 tsp dried mixed herbs
1 1/4 tsp fast action dried yeast2 tbsp olive oil
275mln or 1 cup water
Filling
100gm mushrooms, washed and sliced2/3 cup wine
2 tbsp olive oil
1 onion, chopped
2 garlic cloves chopped
salt
1. Put the flour into a large bowl, add the sugar, dried yeast, salt, chilli flakes and gerbs. Add oil, enough water and knead well for about 10 minutes into a smooth and elastic dough. It should be soft and shiny but not too wet. Cover with oiled clingfilm and leave to rise for 1 hour or until doubled in size.
2. Heat oil in a pan and saute the onions and garlic for 5 minutes. Add the sliced mushrooms and fry on high heat for 2 minutes, add the red wine and salt and simmer till the liquid boils away.
3. Take the dough out from the bowl and knead well. Roll into a rectangle about 17 X 19 inches ( I will make two rectangles next time, since this one was too big for the oven).
4. Spoon the mushroom filling over the rectangle in a thin layer, then roll up the dough starting from one of the longer sides of the rectangle.
5. Put the dough on a greased baking sheet or tray, brush with oil, cover loosely with clingfilm and let it rise for a second time for about 30 minutes.
6. Bake in a pre heated oven, 200C for 30 minutes or until golden brown. Transfer to a wire rack to cool.

looks delicious miri. the joys of instant yeast!!
ReplyDeletei am using google analytics on my site now.
Oh! That's helpful I hope?? many people seem to be using that!
ReplyDeleteLooks really delicious, love the filling', such a complete meal:)
ReplyDeletemy dough only rose once when i used fresh yeast...active dry yeast always fails me. the baguette looks scrumptious. love the addition of mushroom to it.
ReplyDeleteThe stuffed baguette is looking good. Never gave instant yeast much thought, will give it more respect from now on :)
ReplyDeleteLike your new look as well.
This is the yeast you were telling me about ? Wow ! Must ask someone to get it for me ! Stuffed mushroom and garlic sounds perfect !!
ReplyDeleteThe stuffed bread looks wonderful! If you know anyone visiting you from the US, let me know and I'll be thrilled to send you a giant pack of instant yeast, it can live in the freezer practically forever.
ReplyDeleteMiri
ReplyDeleteI love the fresh new look of your blog
The stuffed baguette looks immensely appetizing. Why do I feel making bread is a huge chore, you make the whole thing seem so easy. Do you have to knead the dough real well ?
Thanks S - I was wondering how it looked to y'all...
ReplyDeleteBread making is much easier than it looks - I used to think of it as a chore too... till the first time I made it.
Do you knead chapati or puri dough? if you do, then it's about the same - I usually knead it for 8-10 minutes, no more. I guess in the West, the kneading gets written up a lot because it is not part of their everyday cooking, whereas for Indians who make rotis on a daily basis, its par for the course.
Thanks so much for the offer Nupur - I will definitely keep it in mind :)
ReplyDeleteMiri
ReplyDeleteI am horrible at kneading. Maybe because I like rice much more than Roti, I always think kneading is a chore. I usually get D to knead the dough for Puris, he does a good job ;-)
This comment has been removed by a blog administrator.
ReplyDelete