Wednesday, September 28, 2011

Nutella Pinwheel Cookies

I amo actually not much of a Nutella enthusiast - certainly not like my brother who can slather it on to bread slices and make sandwiches of it!! But I recently bought a jar in an attempt to persuade my daughter to finish up her lunch box - the deal being that she would get Nutella sandwiches one day of the week if she finishes up her lunch the other 4 days. (I don't even know why I am making these deals because its not as if the lunches on the other days are uninteresting or she doesn't like them. She just chats and eats so slowly that she runs out of time most days. Sigh....and some days she has Chocos from her friend's lunchbox - not to judge, but really Chocos for lunch?? Must be another harried Mom who was trying to make a deal with her 6 year old!

Anyway, so when I saw this latest post on Anita's blog for some luscious Cinnamon Rolls,  what instantly came to mind were pinwheel cookies and the Nutella jar in the fridge. I thought Joy of Baking would have a recipe for pinwheel cookies of some sort, but they didn't and instead found a site called Joy of Desserts and I found this recipe which used chocolate. I adapted the recipe to use the chocolate hazelnut spread and it was a lovely combination.

The humidity made it a bit difficult to roll out the dough even though I chilled it, so I finally had to roll out the chocolate part of the dough on top of the plain dough which is why the pinwheels are not as well defined as I would have liked them. Did nothing to the taste though; these were some seriously good cookies - soft and crumbly and with the delicious taste of chocolate and hazelnuts mixed in without being overwhelmingly cloying.


Nutella Pinwheel Cookies (Adapted from Joy of Desserts)

1 1/2 cups flour (I ended up kneading in about another 1/4 cup of flour in my attempt to roll out the dough)
1/2 cup butter ( I had only salted butter so skipped the pinch of salt in the original recipe)
1/2 cup sugar
2 tablespoons Nutella
1 egg
3 -4 tablespoons milk
1 1/2 teaspoons baking powder

1. Sieve the flour with the baking powder (and salt if usinng)
2. Cream the butter and then add the sugar and bear till light and shiny.
3. Add the egg and beat for another 2 minutes.
4. Fold in the flour and baking powder and mix well, adding milk one tablespoon at a time till you manage to get a soft dough.
5. Divide the dough into two portions and add the Nutella to one of the portions.
6. Wrap the dough portions with plastic wrap and chill in the fridge for 15 minutes.
7. Turn the plain dough out and roll 1/8th inch thick. Roll the Nutella dough out to the same size as the plain dough.
8. Place the Nutella dough over the plain dough and press together, Then roll away from you into a tight even cylindrical roll.
9. Chill again for 10 minutes, Remove and cut into thin slices.
10. Bake in a pre heated oven at 190C for 10 minutes.

Wednesday, September 21, 2011

Laksa


Laksa is one of my favourite noodle soups and I always try to order it when we are eating out at a restaurant which serves Oriental cuisine (and come to think of it we seem to land up at these places a lot because both of us love those flavours). This is a Malaysian dish, though to be more accurate it is supposed to have a lot of Chinese elements to it, so its popular in a place like Singapore as well.

I was recently reminded of this dish when I saw a vegetarian Laksa being made on Rachel Allen's Home Cooking show - she made it with sugar snap peas and bean sprouts. I suddenly had a craving for Laksa and since I am still recuperating, decided to try making it at home with the help of my trusted Tara. It turned out to be a delicious one pot meal for our Sunday lunch which even my 6 year old enjoyed and smacked the last bits from her bowl.

It was a perfect dish to have for my starved palate which has been surviving on khichdi and mostly bland food....the chicken was cooked to perfection as well. I used glass noodles instead of rice noodles and they made a nice change. You could use Thai curry paste instead of making the paste from scratch but I do believe that the freshness of the ground ingredients adds to the flavours which may otherwise get submerged in the coconut milk. Season this dish with caution since it has fish sauce as well as stock cube in it, both already have salt in them.

Chicken Laksa - recipe adapted from Rachel Allen's Laksa

Chicken - 200gms boneless cut into strips and marinated with a little salt and lemon juice
Vegetables - 1 cup sliced - I used babycorn and bell peppers
Coconut milk - 400 ml
Chicken stock cube - 1 dissolved in 400ml of water
Sesame oil - 2 tsp

Spice paste:
Ginger - 1" piece
Garlic - 4 cloves chopped
Lemon grass - 1 tbsp chopped (only the tender inner part not the tough outer stalks, if you'd rather not grind this because of the fibres, then just add the lemon grass whole to the laksa when its cooking)
Coriander leaves - 1/2 cup chopped
Fish sauce - 2 tbsp
Green chillies - 4-5

Rice noodles/Glass noodles - 250 gms, soaked in hot water till soft and then rinsed in cold water.

1. Grind all ingredients for the spice mix to a paste - it will be a little coarse and not fine.
2. Heat the sesame oil in a wok and fry the spice paste for a few minutes, then add the chicken pieces and fry on high for 3-4 minutes.
3. Add the coconut milk and chicken stock to the wok and bring to boil. Then simmer for about 20 minutes till the chicken is cooked. Add the chopped vegetables and cook for 5 more minutes.
4. I usually take out a portion for my daughter at this stage and add a couple of slit green chillies for a little heat.
5. Check the seasoning and add some salt if necessary.
6. In individual serving bowls, portion out the cooked noodles and then pour some laksa over it.

Wednesday, September 14, 2011

Chocolate Brownie (Cocoa based)


This almost turned out to be a disaster because the sugar just refused to melt and I had a sticky mass of butter and cocoa powder. What should have taken about 15 minutes to make took more than an hour as we battled to have the sugar melt into some kind of semblance of what it usually does. Something definitely wrong with that batch of sugar I bought - not from the usual supermarket, so I guess I'm not going back to the neighbourhood kirana wala for sugar anytime soon now.

Coming to the recipe, this is one of my favourite recipes for a deliciously decadent brownie - this is not a very gooey brownie though, its a little chewy but soft and the coffee (which is my addition) adds a lovely rich flavour to it. This recipe is adapted from this blog which itself is an adaptation from Alice Meidrich's Bittersweet and has a mint adaptation to it. I also like this recipe because it uses cocoa powder which I almost always have at home, as opposed to chocolate which I may or may not have at hand.

I usually put in walnuts but this time since I was a bit doubtful about the sugar which had not melted properly, I decided not to waste nuts in case this turned out to be a disaster. But I had promised chocolate chips when we started baking so my daughter insisted on it and they went in. I would go with the nuts though, the chocolate chips in a chocolate brownie is rather a lost cause but who's to argue with a 6 year old!

This batch was demolished quite swiftly - its almost addictive once you taste that lovely, dark chocolate flavour and one can go on eating it. Easy to whip up - this is a must try.

Chocolate Brownie
Butter - 1/2 cup (I used salted butter so omitted any salt in the recipe, if using unsalted, I would add about 1/2 tsp of salt)
Sugar - 1 cup (can reduce to 3/4 cup)
Cocoa powder - 3/4 cup
Instant Coffee powder - 2 tbsp
Vanilla essence - 1/2 tsp
Eggs - 2
Maida (all purpose flour) - 1/2 cup
Chocolate chips - 1/2 cup (can be substituted partly or wholly with walnuts)

1. Combine the sugar, butter and cocoa powder in a vessel and place in another pan containing water which is simmering. (The next time I would just use softened butter and combine it with powdered sugar and cocoa powder till smooth and shiny.) Mix with a wooden spoon till melted and well blended.
2. Take off heat and cool slightly till just warm. Add the vanilla essence Dissolve coffee powder in  1/4 cup of boiling water and cool. Add to the sugar butter mixture.
3. Add the eggs one at a time and beat well. Then add the flour and beat till just combined with a wooden spatula.
4. Fold in the nuts or chocolate chips and pour into a tray which has been covered with aluminum foil.
5, Bake in a pre heated oven at 180C for about 20-25 minutes. Remove when the toothpick inserted comes out not completely dry but just a bit moist inside.
6. Cool completely and cut into squares. Depending on the size of the squares you could get upto 15-20 pieces. I cut them small and got about 20 pieces.

Monday, September 5, 2011

Andhra Keema Curry


 The Taj Lands End apparently makes a mean Keema Pau (lamb mince with rustic bread) - or so I hear from hubby who stays there sometimes. He was hankering for some keema on a weekend and telling me about this dish they have on the breakfast buffet and how he really likes it. So, I put on my best snob accent and tell him there is no way a swanky hotel can hope to recreate authentic keema pau. Now an Irani restaurant - that's the place to have a good plate of keema pau!

But since the hankering was for keema, I decided to cook some Andhra mince curry from this recipe in Sailu's Kitchen. Good decision - the dish is as good as it looks. This was the first time my daughter had mince and she loved it. She ate it for the next three meals (in small quantities) - with roti, rice and bread! Since, hubby had the keema pau in mind, I adapted this recipe to make it much drier than the original version.Sailu's version is a thick gravy like dish. Mine is not only drier, its also pretty spicy I think - I added more chilli powder to enhance the colour and that seems to have done the trick.
 

Andhra Keema Curry

My adapted recipe which makes it more robust and a little more fiery:

Ingredients:1/2 kg minced goat meat (mutton keema), washed thoroughly and drained
2 onions finely chopped
2 tomatoes, finely chopped
1tbsp ginger garlic paste
curry leaves - handful
Green chillies - slit - 3-4
Kashmiri chilli powder - 1 tsp
Red chilli powder - 1/2 tsp
Garam masala powder - 1/2 tsp
2 tbsp oil and 1 tsp ghee
coriander leaves for garnish

Dry roast the spices and powder
1/2 tbsp coriander seeds
1/2 tsp cumin seeds

3 dry red chillis
Methi seeds - pinch
Saunf - 1/4 tsp

(I omitted the poppy seeds from the original recipe because I didn't want the creaminess it gives)

Method:
1 Heat oil and ghee in a pressure cooker, add the green chillies, onions and saute till the onions turn transluscent. The ginger garlic paste goes in next for about 3-4 minutes and then the mutton. Stir fry on high for 5 minutes.
2.Add the freshly ground masala powder, red chilli powders and chopped tomatoes and cook till pulpy.
3 Add the salt and about half a cup of water and put the weight on the cooker, close and cook under pressure for 3-4 whistles and then keep on low flame for 5 minutes.
4. Open the cooker when the pressure reduces, heat and add water if needed or bring to boil and simmer till excess water is  taken away and the keema consistency is reached.
5. Sprinkle coriander leaves and serve with pav or rice.

Tuesday, August 23, 2011

Gujarati Kadhi


This is such a cooling dish for the summer. And for me its also a favourite comfort food especially when paired with khichdi. I used to have bowlfuls of this at my friends' house(I went to school in Sion, Mumbai and had a lot of Gujarati Jain classmates). I liked this dish the best even on our visits to Thakkar's - a small Gujarati thali joint in Girgaum, my dad (the original foodie)used to take us to. The spices and slight sweetness go well together and it's quite addictive.

I learnt from my friend H that the tempering needs to be added to the kadhi after the gram flour yoghurt mixture has been cooked and that's what I do- seems to really keep the flavours of the spices at the surface. The ginger and green chillier though, I add while cooking the kadhi itself so that the flavor is not too raw.

Gujarati Kadhi
Yoghurt - 2 cups whipped in 4 cups water
Gram flour (besan) - 2.5 tbsp
Green chillier-2
Grated ginger- about 1" piece

Coriander leaves- chopped 2 tbsp

Tempering

Ghee - 2 tsp
Red chillies - 2
Cinnamon stick-1
Cloves-4
Cumin seeds-1 tsp
Fenugreek seeds - 1/2 tsp
Mustard seeds-1tsp
Asafoetida- a pinch

1. Whip the thinned yoghurt with the gram flour till no lumps are left behind and add the green chillies and ginger. Season with salt.
2. Bring to a simmer and then a slow boil on a low flame. Continue simmering for about 20-30 minutes till the raw smell goes and its well cooked but remains runny. Add more water and salt if needed.
3. Heat the ghee (or oil) for tempering in a small pan and add the mustard seeds and wait till they pop. Add the rest of the ingredients and saute till they change colour, add to the simmering kadhi and turn off the flame.
4. Garnish with coriander.

Arch reminds me that I forgot to mention the fact that the original recipe always has a tsp of jaggery or sugar to add a lovely hint of sweetness. I keep it really low so that it doesnt become too sweet.

Thursday, August 4, 2011

Garlic Bread Soup - and other Leftover Tales

This is a literally a recipe which came about because of Leftovers. My usually dependable recipe for paav went kaput and I was left saddled with a laadi of baked but inedible pav. Well one could technically eat them, but not actually enjoy them. Plus I had a dinner with some friends and there was French baguette left over the next day, which became quite hard and stale by the next day since it was outside uncovered while we chatted and ate.

I found a great savoury pudding recipe from Mark Bittman which I adapted to make a bake for the dinner itself. But the French bread was languishing the day after and getting harder everyday. So I looked around and found that soups were another great way of using up leftover bread! And this soup is so good, I would gladly buy fresh bread to make it! A great find by the way for someone like me who loves soup - The Joy of Soup

It looks very ordinary but the combination of garlic and onion and bread is simply awesome. I didn't add as much cheese and stuck to Cheddar instead of Parmesan - but I did use much more garlic and it was just amazing. The flavours of this soup come together very well and I must ask you try this - we had this in 38C weather, so its not like one of those hearty, warming soups which make you feel all full - its quite light.


Garlic Bread Soup
Onion - 1 chopped
Garlic - half a bulb of garlic - not a clove, but half of a whole garlic, chopped
Bread - crusty French  bread is great, but any bread you want to use up is good. - about 1 cup diced.
1 chicken stock cube dissolved in 3 cups of water. (about 600-700ml)
1 bay leaf
2-3 peppercorns

1/2 tsp paprika powder
salt, pepper and olive oil

1/4 cup cream
2-4 tbsp grated cheddar cheese
parsley/coriander to garnish

1. heat the oil in a sauce pan and add the onions, garlic, peppercorns and bay leaves to it. Saute for about 5-7 minutes till the onions turn a little brown.
2. Add salt and the chicken stock and bring to boil. Simmer for about 30 minutes on a low flame and then add the paprika powder and some more salt if needed
3, Add the bread and wait for it to dissolve into the soup. Remove and cool. Blend into a smooth consistency.
4. Add the cream and warm gently on a low flame. Add the cheese and wait till it dissolves or add it individually when serving in bowls. Garnish


Sunday, July 24, 2011

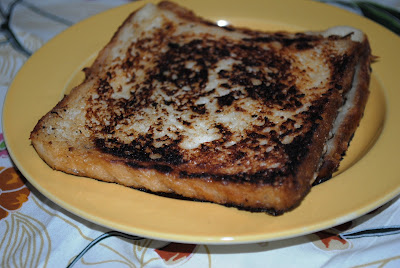
French Toast


Another dish which holds fond memories of my childhood is of Dad making us breakfast on a Sunday. Dad still makes the best French toast - gently soaking the bread in a custard mixture of egg, milk and sugar and then shallow frying it on a griddle till is golden brown.

I now make it for myself and lately for my daughter who has come to enjoy it -especially when she heard the story of how her Thatha used to make it for me. Everytime she eats it though, she stoutly insists that "Your French Toast is the best, Amma!" And so the story continues.


There's really not much to actually warrant a recipe - one egg, about 1 cup of warm milk and 5 tbsp of sugar.

1.Dissolve the sugar in the milk and then lightly beat the egg into it. Pour the egg milk mixture onto a shallow dish.

2. Heat a heavy non stick skillet and melt some butter in it (about a tsp per slice of bread).

3.Dip a bread slice into the milk and soak for about 30-40 seconds before turning and soaking again. Gently moisten the edges as well and then cook on the hot skillet on a medium flame turning till each side is golden brown.

Masala French Toast

This was my adaptation of French Toast for hubby who can't abide by sweet things for breakfast - I myself don't like sweet stuff in the morning - French Toast is the exception.

Replace the sugar with a mixture of salt and green chilli-coriander paste. (Grind 2 green chillies with a a cup of cleaned coriander). Go through steps 2 and 3 as above.

Fried Cheese Sarnies

A recipe I found in a 2002 edition of Good Housekeeping magazine and have tried a couple of times as part of brunch.Very decadent, though savoury.


Bread - 8 slices - crust removed,
Eggs - 2
Mozarella cheese - 4 slices. (mozarella melts well, but you could use cheddar)
olive oil

1. Put a slice of cheese between 2 pieces of bread and cut diagonally into a sandwich.
2. Mix the eggs with salt and put into a large shallow bowl and beat. Add the sandwiches and leave them to soak for 30 minutes, turning them once over, halfway through.
3. Heat 1 tbsp of oil in a frying pan, press the edges of the sandwich firmly together and fry till golden brown.