Sunday, August 31, 2008

Chocolate Brownies


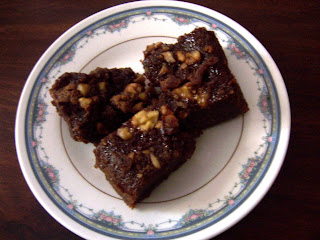
Brownies have been one of my favourite kinds of dessert for some years now and I try not to pass up a chance to have good warm brownies with cold vanilla icecream. But some of the versions I have tasted (especially in those godawful coffee cafes which abound in every nook and cranny) have been really bad. Dry, barely-there chocolate versions which you wish you never tried in the first place.

A good chocolate brownie is one which is moist and fudgy, holds together well but doesn't crumble and of course has some good dark chocolate in it.

For some reason I didn't try making brownies - didn't want to end up with one of those terrible versions I despised....until I saw this recipe at Jugalbandi. The pictures screamed gooey delectable squares of heaven. And of course, as anyone who knows Jai and Bee will tell you, if it's on their blog and looks like its delicious - it *is* delicious!

Jugalbandi was most certainly an inspiration when I wrote my first post - and I made that sweet beginning with one of their recipes - seems fitting then that almost a year later and close too 100 posts, I post yet another recipe from their amazing blog!

I made this Chocolate Brownie from J&B's recipe for Chocolate Almond Brownie and it was absolutely delicious. I added walnuts to the original recipe, used three eggs instead of four and used all butter instead of apple sauce. Verdict - chocolate brownies just the way I like them - moist, chocolately and not cloyingly sweet!

This is going to Zlamushka's event Tried and Tasted - Jugalbandi's blog is this month's pick and I am looking forward to seeing what's everyone's favourite recipe from their blog!! Recipes inspired from their blog:

Chicken & Red Pepper Crustless Pie
Rosy Tomato Risotto
Poee and Xacuti

Wednesday, August 27, 2008

Creamy Chicken Curry

With all the debates and opinions on what exactly constitutes a curry, I hesitated before calling this a curry. But then decided, I would go ahead and call a curry a curry!

I had been making South Indian curries the last few times I had made it and decided it was time to make something from the North. One of my dear friends made a delicious Punjabi chicken curry some years back when she visited us in Chennai. I have made that a few times and this time decided to tweak it a bit.

I wanted it a bit more creamier, so I added some cashew and almond paste to the original tomato onion base. As always, I marinated the chicken for about 2 hours; I find it makes the chicken much more tender and able to absorb the flavours of the curry better. Don't mistake the creaminess of the curry for blandness though; this curry is spicy and nothing like the non- descript sweetish tomato and cream curries one finds in most restaurants these days.

The best part of the curry though was the freshly ground cinnamon powder which I added at the end. Though I used whole spices in the beginning, the cinnamon powder gave a distinctive taste to the curry instead of the generic garam masala taste which most curries have. I'm going to do this more often I think, replace the garam masala powder with just one spice powder.

This dish goes to celebrate the first anniversary of Think Spice - that wonderful brainchild of dear Sunita - come join the fun at Sunita's World!


Creamy Chicken Curry


Chicken - 500gms

Marinade:
Yoghurt - 1/2 cup
Ginger Garlic paste - 1 tbsp
Red chilli powder - 1/2 tsp
Cumin powder - 1/4 tsp
Turmeric powder - 1/4 tsp
Salt - 1/4 tsp

Onions - 2-3 grated
Tomatoes - 2-3 pureed
Coriander powder - 2 tsp
Cumin powder - 1/2 tsp
Red chilli powder - 1 tsp

Cashews - 8-10
Almonds - 5-6

Whole spices:
Cinnamon - 1 " stick
Cardamom pods - 2
Cloves - 2

Cinnamon powder - 1/2 tsp
Cream - 2 tbsp
Oil - 1 tbsp
salt to taste

1. Mix the marinade ingredients and soak the chicken pieces in it for atleast an hour or two.
2. Soak cashews and almonds in warm water for fifteen minutes, skin the almonds and grind to a smooth paste.
3. Heat the oil in a heavy bottomed pan, add the whole spices and saute till they change colour.
4. Add the grated onions and saute for about 5-6 minutes till it changes colour.
5. Add the red chilli powder, coriander powder and cumin powder to the onion paste and saute for another 5 minutes.
6. Add the marinated chicken pieces and stir fry on high for 5 minutes. Lower flame, add the cashew almond paste and tomato puree along with salt and a cup of water and bring to a boil
7. Lower flame, cover tightly and simmer for about 15 minutes till the gravy comes together and the chicken is cooked.
8. Add the cinnamon powder and cream and turn off the flame.

Sunday, August 24, 2008

Coconut Lemon Cake

I'm sure most of the Indian (and other) food blogging community knows about Meeta's fabulous blog What's for Lunch Honey - an incredible space for some brilliant recipes as well as breath taking photography.

I especially love her baking recipes and frequently find myself being drawn from one post to another marvelling at the ease which she puts together combinations of flavours and tastes, colours and textures.

One such unbeatable combination was Mum's Coconut Lemon Cake - I just had to try it out the moment I saw it. It also had some lovely memories of her childhood and the special bond she shares with her mother which made it a delightful post to read.

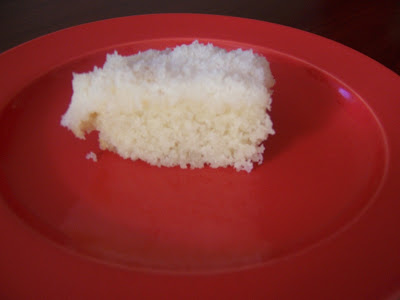
Well, I baked it in two moulds with the idea that I would take the larger one to a lunch at my friend's place and the other smaller one to keep at home. The larger one fell apart for some reason (maybe I turned it out too soon and it wasn't cool enough) and I was quite dismayed but I was in a hurry and just took it as it was - crumbs and all. I needn't have worried - the cake was so delicious that my friend asked if she could keep the rest!

The one at home was also very difficult to take out in one piece but I was more careful this time and managed better. But it got polished off really fast and I hardly had a couple of pieces left to click!

The taste of lemon along with the coconut was just pure brilliance - thanks Meeta (and Mum) for this lovely recipe! This goes to Monthly Blog Patrol (MBP) - Fruit Fare Yyes I know coconuts and lemons do not fit the usual concept of fruit - but they are fruits, so there! ;)

MBP was started by Coffee of The Spice Cafe and is being hosted this month by dear Aparna of My Diverse Kitchen

Saturday, August 16, 2008

Hot & Sour Soup

A hectic Saturday finishing up chores, bank work, grocery and veggie shopping, dealing with carpenters who don't have a clue what they are supposed to do.......all this in the morning half. Spending time with my daughter, making lunch and attending a kiddie birthday party(thankfully just upstairs and all friends around) was the second half. We were tired and also stuffed on the delicious snacks at the birthday party, so didn't really want a full meal for dinner.

Soup sounded like just the ticket for the evening and I was in the mood for something really tongue tickling, but a clear soup since I didn't want it to be too heavy. What followed was my "look at what's in the 'fridge, throw most of them into a pot and let's see what happens" kind of cooking!
The clear soup condition meant that it was going to be Oriental so that pretty much led me to where I was going. Mixed veggies, minced garlic and chopped ginger (so hubby can take them out if he wants to), stock cubes, lemon juice and fragrant Gandhraj lemon leaves - and within 15 minutes we had ourselves steaming bowls of absolutely refreshing and filling soup. Not to mention tangy and tongue tickling!
You can add shredded boneless chicken pieces if you want, or shrimps or even tofu cubes; lemon grass is a great addition too instead of the Gandhraj lemon leaves. Home made vegetable stock or chicken stock and a dash of thai chilli paste are other ideas.

This post goes to AFAM - Lemon being hosted this month by Simple Indian Food. A Fruit A Month was begun by Maheshwari of Beyond the Usual.

Hot & Sour Soup

1.5 cups mixed vegetables cut into thin long strips (carrots, mushrooms, beans, babycorn, bell peppers)
4 cloves garlic - minced
1 " piece of ginger - chopped big
2 slit green chillies
2 onions sliced (spring onions can be used)
2 soup cubes dissolved in 2 litres of warm water
salt to taste
1 tsp oil
juice of 1 small lemon
2 Gandhraj leaves
1. Heat the oil in a heavy bottomed pan, add the minced garlic and chopped ginger and saute 1 minute.
2. Add the sliced onions and sliced green chillies and saute till translucent. The chopped vegetables go in next, stir fry on high for 4 minutes.
3. Lower flame and pour in the stock, add salt and bring to boil.
4. Cook covered on a low flame for about 10 minutes, till the vegetables are all just cooked but still retain their colour.
5. Put the Gandhraj leaves in and switch off the flame. Add the lemon juice and serve hot.

Sunday, August 10, 2008

Murgh Biryani (Chicken Biryani)

My beloved blog hasn't been getting as much attention as it used to, as some of you may have noticed (and pointed out!!) I have just returned to full time work, its been three weeks now and with a full day at work and trying to spend as much time as possible with 3 year old, its been tough to spare much time for blogging.
BUT, I hope to be better organised and keep up with it - I definitely don't want to give it up. Thank you A for prodding me on and reminding me that there ARE people (even if they are only a handful :) ) who read this blog and making me want to make that effort!
This post for example, I did write it on the weekend, but just didn't end up uploading the pics....well, this morning I did. I have also decided to schedule my posts in advance so they get published regularly and I don't have to find time during the week to post.
Your comments are much appreciated, do keep them coming; they inspire me to blog!

Biryani – the name conjures up images of aromatic Basmati rice, each grain cooked to perfection yet retaining its indivudality. The saffron tinted rice hides within its bosom succulent pieces of lamb which have been marinated in a mixture of yoghurt and spices and then cooked along with the rice till the meat falls apart from the bone. Visions of huge "degchis" being cooked on "dum" (slow cooking) for feasts for special occasions come to mind.

Though these images are probably more nostalgia than reality, things haven’t really changed much where the biryani is concerned. Sure, now they can be had anywhere - from a dhaba to a five star restaurant without waiting for a wedding, but authentic recipes, freshly ground masala and the slow cooking have not been completely forgotten.
The Biryani has a rich history –it is supposed to have originated in Persia and come to India via Afhanistan, brought by the Mughals (Taimur is usually credited with this) as part of the rich heritage they brought with them when they invaded Northern India. After that, it seems to have taken on a life of its own, going South from the Avadhis to the Nizams of Hyderabad and morphing into even more different varieties. Read more about its history here

For me, a good Biryani has always been more about the flavours than the meat - I know, sacrilege! Chitrita Banerjee in her book "Eating India" - writes about the difference between the rich Avadhi Biryani and the "kucchi" Hyderabadi Biryani and prefers the former over the latter.

Well, for me its, the other way - Biryani in the North has always seemed to be less flavourful than the Hyderabadi Biryani or even the biryani made down south in Tamil Nadu. Maybe its to do with the fact that Avadhi biryanis rely more on the flavours from the meat itself(which is precooked and added). I love the Hyderabadi biryani because the meat when cooked with the rice in its rich marinade, imparts a heavenly flavour to the rice.

In Mumbai, there was nothing , according to me, to beat Lucky's biryani - a small joint in Bandra which had the most amazing biryani ever; I still remember ordering it for my 22nd birthday, my last one as a Mumbai resident. On later vists I have had biryani from Urban Tadka and it was passable, in an assembly line kind of way.

I have had more biryani since then, mostly in Chennai. Crescent in Nungambakkam was a favourite with my boss, he ate it practically every day;then there was Deluxe - a hole-in-the-wall in Pondy Bazaar, T. Nagar which served up a mean prawn biryani as well as a Deluxe special which was a favourite with out-of-towners because of the fried chicken pieces in it. Amravati's biryani was a hit-and-miss affair and depended on the day you went while Anjappar's was quite good. Ponnuswamy's biryani was overrated according to me while I have heard the biryani in Velu's Military Hotel is quite good.

Often while driving on the highway to Ooty or Kodai, we would see these signs at roadside dhabas "briyani ready" and I would wonder how these would taste if only we had the time and inclination to stop by. While waiting in the car in Mylapore one day, while my husband ran an errand, I saw this small shop which had a huge "degchi" (vessel) of biryani right outside the cash counter. As people would come and pay up, the guy manning it would take a quarter plate and just plunge it into the vessel and remove a plateful of biryani which he would shape into a heap with another plate, making sure it had the requisite three to four pieces of meat in it with one boiled egg. He served a cool 5 plates in the fifteen minutes I was parked...

The best biryanis I have had till date are:
1. Biryani catered by this lady in Kilpauk for my last birthday - it was the first time there were no leftovers.
2. Biryani at a small eating joint in Egmore (Marhaba Thirumana Biryani) which served only biryanis - nothing else.
And now coming to the biryani I made this Sunday. It was chicken biryani (I know, sacrilege again, but we prefer chicken to red meat!) ; hubby "felt like eating biryani" and I didn't feel like going out and experimenting in Delhi (haven't yet found a place which we like, have heard a lot about Andhra Bhawan though and need to check it out).

So I made it at home - the chicken was really tender and the rice loaded with the taste of spices and the marinade. It took me just about an hour to make, not counting the marination time for the chicken which was about another hour and a half; I actually marinated the chicken, went out grocery shopping and then came back and made it in time for lunch.
So, you can try this simple version when you are in the mood. You can add biryani masala which is available under different brands, if you want the restaurant taste.

Murgh Biryani

Chicken - 8 pieces

Marinade:

yoghurt - half a cup

red chilli powder - 1 tsp

coriander powder - 1 tsp

turmeric powder - 1/4 tsp

ginger garlic paste - 1 tbsp

salt 1/4 tsp

Basmati rice - 1.5 cups

few strands of saffron soaked in warm milk

Cardamom - 4

Cloves 6

Cinnamon - 1 " stick

Tej patta - 2

Onions - 2 sliced

Oil - 1 tbsp

Ghee - 1 tbsp

salt to taste

1. Mix the marinade ingredients and marinate the chicken in it for about an hour and a half atleast. Soak the basmati rice in three cups of water for about half an hour.

2. Heat the ghee in a heavy bottomed pan, add half the whole spices and fry one minute till they change colour.

3. Add the sliced onions and fry till well for about 5 minutes.

3. Add the chicken pieces along with the marinade and fry on high heat for about 5 minutes turning mid way so that both sides get seared. Lower flame, add 2 cups of water and simmer for another 10 minutes till the chicken is cooked.

4. Remove the cooked chicken pieces from the pan and strain the stock and keep aside.

5. Heat the remaining oil in the same pan, add the other half of the whole spices and when they change colour, drain basmati rice (reserving the water) and add to the pan. Fry for three minutes, then add the chicken pieces.

6. Measure the chicken stock you have reserved and add the basmati water and saffron milk to it to make 4 cups.Add it to the pan along with salt, bring to boil and then cover with a tight fitting lid (or seal with atta dough) and cook for about 10-12 minutes, till the rice is cooked but stays separate.

Switching it off a bit earlier helps since it will cook further with the lid closed.


Tuesday, August 5, 2008

Araichu Vitta Kozhambu (Gravy made with freshly ground spices)


Most of you must have figured out now that I love kozhambu (South Indian curries), the spicier and tangier the better! There is this one with okra, another one with pumpkin and yet another one with sun dried berries

A week of dals, roti, subzi or even pasta, pizza and tortillas and there will be this gnawing feeling at the back of my mind (or is tongue) and eventually I figure out I can't wait to shake up my palate with a lip smacking kozhambu. It took some time for me to get the proportions right, but when I did, making this seemed even more easier than sambar - atleast one didn't have to wait for the dal to cook.

This Sunday morning was one such day. I woke up feeling quite in the mood for something different than the usual tomato or onion chutney or sambar we have with dosai. It helps if you have a stock of tamarind extract or if you are using tamarind paste.

But even if you don't, pour some warm water over a small ball of tamarind. By the time, you cut the veggies and boil then, roast the masala and grind it, it would have soaked for about 20 minutes - long enough to extract the juice. Boil with the freshly ground masala, add the cooked vegetable half way through and in a bit you have some great tasting kozhambu ready to go with dosai, idli or rice.

This dish goes to Srivalli's Curry Mela which she is hosting on her blog Cooking 4 all Seasons.

Araichu vitta kozhambu


Half a cup chopped pumpkin (drumstick, brinjal or okra can be used; brinjal and okra need to be fried a bit before adding to the gravy and not cooked in water)
Small lime size ball of tamarind soaked in 3 cups of water

Masala:
Red chillies - 5
Coriander seeds - 1 tbsp
Fenugreek - 1/4 tsp
Chana dal - 2 tsp
1/4 cup grated coconut

Tempering:
Oil - 1/2 tbsp
Mustard seeds - 1/2 tsp
asafoetida - pinch
curry leaves - 5-6

1. Extract juice of tamarind and keep aside
2. Cook the pumpkin pieces in about 2-3 cups of water till just done.
3. Roast the spices in half a tsp of oil and then grind to a paste with the coconut.
4. Heat oil in a kadai, add the mustard seeds; when they splutter, add the asafoetida, curry leaves and saute for half a minute.
5. Add the masala paste and fry for a minute
6. Pour the tamarind extract, add salt and bring to a boil. Cover and simmer for about 15 minutes
7. Add the cooked vegetables and simmer for another 5-10 minutes till the gravy is a bit thick and the flavours have blended well.
8. Serve with idli, dosai or rice.