Thursday, May 29, 2008

Brown Rice (Rosematta) with Chicken and Pumpkin


My attempts to incorporate rosematta into our meals continue......the rice dishes have gone down well so far and the latest dish I put together had chicken and pumpkin in it.

Made for a lunch at my place for a few friends and their kids, it was a nice summer dish paired with Lobia Saag(cowpeas and spinach), fresh cucumber and tomato salad, raw mango chutney and a crustless spinach and feta cheese quiche - fusion food at its best I guess!

This what I have learnt about cooking with rosematta.

1. Soaking for about an hour or so helps the plump grains to absorb moisture, swell and cook faster.
2. One cup of rice requires about three to four cups of water/liquid to cook.
3. Using vegetable or chicken stock or even stock cubes greatly enhances the flavour if you are cooking it as a one pot dish.
4. Cooking the vegetables along with the rice makes the dish very flavourful.

Next time I am going to try making idlis using rosematta rice.

So what has your experience been with cooking rosematta rice? and do you have any special recipes or tips you would like to share?

Brown Rice (Rosematta) with Chicken and Pumpkin


Ingredients:

Brown rice - 2 cups
Vegetable stock (I used two stock cubes dissolved in 1 litre of water)
White wine - 1 cup (optional, add one more cup of water to the vegetable stock if you omit this)
Boneless chicken cut into strips - 1 cup
Pumpkin - peeled and chopped - 1 cup
Onions -1 big sliced finely
Garlic - 3 cloves chopped
Cinnamon stick - 1 " piece
Bay leaf - 1
Cloves - 2
Oil - 1 tbsp
salt to taste
Chilli powder - 1/2 tsp

Method:

1. Wash and soak rosematta rice in water for an hour.
2. Heat up the vegetable stock and keep aside; heat it up a bit later, if necessary.
3. Take a large non stick pan, heat the oil and add the cloves, cinnamon and bay leaf. Saute 1 minute then add the onions and fry till it is golden brown.
4. Add the chicken pieces and fry on high heat for two minutes till it gets seared on both sides and cooks a bit. Sprinkle chilli powder, lower heat and cook for 5 minutes.
5. Add the white wine, drain the soaked rice and add it to the pan. Saute for 3 minutes.
6. Add half the hot stock to the rice and cook for about 8 minutes, then add the pumpkin pieces, the remaining hot stock and salt to taste and cook further for 10 minutes or till the water is absorbed and the rice is tender.
7. If you think the rice needs more cooking, add hot water or vegetable stock half a cup at a time.
8. Serve hot.

Saturday, May 24, 2008

Pasta tossed with Coriander and Walnut Pesto


This post by dear Mansi of Fun and Food really set me thinking. Though I had known for sometime now that Pesto needn't contain only Basil, I had never tried making it with any other ingredient. Basil isn't very easy to get around here (except the more pungent Holy Basil variety - tulsi).

I made the Coriander Walnut Pesto recipe with a few changes to it. I didn't want it as a dip though but in some form for dinner. So, I boiled some pasta and tossed the pesto in and mixed in some halved cherry tomatoes. Served it warm with some pumpkin soup and a roasted mushroom salad for a delicious meal.

I also had some leftover pasta cold for lunch the next day and it tasted great with the pasta taking on the pesto flavours completely.

There was some leftover pesto which I added to a bread recipe I was making - and voila! Pesto Yoghurt Bread! Thanks for the recipe Mansi!

Pasta tossed with Coriander and Walnut Pesto


Ingredients:

Pesto:

Coriander leaves - 2 cups washed and chopped
Walnut, lightly toasted and skin removed - 1/3 cup
Sweet corn kernels - 1/2 cup
Green chillies - 2-3 depending on heat level
Olive oil - 4 tbsp
salt to taste
Lemon juice - 1 tbsp

Pasta:

Macaroni or Spaghetti - 1.5 cups
Cherry tomatoes washed and halved - 1 cup
salt to taste
Olive oil - 1 tbsp
Crushed Black pepper - 1 tsp
Parmesan cheese - 1/4 cup
Method:

1. Bring enough water with salt and a tsp of the olive oi in a large vesse, to a boil. Add the pasta and cook for about 8-10 minutes; the pasta should not be overcooked but remain al dente (with a bit of bite to it).
2, Drain the water and rinse under cold water for a minute to stop it cooking in its own heat. Toss with the remaining tablespoon of olive oil and keep aside.
3. Meanwhile, blend all the ingredients for the pesto together, adding the olive oil a tablespoon at a time till they come together in a thick paste.
4. Gently toss the warm pasta with the pesto, crushed black pepper and the cherry tomatoes till well combined, check seasoning and adjust salt if needed. Sprinkle the parmesan cheese on top and serve immediately.


Tuesday, May 20, 2008

Revisiting recipes – Crustless Quiche with Spinach and Feta Cheese


I have often wanted to make this recipe of mine; invariably I would either be out of eggs or feta cheese. Last week when my daughter had a day off from school, a couple of friends and I planned an "art day"for the kids at my place. (Read keeping the kids busy and out of our hair!)

My upstairs neighbour organised the brushes, the face paint and loads of one sided paper. Some simple cuts in potato and brinjal halves and they had a whale of a time dipping them in the paint and making block prints! Then there was spray painting which they did with cut outs and an old toothbrush. Of course most of the paints seemed to be on them than on the paper LOL!

Lunch was a mixed spread. Phulkas, Lobia Saag (Cowpeas beans and Spinach Gravy), Cucumber and Tomato salad, Crustless Quiche with Spinach and Feta cheese, Brown Rice with Chicken and Pumpkin and Apple Crisp.

I have made a similar quiche before using roasted peppers and cream cheese. I wanted to make it again with different ingredients; spinach was the first thing which came to mind and since I had feta cheese too, it seemed perfect.

I was searching for other ideas and I came across this recipe from Baking Bites - the talk of flour that would automatically separate from the batter and form a crust seemed too exciting, though I had used flour in my earlier recipe too and didn't remember a crust forming. I decided to try this once again and adapted the recipe.

The quiche was good and we really liked the wedges we had; the browned top making a lovely contrast to the flaky insides and the delicious feta complimenting the overall taste. But I didn't get the crust effect separately though the bottom was quite firm. Maybe next time I will stick to the recipe completely and see what happens since the flour proportion was quite different from what I used in mine.

Crustless Quiche with Spinach and Feta Cheese


Ingredients:

Wheat flour - 1/2 cup
Refined flour (maida) - 1/2 cup
Baking powder - 1/4 tsp
Baking soda - pinch
Salt - 1/4 tsp
Egg whites - 3
Milk - 1 cup
Spinach - 1 cup cleaned and chopped
Onions - 1 cup chopped
Feta cheese - 1/3 cup cut into small squares
Chilli powder - 1/4 tsp
Carom seeds (ajwain/omam) - 1/4 tsp
Crushed black pepper - 1 tsp
Olive oil - 1 tsp

Method:

1. Mix the flours, baking powder, baking soda and salt together in a bowl.
2. Pre heat the oven to 180C and grease a 10" pie pan or a shallow baking pan. Take a pan, heat the oil and put in some ajwain seeds, when they change colour (1/2 a minute), add the onions and saute for 2-3 minutes till transluscent. Then add the chopped spinach and saute till it softens and wilts (about 3 minutes). Remove and cool.
3. Whisk the egg whites and add the milk, salt, crushed black pepper and chilli powder to it.
4. Mix in the flour mixture gently and then add the spinach onion mixture.
5. Pour in the batter into the prepared pie plate and place the pieces of feta cheese on top.
6. Bake at 180C for 15-20 minutes, a toothpick inserted will come out clean and the top will be golden brown.


Friday, May 16, 2008

Mixed Vegetable Kadhi

This is a spin on the classic Kadhi Pakoda. I am not a fan of fried stuff floating in liquid - whether it is dahi wadas or vadai curry, but I do love yoghurt based dishes. So, it was a matter of time before I appropriated this dish and made it my own.

I love the flavours the vegetables bring to the plain yoghurt and the best part of it is of course the tempering ingredients. They lend an unmistakable touch to the dish and I think there must be some culinary link based on either Ayurvedic or similar principles between the yoghurt based dishes made in different parts of India.

Otherwise, how does one explain the dhania and methi seeds ground into the Mor Kozhambu of the South appearing in the tempering of the Punjabi Kadhi and Gujarati kadhi (only the methi there though), the mustard and hing in the tempering of these dishes and of course the thickening of the yoghurt with gram flour (besan) in kadhi and the chana dal(bengal gram dal) ground into mor kozhambu.

Maybe thats where the saying "Ab dudh ka dudh or paani ka paani ho jayega" originated - they were referring to yoghurt all along! :0)

But coming back to topic - there is a reason yoghurt based dishes are found in almost all regional cuisines of India. Curd or yoghurt is traditionally known to have cooling properties - a much prized quality during the heat of an Indian summer.

But besides this there is a nutritionally sound reason for including curd in our day-to-day diet. The lactose (natural sugar) found in milk when allowed to ferment into curd, changes to lactic acid - a factor which enhances the absorption of calcium by the body.

Tempering (tadka/baghar/thalimpu/poppu) is an intrinsic part of Indian cooking and imparts a distinctive flavour to any dish. Do you know its other benefits?
  • The hing (asafoetida/perungayam) used to temper dals makes it easier to digest protein heavy pulses and avoid flatulence.
  • Certain vitamins are only soluble in fat and require a medium for release - e.g vitamin A found in carrots and the carotene in curry leaves(karuvupellai/karipatta).
  • Essential fatty acids required by the body are found in the vegetable oils used for tempering as also in mustard and urad dal.
So, the next time someone at home complains about the tadka smell remind them of the good it does (the tadka, not the smell!).


Mixed Vegetable Kadhi

Kadhi went well with peas pulao and stuffed eggplant


Ingredients:

One cup chopped mixed vegetables - I use any three to four of these vegetables- carrot, beans, capsicum, yam, peas, potato

2 cups yoghurt - whisked smooth
2 cups water
One tablespoon gram flour (besan)

salt to taste
turmeric

Tempering:
Oil - 2 tsp
Coriander seeds (dhania) - 1 tsp
Fennel seeds (saunf) - 1 tsp
Fenugreek (methi) - 1/4 tsp
Mustard seeds (rai) - 1 tsp
Red chillies - 2
Asafoetida(hing) - a pinch

Method:

1. Mix the water with the curd and whisk till smooth. Take a little of the mixture and mix in the gram flour so that there are no lumps. Combine this with the rest of the diluted yoghurt along with salt and tumeric.
2. Take a large pan and add the yoghurt mixture and heat on a low flame.
3. Meanwhile take a smaller wok and heat the oil for tempering. Add the mustard seeds and when they pop, add the fennel seeds, methi seeds, dhania seeds, red chillies and hing. Saute 1 minute
4. Add the chopped vegetables to the tempering and saute for 2 minutes, then cook on a low flame for another 5 minutes till almost cooked.
5. Transfer the tempered vegetables to the simmering yoghurt mixture and continue cooking on a low flame for another 10 minutes till it thickens and the besan is completely cooked.
6. Serve with chapatis or rice.

Wednesday, May 14, 2008

A MeMe and an Award

Deeba of Passionate about Baking has been an extremely encouraging blogger and I have also had the pleasure of meeting up with her. Its just amazing the kind of dishes and desserts she conjures up - some of them are simply works of art!!

So, I was more than honoured then when she gave an Excellent Blog award! Thanks so much Deeba!!

And a zillion years back she also tagged me with a MeMe - this one was Weird - well, not exactly, it just asks me to tell weird things about myself!

  • I love making lists and crossing them out one by one.
  • I used to study by reading out aloud - even at PG level - hoarse voice was the norm at the end of my exams
  • I hate being pushed to make decisions while shopping - I am convinced that there was something else I would have liked, if I had just waited a bit longer!
  • I usually start packing for a trip atleast 4 days in advance
  • I love photos....when I ran out early one morning after some major tremors shook the house, I could only think of how we would lose all our photos if something happened....
Enough weird things to last for sometime I think - I am not passing this one to anyone in particular - but if someone would like to share stuff about themselves, consider yourself Tagged!

I am also taking a break and will be back by the end of the month. Though I will be posting I may not be able to visit with you and participate in events till I am back in June.

Saturday, May 10, 2008

Lemon Coriander Chicken with Coconut Mango Sauce


Mangoes have been trickling into the market for the past 3 weeks and they are getting sweeter and tastier. New varieties for me to taste now that I am in Delhi - I spent the first 22 years of my life eating only the luscious Hapoos - those delicious golden Alphonsos from Ratnagiri. Then I moved to Chennai and after one year * of holding out I finally gave into the Banganapallis (called Benishan in the North but different from the Safeda) and was pleasantly surprised.

After tasting some more varieties like the Rumani, Neelam and Imam Pasand and now hearing about the magic of the Langda, Dashehari and Chausa varieties, I figure there is no point debating which one is superior. They have such different textures and flavour, why bother nit picking? try them all one by one and have mangoes throughout the season!!

In fact I am going to start trying the little known ones too whenever possible - the ones which are known only locally - Himsagar from West Bengal, Cherukurasam from AP, Imam Pasand from AP and TN (also known as Himayuddin), Kesar from Gujarat, Mankurado (scary hairy!) from Goa, Raspuri from Karnataka.....so many mangoes, so little time!

Well, as you may have guessed by now, I love mangoes and after I finish eating the mangoes for the first 2 weeks of the season, I then start thinking about how I can include it some dish or the other. This dish is an outcome of that train of thought this year.

My best friend is Konkani and I used to practically live there during my graduation and PG.'
One of the dishes Sandhya Pacchhi (maternal aunt in Konkani) used to make was saasam - a creamy gravy which combined the sweet flavours of fruits like pineapple or mango with the spice of mustard and red chillis and a hint of sourness from tamarind. I used to love this dish and have been wanting to make it for a long time. I did finally, but with a twist to the recipe and used it to as a sauce to accompany some grilled chicken (I adapted this recipe from Sig's delightful blog Live to Eat).

Saasam is usually not cooked and the fruit pieces are left whole. I pureed three fourth of the mangoes with the coconut and spices, omitted the tamarind since the mangoes were slightly sour, gently heated the sauce for about a few minutes just before serving and folded in a spoonful of cream.

The combination of the grilled chicken marinated in coriander, mint and lemon juice and the spicy sweet mango saasam was just fabulous!


Marinated chicken before baking

The chicken was juicy and moist and had absorbed the flavours of the herbs and spices beautifully. The mango sauce complemented the chicken and was unlike anything I had made before.


Lime Coriander Chicken with Coconut Mango Sauce

Chicken - 3 skinless breasts (400gm) with the bone
Sliced onions - 2
oil - 1/2 tbsp

Marinade:

Juice of 2 limes
Ginger - 2" piece finely chopped
Garlic - 4 cloves minced
Black peppercorns - 5-6
Green chillies -2-3 chopped fine
Mint leaves - 1 cup
Coriander leaves - 1 cup
Cumin seeds - 1 tsp
Coriander seeds - 1 tsp
Salt to taste


Coconut Mango Sauce (Ambe Saasam)

Coconut - 1 cup chopped pieces
Mustard - 1/2 tsp
Red chillies -3-4 (tone this down to 2 if you don't like it too spicy)
Jaggery grated - 1 tsp
Mangoes - 2 peeled, seeded and diced (about 2 cups)
salt to taste
Cream - 1 tbsp


1. Wash and clean the chicken and keep aside.
2. Pound the ginger, garlic, pepper, cumin and coriander till coarsely crushed, add the mint and coriander leaves and pound again. Finally add the lime juice and salt and mix well.
3. Marinate the cleaned chicken in this mixture for about two hours in the refrigerator.
4. For the saasam, grind the coconut pieces, mustard, jaggery, red chillies and three fourth of rhe mango pieces to a smooth paste adding a little water if needed. Add salt and the rest of the mango pieces and keep aside.
5. Preheat the oven to 350C, heat oil in a pan and add the sliced onion and saute till a little browned - about 4 minutes.
6. Take a glass baking dish with a lid, put in the fried onions at the bottom and arrange the chicken breasts on top of the onions. Pour the remaining marinade over the pieces and cover with the lid.
7. Bake in the oven for 40 minutes till the chicken is cooked well.
8. Remove from the dish and pan fry each piece for a few minutes on high flame to brown them a bit.
9. Heat the mango sauce for a few minutes till it is just barely warm and gently fold in the cream. Remove from flame and transfer to a serving bowl.
10. To serve, put one piece of the chicken on a plate, a portion of steamed rice on the side and spoon the mango sauce over the chicken and the rice.

Wednesday, May 7, 2008

Vankaya Poornam - Stuffed Brinjal (Eggplant)


Stuffed vegetables are a big favourite at home and I have never thought of them as being difficult to make. So bitter gourd, capsicums, brinjals and tinda with stuffing are quite a regular on our menu - the fillings also change to make things different and they make a welcome addition to the regular sabzis and porials we have with our meals.

This Sunday lunch had a simple menu - peas pulao, mixed vegetable kadhi and stuffed brinjals. I wanted to try a different filling from the two I usually use - a well bhunaoed (roasted) tomato onion masala mixture and a Maharashtrian dry spice powder. I vaguely remembered a stuffed brinjal recipe I had written down from Femina a few years ago searched for it in my book.

If I remember correctly this is an Andhra recipe (vankaya in Telugu refers to eggplant and poornam means "filling") and was part of a delicious Andhra food feature - have no clue about the author now, so am not able to give due credit. I have adapted the quantities of the original filling ingredients since they seemed to be quite a lot.

Sesame(til) and dessicated coconut (copra) give the filling a distinctive nutty flavour and the tamarind balances it out beautifully.

Choose eggplants which are small, firm and have a glossy skin. Avoid those with spots or holes on them or those with shrivelled skin and soft spots. The stem should be green and fresh and not dried up. Fresh eggplants work best since they cook fast, have more flesh and less seeds than the mature ones.

While filling the eggplants, some people recommend keeping the stalk on, but I prefer cutting it off so that I can check inside the brinjal for any holes or black spots which mean they need to be thrown away.

A good non stick pan goes a long way in helping to cook the eggplant without much oil and without having to constantly stir it around - and this in turn helps prevent the brinjal pieces from falling apart. Other than that, this is quite a no fuss recipe and gets done while you are cooking the other items on the menu.

Vankaya Poornam - Stuffed Brinjal (Eggplant)


Ingredients:

Small size eggplants - 1/4 kg (around 5-6)
Mustard - 1 tsp
Curry leaves - 6-8
Oil - 1 tbsp

Filling:

Oil - 1 tsp
Sesame seeds (til) - 1.5 tbsp
Poppy seeds (khus khus) - 1 tsp
Coriander seeds (dhania) - 1/2 tbsp
Red chillies - 2

Dessicated coconut powder (copra) - 2 tbsp
Tamarind piece (imli) - 1 " piece
Onion - 1/2 cup chopped

Method:

1. Heat 1 tsp oil in a heavy non stick pan and add the sesame seeds(til), poppy seeds(khus khus), red chillies and coriander seeds (dhania) to it and roast over low heat for about 10 minutes till a nice aroma emerges, stirring frequently so it doesn't get burnt.

2. Add the onion, coconut and tamarind piece and roast for another 3 minutes. Remove and cool.

3. Grind the ingredients with a teaspoonful of water to a smooth paste adding salt to it. The mixture should taste a wee bit salty since the eggplant itself will not have any salt in it. It should also be as thick as possible so that it stays inside the eggplant and doesn't fall out.

4. Remove the stalk and make 2 slits in the shape of a cross mark, stopping just about halfway through. Don't carry on right till the end, else it will fall apart.

5. With your fingers, gently fill each eggplant with the prepared masala paste taking care not to separate the four portions too much.

6. In the same non stick pan, heat a tbsp of oil and temper with the mustard seeds and curry leaves (when the mustard seeds pop add the curry leaves and stir for half a minute).

7. Place the eggplant pieces one their side in the pan and let them cook uncovered on a low flame for about 5-7 minutes; then carefully flip them over to cook on the other side. Similarly keep rotating them till all the sides are cooked including the top and the bottom. The skin will change colour and shrivel a bit.

8. If all the sides except the top or bottom are well cooked and some spilled masala is starting to stick to the bottom, stand the eggplants on their top or bottom, sprinkle a few drops of water on the bottom of the pan and cover and cook for about 5 minutes.


Sunday, May 4, 2008

Pumpkin Walnut Bread - Eggless


Pumpkin is not a well liked vegetable by certain members of this house because of its sweet taste which "spoils" the taste of the dish. *ahem*.
I
, on the other hand, love its orange flesh, the way it takes on the flavours of the dish it is cooked in - spicy if put into a puli kuzhambu or sambar, mustardy with potatoes in a typical Bengali dish, plumping up the volume of a soup, melding beautifully into this risotto and sweet when put into a pie.

The ones we get here are usually those huge green and white streaked ones.....simply called "kaddu" - no differentiation into varieties (I wouldn't know a kabochon if it stared me in the face!). Just ask the sabziwallah to cut a 500gm piece and you're good for a week.

Well, this time our friendly neighbourhood Mother Dairy outlet had the smaller variety. Peach coloured skin and a nice plump shape. I picked it up immediately; I would figure out what to do with it later. A couple of days later, I remembered a pumpkin loaf recipe I had seen on Elise's Simply Recipes - the recipe was adapted from Fannie Farmer and seemed fuss-free.

I laid out the pumpkin to roast in the oven while I went out and finished some chores. When I came back, the pumpkin flesh was cooked and ready. l I started removing the rest of the ingredients for the bread - and then discovered that there were no eggs at home! I hate when this happens (as if I have anyone else to blame but myself) and then my latent substitution avatar just takes over.
The prospect of going out even for the 3 minute walk to the store to buy eggs was just too much to contemplate in the heat of the afternoon. Technically, I could have waited till evening, but nope- I HAD to finish baking the bread then and there!

I remembered baking a Walnut & Ginger Bite ring sometime back which didn't have eggs, so I knew it was possible. I went to work modifying the original recipe. Eggs basically bind the ingredients or help in rising, so I put in one teaspoon of baking powder for the leavening and though the pumpkin may have been enough for the moisture, I added half a ripe banana as well.

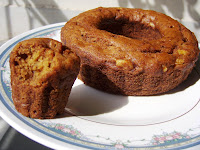
The bread was a beautiful brown colour when it came out of the oven and the house was redolent with the aroma of cinnamon and nutmeg. It had a brown crust and a nice moist texture to it. Not too sweet so I didn't mind having it with breakfast and it makes a great tea time treat too. If you want to have it for dessert, its delicious with a scoop of vanilla ice cream. It tasted even better the next day, something I have often found with baked stuff.

I do have a theory about cinnamon though - I think it heightens the taste of salt in a dish - its happened in a restaurant once and with a carrot cake I baked a couple of years back. This time too, though not very salty, you could taste a bit of salt in the bread and I think it was because of the cinnamon in it.


Susan of Food Blogga is hosting Beautiful Bones - an Osteoporosis Food Event "to alert women to the potential risks of osteoporosis and encourage them to take steps to protect their bones at every age". This event is on the whole month of May which is National Osteporosis Awareness Month.Along with anaemia, Indian women are particularly susceptible to osteoporosis; genetics have much to do with it (Asians and Caucasian women are at greater risk) but also the fact that a high percentage of Indian women suffer a great deal from malnutrition - either due to a poor diet while growing up (many times due to a gender bias) or their own negligence of their health while taking care of the others in the family. It is estimated that 50% of healthy Indian women over 50 years of age have low bone mass.

I got concerned with this gap when I saw a direct correlation between the reduced intake of calcium in my MILs diet and her increasing joint problems and reduced bone mass. She put it down to age, but I connected to the fact that she was consistently reducing her milk, yoghurt and other calcium intake after my FIL died (culturally ingrained reactions to societal pressure are a whole another post!)

A diet rich in calcium and Vitamin D (adequate vitamin D is required for proper absorption of calcium) during childhood and adolescence goes a long way in preventing osteoporosis later.
But that doesn't mean that calcium is not as important after your teens. Women in the age group 25-50 years required 1000mg of calcium per day while women over 65 years of age require 1500 mg per day.

Don't feel like glugging a glass of milk everyday? Milk is not the only source of calcium; in fact it is difficult to digest and may not give you all the calcium you need. Think of other calcium rich sources:

1. Leafy greens like spinach (paalak), lettuce, spring onion greens and other local greens (keerai) like methi (fenugreek), suva (dill), sarson (mustard greens), khatta paalak, haak, molai keerai/arai keerai/siru keerai(all amaranth varieties), murunga keerai(drumstick leaves),agathi keerai,poonaganni keerai,pulichai keerai,manathakali keerai.

2. Vegetables like cabbage, broccoli, green beans, bhindi (okra), pumpkin/squash, radish (mooli) , cauliflower, carrots, eggplant (brinjal), brussel sprouts, asparagus and celery

3. Herbs and spices like coriander, basil, thyme, rosemary, fennel, oregano, garlic, cloves and cinnamon.

4. Nuts,seeds and beans like sesame seeds (til), mustard seeds (rai), walnut (akhrot), almond (badaam), cashewnut (kaju), kidney beans (rajma, lobia), chickpeas (kabuli chana, kadala), water chestnuts (singhada), lotus seeds (makhana), melon seeds.

5. Fruits like tomatoes, oranges, guava, banana, chikoo (sapodilla), coconut, figs (anjeer) and custard apple

6. Milk products like yoghurt, cheese and paneer and Soy products like tofu, soya beans, soy milk

Apart from calcium intake, it is important that it gets absorbed by our body:

  • Vitamin D aids in absorption of calcium; sources rich in Vitamin D are
  • High consumption of sodium (salt) and caffeine (whether in coffee or colas) results in increased excretion of calcium.
  • Calcium through one's diet is better absorbed than through supplements.
  • While there are factors which may prevent complete absorption of calcium from sources like spinach, beets, celery and peanuts (oxalic acid) and whole grains, nuts and beans (phytic acid) - the decrease in the available quantity of calcium for absorption is relatively low.
  • Calcium interference with iron absorption or vice versa is not considered significant enough to affect normal intake when the intake of both is in typical moderate amounts.
Read more here on calcium, its importance, dietary sources and absorption.

While pumpkin is a moderate source of calcium (24mg per 1 cup) and cannot compare to greens and other vegetables in terms of calcium content, walnuts have about 100mg of calcium in every 100gm. What better excuse to indulge in this nutty bread!


Pumpkin Walnut Bread - Eggless


Ingredients:

Skinned and cooked pumpkin - 1 1/4 cup
(I followed the recipe instructions, cut the pumpkin into 4 parts and kept them cut side down on foil, cooked them in a pre heated oven at 200 C for 45 minutes. When it was completely cooled, I scooped the cooked flesh out of the skin, measured out what I wanted and froze the rest of it; You can also skin and chop the pumpkin and steam cook the flesh)

Flour - 2 cups (I used wheat flour 1 cup and refined flour (maida) 1 cup)
Vegetable oil - 3/4 cup (the original recipe uses olive oil)
Brown sugar - 1 cup (more if you want the bread to be sweeter)
Baking soda - 1/2 tsp
Baking powder - 1 tsp
Salt - 1/2 tsp (I would reduce it to 1/4 tsp next time)
Cinnamon powder - 1/2 tsp
Grated nutmeg - 1 /2 tsp
Water - 1/2 cup
Ripe banana - 1/2 mashed
Chopped walnuts - 1/2 cup (lightly toast the walnuts for 3-4 minutes to remove the skin, cool and chop.)

Method:

1. Pre heat the oven to 180C (350F), grease a loaf tin or a ring mould and keep aside.
2. Sift the flour, salt, baking soda,baking powder, cinnamon powder and grated nutmeg together.
3. In a big bowl, mix the cooked pumpkin with the oil, mashed banana, water and sugar till well combined.
4. To this add the mixed dry ingredients a little at a time mixing just as much as needed. If you find the batter too thick, add milk a teaspoon at a time till you get the required consistency - not pouring consistency but spoon dropping type.
5. Mix in the chopped walnuts gently and spoon into the prepared loaf tin or ring mould.
6. Bake for about 45-50 minutes or till a toothpick inserted in the middle comes clean. Mine took about 60 minutes but was quite moist inside and did not dry out.


Other calcium rich recipes:

Sindhi Sai Bhaji

Broccoli Soup