Monday, December 28, 2009

Keerai Masiyal (Spinach with split mung bean lentils)


The amount of food we eat during the winter seems to be inversely proportional to the temperature; as the mercury drops, so our intake increases! Add to that all the celebrations and parties in the festive season and before you know it, the pounds have piled on by February. All this is quite new to me - never having lived in a city which could claim to have a distinct winter season, we managed to maintain our average calorie levels right through the year. It doesn't seem to help that the increasing weight is nicely hidden out of sight under the many layers that we pull on :)

So, I am trying to increase the quantity of soups that we usually consume; but its tough though when all your body craves is carbs. Salads especially, which are quite welcome during the summer months, just don't seem to do anything for us in winter. Enter the protein quotient - lentil soups, legume soups, chicken salads - now these seem to do the trick of filling us up and at the same time reducing our carb and cheese intake, not to mention being very delicious and giving me a lot of choice to play around with.

In this category then falls one of my favourite comfort foods - keerai masiyal in Tamil. Its a very simple dish which involves cooking spinach till just tender, mashing it up (not pureeing!) gently and finishing with a light tempering of garlic and red chillies.

Adding lentils to it is optional - I do or don't depending on my mood of the moment. On a chilly afternoon, the addition of split mung bean lentils (yellow moong dal) brings a creamy consistency to the dish and fills one up pretty nicely. Pair that with a spicy kozhambu and a porial (foogath) and you are set for a rather satisfying meal. or simply serve with warm phulkas and that is a complete meal too.

Keerai Masiyal (Spinach with mung bean lentils)


Spinach - 1 small bunch, washed in several changes of water and chopped roughly
Mung bean lentils (yellow moong dal/paasi paruppu) - 1/3 cup
Turmeric powder - 1/4 tsp
half a tomato chopped
1 green chilli slit
salt to taste


Tempering:
Oil - 1 tsp
1 dried red chilli
urad dal seeds - 1 tsp
Asafoetida (hing/perungayam) - (pinch)
4-5 garlic cloves sliced thin


1. Wash lentils in water, drain and mix with the cleaned and chopped spinach, turmeric, slit green chilli and salt.
2. Cook in a pressure cooker in just enough water (2 cups) for 8 minutes (2 whistles), wait for the pressure to drop. Or this can be cooked on the stove top by increasing the water for cooking (use a heavy bottome vessel)
3. Drain and reserve any excess water on the top and with a back of a ladle (or a wooden masher - mathu), mash together the lentils and spinach gently till well combined. Remove the green chillies if you like and adjust seasoning.
4. Heat oil for tempering, add the red chillies, garlic and urad dal and when they start to brown add the asafoetida and immediately turn off the flame, taking care not to burn the garlic.
5. Add to the spinach lentil mixture and serve warm with rice or rotis.

Sunday, December 20, 2009

Chocolate Gingerbread Men


"'Tis the season to be jolly' - indeed! This year the cold has been slow in coming - or maybe its just that I have got more accustomed to it over the last two years. By this time last year, we had the room heaters on; this year I haven't even broken out the thermals! Anyhow, I have been enjoying the weather and of course my cooking is reflecting the festive spirit.

The fruits for my Christmas Cake are all marinated, there have been some great soups (sorry no pictures and so no posts!), a first attempt at Butter Chicken (turned out great - but how Da-lhi is that!), fiery kozhambus, soothing masiyals (mashed spinach with lentils finished with a simple tempering) and comforting French toast. There have been visits from dear friends and simple meals shared (not to mention a disaster of a simple casserole!), a delicious meal at Karims, the perfect wedding anniversary celebration and a beautiful evening at the Garden of Five Senses.

This weekend, after visiting the Christmas Carnival at my daughter's old playschool (was it just a year back we were going through the nerve wracking admission process for her?!) I finally got down to baking cookies with her - she has been asking for the Gingerbread Man for the whole of last month, since we have been reading the story. I didn't have molasses, which is what all the recipes seemed to call for. So I decided to replace it with dark chocolate to get the right colour and a different flavour.
They were perfect - the spices beautifully complimenting the chocolate and I even managed icing - I guess my daughter seems to know how difficult I find it, because she kept egging me on "Its great, Amma - you are doing good!" LOL :) Its not the actual work involved, but putting all the sugar in which makes me think twice! Well worth the effort though - the shining eyes and cheery smile as she devoured a gingerbread woman, was priceless!

I did other shapes which my daughter could cut out with the cookie cutters - the gingerbread people I did with stencils since I didn't have the cookie cutter shapes for them. I also made some plain gingersnap cookies (without the chocolate and with more ginger in them) for the adults in the house. The lack of molasses/ chocolate shows in the pale colour, but the taste was great and they were thin and crispy - just the way I like my cookies!

Chocolate Gingerbread Men
Refined flour (maida) - 150gms
Whole wheat flour (atta) - 100 gms
1/2 tbsp dry ginger powder (soonth)
1/2 tbsp cinnamon powder
1/2 tsp powdered star anise
pinch of salt
1/2 tsp baking soda

Unsalted butter - 100gm
Brown sugar - 40gm
1 egg
1/2 cup melted dark chocolate

Tiny black raisins for decorating

Royal Icing: (Some tips here)

White of 1 1/2 small eggs
1/2 tsp lemon juice
2 cups icing sugar

1. Cream the butter (softened on its own if possible) in a bowl till smooth, add the brown sugar and mix again till shiny. Then the egg goes in and mixed for about 3 minutes till light and finally add the melted chocolate (Melt at 10 second intervals in a microwave or in a bowl over barely simmering water on the stove top)
2. Meanwhile, measure out the flour, baking soda, salt and spices and mix together.
3. Add one third of the flour mixture to the creamed butter/egg mixture and mix till just combined, add the other two thirds the same way, taking care not to over mix.
4. Use your hands at the end if needed, divide into two portions, cover with clingfilm and chill in the refrigerator for atleast one hour.
5. Pre heat the oven to 180C. Remove one portion and try to roll out on a floured surface - a rectangle 1/8th of an inch is sufficient. If it is too dry, add some milk a tsp at a time till you can roll out without sticking. If handled too much the dough may need to be chilled again since the chocolate might make it sticky.
6. While rolling out, make sure you keep trying to lift the rolled out dough off the work surface to check whether it is sticking, else you wont be able to peel of the cut out shapes.
7. Cut out the shapes with cookie cutters or stencils (search for Gingerbread men shapes on the internet, print, cut out and place on the cookie dough and cut with a sharp knife), put in small raisins for the eyes and buttons, transfer to butter paper (parchment paper) and bake for 15 minutes - check at 12 minutes and remove if it is done.
8. Cool on a rack - meanwhile, whip the egg white and lemon juice together while adding the icing sugar gradually till the mixture forms peaks when you lift the blender out of the bowl. A little less than 2 cups of sugar usually suffices. Transfer to an icing cone and decorate the cookies when cooled. Leave aside to dry completely.

The Gingersnap cookies

Thursday, December 10, 2009

Maw Gaeng - Thai Sweet Potato Pudding


I had some sweet potato as well as coconut milk left over from this recipe and just as I knew I wanted to make a nice one pot meal from those ingredients, I also knew that this had to go into a dessert. Luckily, there seems to be a recipe to match every mood of mine ;).

This Thai dessert (which seems to have several variations) is quite unusual in that it uses sweet potato (the dark pink, skinned root vegetable). The coconut milk and egg pudding combination is something I have seen in Sri Lankan cuisine too.

Very simple to make and equally easy to finish off! I imagine that it would be quite easy to make a vegan version with a substitute which can be used to replace the eggs.

Maw Gaeng - Thai Sweet Potato Pudding


2 eggs beaten lightly
Coconut milk extract - freshly squeezed from one half of a coconut (or use a cup of canned coconut milk)
1 cup sugar
2 sweet potatoes, boiled, peeled and mashed.
cardamom powder - 1/2 tsp

1. Mix the beaten eggs, coconut milk and sugar in a heavy bottomed pan.
2. Add the mashed sweet potatoes and mix well, heat on low flame and keep stirring till the custard thickens - about 6-7 minutes.
3. Pre heat an oven to 180C and lightly grease a baking dish. Pour the custard into and bake for 45 minutes till golden brown on the sides and the top. A skewer inserted will not come out totally clean but not be sticky.
4. Serve warm with vanilla ice cream

Sunday, November 29, 2009

The Whole Enchilada


Tex-Mex is quite the favourite with most people and the same is true for us. We first sampled the fare at Chennai's Don Pepe restaurant and it was finger lickin' good! The quality was consistent and the taste was just fabulous.

Its been a couple of years now since we moved to Delhi but the only two places that I have had Tex Mex is at Sanchos in South Extension- average at best - and Rodeo in Gurgaon - terrible! . Amigos touts itself as a fine dining (read expensive) Mexican restaurant but I haven't eaten there yet (frankly the concept of Mexican fine dining doesn't really make much sense to me); we did go one night for a promotional event but it was so crowded and noisy that we fled and took refuge at the Steakhouse Grill next door.

One afternoon last month, we hopped across to a mall in Noida to check out an electronics store and since it was almost lunch time decided to have a quick lunch at TGIF. Now, its been a long time since I have eaten at TGIF and the last thing I remember is that the food was usually good whenever we had eaten there. We decided to order from their Tex Mex menu and chose the Chimichangas and Tacos (both dishes were to be served with black beans on the side). When the food came we were taken aback.

The tacos were cold and stuffed with some rubbery batter fried chicken; the chimichangas were cold too and had a smear of congealed cheese on top. But what really annoyed me was that the "black beans" which was served to us was nothing but black lentils!!! When I protested to the serving staff, the person in charge insisted that they were black beans and even brought the uncooked version for us to check - that really sealed the deal because they were so obviously black lentils! I was really annoyed by then and sent the dish back and we left really soon.

I did get a call from the manager the next day (in response to an email from me) offering us a meal on the house at our convenience and I thanked him for atleast responding. But I was disappointed that a well known chain of restaurants would attempt to pass off something as generic as lentils as black beans! I mean do people think that the customer of today doesn't know much about international food? Or that she won't bother about what she is being served. And we are not talking about a cheap joint here, but one where a meal for two won't cost anything less than Rs. 1,500.

Which is how I came about cooking enchiladas at home. Helped by the fact that I found a pack of burritos and enchilada sauce in the local "gourmet" store. I have made sauce for enchiladas from scratch before and it really isn't difficult but this time I went with some outside help because I was pressed for time. (you can increase the quantity of chopped tomatoes and add a cup of salsa)

I did two fillings one with chicken and the other with vegetables and tofu. I added kidney beans (rajma) to the sauce and this turned out as one satisfying dinner. DH in fact asked whether he could have a third portion - sheer greed considering each one was so filling!!


Enchiladas


Boneless Chicken - 200gm, marinated with lemon juice and salt) OR
Tofu - 200gm, cut into cubes and marinated with lemon juice & salt

Mexican seasoning - 1/2 tsp
1 tsp oil
Bell pepper - 1, sliced thinly

Onion - 1 chopped
Garlic - 2 cloves minced
3 tomatoes - peeled and chopped
red chilli powder - 1/2 tsp
cumin powder - 1/2 tsp
green chillies - 1-2 chopped
1 tin enchilada sauce

Kidney beans - 1 cup, soaked overnight and cooked till soft (reserve water)
Ice berg lettuce, washed
1 tbsp oil

1 cup grated mozarella cheese (jack cheese is best if you have it available)

1. Heat oil in a pan and saute the onion, green chillies and garlic till the onion is translucent.
2. Add the chopped tomatoes and saute till pulpy, add the red chilli powder, cumin powder, salt and saute for 3 minutes
3. Add 1/2 the tin of enchilada sauce and cooked kidney beans (rajma); pour in about 1/2 cup to 1 cup of the the reserved water and bring to boil.
4. Reduce flame, cover and cook for about 10-12 minutes till the sauce reduces to as thick consistency. Cool
5. Meanwhile, cook the marinated chicken and shred it (I usually pressure cook it for 5 minutes).
6. Heat 1 tsp oil in another pan and saute the shredded chicken or cubed tofu along with the sliced bell peppers for about 5 minutes on high; add the mexican seasoning to this and some salt if needed. Remove and cool.
7. Pre heat the oven to 180 C, grease the bottom of an oven proof dish with oil and pour about 1/2 of the remaining enchilada sauce on the bottom.
8. Microwave the tortillas for about 20 seconds on each side till they are just soft.
9. Spoon the kidney bean enchilada sauce on the centre of each tortilla, top with the shredded chicken or tofu and roll. Secure with a toothpick and place seam side down on the prepared dish.
10. Once all the tortillas are prepared (filling should be enough for 6-7) pour the remaining enchilada sauce over the tortillas. Sprinkle the grated cheese all over.
11. Bake for 15-20 minutes till the cheese melts and the top browns slightly.
12. Serve immediately with lettuce on the side.


Thursday, November 19, 2009

Tomato and Sweet Corn Clafoutis

I am always looking for one pot dishes, preferably one which can be baked and thus "cook itself". In this direction, I have tried crustless quiches, frittatas . These are perfect for a late Sunday brunch or even a small evening meal at the end of a long day. While looking for some more such recipes which fitted my baked, one pot criteria, I came across Clafoutis.

Clafoutis or clafouti is a dessert - custard with fruit in its simplest form - which originated in France. The fruit of choice is usually cherries but when not in season is replaced with other fruits like peaches, pears, bluberries and the like. It is a simple way to consume summer fruits with some heavy cream, eggs and sugar and a very non fussy dessert which doesn't smother the fresh taste of the fruits.

Since I don't have such a strong sweet tooth, my thoughts wandered to making this a savoury dish - a quick look around and I found that I wasn't the first one with such an idea! In fact, I even stumbled across a rant about the tribe who convert a perfect great dessert into something of an abomination by adding vegetables and extra flour. Well, in my opinion, some of the best recipes have been created because of such experimentation - I'm not going to stop anytime soon, even if I don't produce any path breaking recipes in the process ;).

I made my recipe with the ingredients I had at home - tomatoes, bell peppers and sweet corn - you can used cherry tomatoes and even bacon.

Eggs - 3
Flour - 3-4 tbsp
Cream - 1/2 cup
Milk - 1//2 cup
Feta Cheese - 100 gm crumbled

2 large tomatoes thickly sliced
1 bell pepper - thinly sliced
sweet corn kernels - 1/2 cup

garlic cloves - 2-3
fresh basil leaves - 2 tbsp chopped
salt to taste
crushed pepper - 1 tsp
red chilli flakes - 1/2 tsp
oil - 1 tbsp

1. Preheat the oven to 180C. Heat oil in a pan and add the garlic cloves. After a minute, add the bell peppers and swiftly saute for about 3-4 minutes. Remove.
2. Grease a baking dish and keep aside. Whisk the eggs in a bowl, add the cream, milk, flour, salt chilli flakes and pepper and whisk some more.
3. Pour the custard batter into the greased baking dish and distribute the vegetables (including the sauteed garlic and bell peppers) over the batter till they just sink in. Scatter the chopped basil on top and sprinkle the crumbled feta cheese.
4. Bake for about 40-45 minutes till the custard is just set is just starting to turn golden on top.

Sunday, November 15, 2009

Sweet Potato & Spinach Rice

The start of winter in Delhi and along with the weather, the produce at the local market is also changing. No more sad wilted Spinach; Methi (fenugreek leaves) along with other greens are making their appearance and soon it will be time for sarson ka saag (mustard leaves preparation) and bathua raita.

Root vegetables are also plentiful during this season and along with the turnips and yams, what I like best is the lovely deep pink sweet potato. I can have this just plain - boiled and mashed. Stuffed parathas are a favourite with my daughter. But one evening last week I wanted to have it some other way. So right after work I put the potatoes to boil and set about preparing a dish solely based on the flavours I wanted to have for dinner that night.

I knew my palate was craving coconut milk to be paired with the sweet potato but I didn't want a curry. It was also getting late for my daughter's dinner so whatever it was had to be a one pot meal since there wasn't too much time. So thats how this wonderful tasting rice cooked in coconut milk came about.

I soaked the rice and set to work; spring onions seemed right for this but if you don't have any at hand, plain old onions will work fine. I tossed in some chopped spinach as an afterthought to give it some crunch and balance out the sweet potatoes. Garlic, ginger and a slit green chilli were all the spices it needed and a single tomato put in a slight tang; by the time all this had been fried, the rice was soaked and ready to be put in with a small cup of coconut milk. I used a stock cube dissolved in the water in which the rice had soaked for the remaining 2 cups. 15 minutes later and garnished with spring onions, the dish was done. M daughter declared that she loved the rice and could I send this for her tiffin the next day too? I gladly did :)

This dish is a beautiful meld of flavours - the coconut milk, the sweet potato, the spinach - all add their own unique stamp to it. Definitely something I will make again. You can add some more green chillies to up the heat quotient but I would avoid adding cloves, cinnamon etc which might overpower the dish as it is. The photograph didn't do any justice to this dish so I'm not posting it!

Sweet Potato and Spinach Rice

Rice - 1 cup soaked in 3 cups water for 10 minutes ( I used short grained Sona masuri, basmati is fine too)
2 medium sweet potatoes
Spinach washed and chopped - 2 cups
Coconut milk - 1 cup (fresh thick extract or canned)
Tomato - 1 chopped fine
Ginger - 1 " chopped fine
Garlic - 3-4 cloves chopped fine
Green chillies - 1-2 slit
Spring onions - 3-4 sliced, greens chopped and reserved
salt to taste
oil - 1 tbsp

1. Pressure cook the sweet potatoes for about 8-10 minutes, peel and cut into cubes.
2. Heat oil in a pan and saute the spring onions for 4 minutes. Add the slit green chillies, chopped ginger and garlic and saute 2-3 minutes
3. Add the spinach and fry briefly on high till wilted. The chopped tomatoes go in next - fry for 2 minutes.
4. Add the sweet potatoes, fry couple of minutes. Meanwhile, drain the rice, heat 2 cups of the water in which it was soaked and dissolve the stock cube in it.
5. Add the drained rice to the pan and fry for 2 minutes, then lower flame, add the coconut milk, the stock (should make up three cups of liquid) and salt. Bring to boil, lower flame and cover and cook for 10-12 minutes or till the rice is just cooked.
6. Garnish with the spring onion greens and keep covered for another 4 minutes. Serve warm.

Saturday, November 7, 2009

Baked Chicken with lemon and garlic chives, new potatoes and mint flavoured rice


Do you have those days when you are in a whirl from the beginning to the end? oh sure, you say - most days at my house are like that!
Aah...but do you feel like you enjoyed every minute of it at the end of the day when you are absolutely exhausted? Now, those days are few and far between - the days when the exhaustion is self sought.....that feeling which makes all the tiredness completely worth it.

Yesterday was such a day - the previous evening, my daughter's best friend A, decided she wanted to have a sleepover at our place. It was the end of a long week at work and I had decided to stop to finish my grocery-veggie shopping on the way back home, so it was a bit later than usual when I reached home. But the sight of two 4 year old girls all excited about their sleepover, giggling over dinner, eyes shining at an unexpected sweet treat and chortling away at silly things (like the sound one makes while gargling) was enough to chase those dregs of life away. By the time they had changed into their night clothes, patted Teddy and Pinky and were tucked into bed, they were truly tired and fell asleep in no time.

A's Mom and I decided that since they would anyway be up early (all of us remember how hard it was to sleep on a sleepover!), we might as well make best use of the cool weather and take them on a picnic to Lodhi Gardens - something we do a lot when the weather is nice. So, the day started at 6 30 and soon we were on our way in two cars - it was a foggy day and the grass was wet with dew - but nothing a hot cup of tea and rava idlis and cheese sandwiches couldn't solve. A's baby brother looked placidly from his stroller while the two girls went ga-ga over all the different dogs which get walked here. Perfect beginning to the day!

Reached home at 10am and a quick change of clothes and I was out the door immediately to join a friend at the Dastkar mela - an annual Nature Bazaar I love visiting. We spend a lovely 4 hours browsing through all the stuff they had - from fresh red chilli flakes from Garhwal to grass chatais from Bengal. Grass magazine and cosmetic racks, Andretta pottery, Kumaoni jams and pickles, dried garlic chives, Zatar spice from Altitude, handmade soaps of vetiver and honey milk, a natural dye skirt in indigo with a lovely red and gold border, coconut wood fruit forks, Elephant poo notebooks and board games - these were some of my delightful finds. Hubby joined us at fag end after he had himself finished shopping for a couple of straight backed "chairs" (what do you call chairs which have no arms and just a curved spine for a back?) in the Cottage Industries next door and we stopped for a quick lunch at Saravana Bhavan. Personally I can't stand Saravanas and I had done lunch at the Bazaar itself - home cooked rajma chawal and wadis in paalak gravy with rice from Himachal at one of the food stalls - heaven!

Just an hour to rest then I raced off to my jazz dancing class 2 doors away - 2 hours of sheer energy! we have delightful young teachers who manage to push us through our stretches and exercises and even keep the energy flowing for the remaining half hour of dancing - it was fabulous though unknown parts of my body creaked and groaned at being pushed beyond their comfort zone!!

I came home surrounded with that warm glow of tiredness - to find my brother was in town and my husband had invited him for dinner. Quick marination of some boneless chicken (yaay for yesterday's shopping!), a hot shower and I settled down for some catching up over drinks while I fed my daughter her dinner. Dinner cooked itself while we chatted and I checked on the rice once in the 10 minutes it took to cook and everything was ready in just under two hours.

The grilled chicken I made for dinner was totally spur of the moment - the garlic chives were on top of my list since I had just bought them, so I added them to the marinade of lime juice, crushed pepper, olive oil and red chilli flakes. I cut some new potatoes into wedges and par boiled them; put them in along with the marinated chicken and chicken stock and baked them for half an hour. The rice was just mildly flavoured with mint and spices and cooked on the stove top with bell peppers. The perfect end to a lovely day.

Baked Chicken with lemon and chives, new potatoes and mint flavoured rice

Boneless Breast pieces of chicken - 2-3 (about 350 gm will serve 3 large portions)
4 potatoes, sliced into wedges (skin on)
Olive oil - 1 tbsp
1 chicken stock cube dissolved in 200ml of warm water and combined with 1 tbsp lightly roasted flour
( I used Better than Bouillon onion gravy mixture dissolved in warm water and simmered till thick)
Marinade
juice of 1 lemon
1 tsp dried garlic chives
1 tsp red chilli flakes
1/2 tsp freshly crushed black pepper
1 tbsp olive oil
Coriander leaves - 2-3 tbsp
salt to taste

Rice
1.5 cups basmati rice soaked in 4 cups water
1 bell pepper sliced
1 bay leaf
1 cinnamon stick
1 onion sliced
2 tsp oil
fresh mint leaves - 1 cup
(or dried mint - 2 tsp)

1. Clean the breast pieces of chicken, make small slashes all over with a fork and mix in marinade ingredients. Set aside for atleast one hour.
2. Par boil the potato wedges in cold salted water for 5-7 minutes - they shouldn't be fully cooked. Drain, reserve the water and keep aside.
3. Dissolve the stock cube in 200-300ml of drained water from potatoes.
4. Pre heat the oven to 200C. Toss the potatoes in 1 tsp of olive oil, 2-3 tbsp of the stock and a few teaspoons of the marinade(add a pinch of salt if needed). Arrange in a baking dish
5. Place the marinated breast pieces of chicken on top of the potatoes. (You could briefly brown the chicken breasts on high heat in a pan with 1 tsp of oil - 3-4 minutes each side and then put into the baking dish - I forgot to do it this time)
6. Mix the marinade with the stock and the remaining olive oil and pour over the chicken and potatoes.
7. Bake the dish covered (with aluminum foil) for 30 minutes, you can remove the foil for the last 5 minutes.
8. Meanwhile, Heat oil in a pan and add the bay leaf and cinnamon, fry the sliced onions for about 6-7 minutes till translucent.
9. Add the sliced bell peppers and fry some more (3-4 minutes). Add the soaked rice (reserving the water) and fry for 3 minutes. Then add the reserved water, salt to taste and bring to a boil. Cover and simmer for 10-15 minutes till just done.
10. Serve the baked chicken with the potatoes and rice on the side, spooning some gravy on the top.

Note: If you don't mind having grilled chicken without a sauce, you can avoid the stock altogether, the marinade is enough to keep it moist.

Sunday, November 1, 2009

Gnocchi in Pumpkin & Basil Sauce

Gnocchi is a kind of dumpling and has many variations. Derived from the Italian word for "lumps" (pronounced nee-okkee), it can be made from just plain flour or have variations with spinach, pumpkin and even bread crumbs. The most common form (and popular) form of gnocchi is the one made with potatoes - gnocchi de patate. These small pillow shaped dumplings are usually made fresh, boiled and served warm with a sauce.

Making these seem to be an art form from all accounts, but the results are absolutely exquisite and well worth the effort. This is one of the recipes I have bookmarked as well as another from a friend in Oz who has been egging me on for a long time. The trick lies in combining just enough flour as is needed to bind the ingredients (spinach or potato or ricotta cheese) so that the flavour comes through and at the same time having enough flour in it to make sure they don't disintegrate while being cooked.

I have long wanted to try making fresh gnocchi have not yet got around to it - so when I saw a vacuum sealed pack of gnocchi de patate in the supermarket I pounced on it! Took me another week to actually plan a meal around it - and the big question was - what sauce do I make for it? The usual tomato sauce seemed a bit Blah for it...so I decided to make a pumpkin based sauce. The smooth, orange sauce was absolutely perfect - I added tomatoes to it to make sure it didn't become too sweet and the fresh basil from my little potted plant made this delicious. Ready made gnocchi takes just about 2-3 minutes to cook, so one has to be careful not to leave it for too long. Also, make sure the sauce is made before you make the gnocchi, the gnocchi might stick to each other if you keep it around too long.

I am sending this to Andrea's Grow Your Event which is in it's 37th edition and is being hosted by her- the last edition for 2009.


Gnocchi de patate - 200 gms

For the Pumpkin & Basil Sauce

Pumpkin - 1.5 cups chopped - about 200gms
Tomatoes - 3-4 medium, blanched, peeled and chopped
Onion - 1, finely chopped
Garlic - 6 cloves finely minced

Chilli powder - 1 tsp
Dried herbs - 1/2 tsp
Freshly crushed black pepper - 1/2 tsp
Basil leaves - 5-6
Fresh Cream - 1/2 cup
Parmesan - 2 tbsp powdered
Salt to taste
Olive oil - 1 tbsp

1. Heat olive oil in a pan and add garlic, saute 1 minute and then add finely chopped onions. Saute till transparent and soft, then add chopped tomatoes.
2. Once the tomatoes become pulpy and soft (approx 8-10 minutes), add the pumpkin pieces and 1 cup water and bring to boil. Simmer on medium flame, covered, for another 8 minutes till the pumpkin pieces are cooked.
3. Remove from flame and cool completely. Blend in a mixer to a smooth puree.
4. Meanwhile, cook the gnocchi in plenty of salted boiling water as per the directions on the packet. Drain and toss with a tsp of olive oil and transfer to a serving dish.
5. Return to pan and add the chilli powder and dried herbs, a little water of required, salt to taste and bring to boil again. Once it reaches a thick, creamy consistency, lower the flame and add the cream.
6. Remove from flame, add the chopped basil and crushed pepper and mix till well blended.
7. Pour over the cooked gnocchi and serve warm with a sprinking of parmesan.

Sunday, October 25, 2009

Banana, Pineapple and Coconut Muffins

These are delicious muffins full of flavour with a rich fruity flavour - one of those amazing treats you can find on Meeta's blog - What's for Lunch Honey!

She calls them Muffins Exotica - and exotic they are indeed, it has banana, pineapple and coconut and for good measure I added some honey as well! The kids who had come over for a playdate with my daughter wolfed them down in no time . I also replaced 1/2 a cup of flour with wheat flour (atta) and it made a good snack to take to work.

Wednesday, October 14, 2009

Rava Laddoo and 7 cup Barfi - Diwali is here!


The festive season started early this year and it seems like we hardly celebrated Dasera and its already Diwali. Life's been a whirlwind this past month - we had friends from Chennai staying with us during the Dasera holidays. The next weekend saw us making a quick dash to Mumbai - in the space of 2 days we caught up with my brother's family, surprised my best friend, met a dear friend who had come down from Oz for the holidays and had a reunion with my CA gang! No wonder then Diwali practically crept up on me and gave me a big surprise.

Its my third Diwali this year, in Delhi, and I am already complaining how its not "cool enough"! I have also become a veteran at shopping for gifts (something we never did in Mumbai and Chennai) at the Diwali melas. Launched an assault on the most popular one (Blind School Mela) at 10 30 in the morning when it was still empty and was done by 12.30!!


The festive mood crept in only a couple of days back - that too it had to be kick started into full gear by wearing a saree to work in the morning the day before Dhanteras! So when I came back after battling shopping traffic on the way home, I was surprised to find myself in the mood to make some sweets. So, after putting my daughter to bed and in the midst of dinner, I made my favourite first - rava laddoos. There's something about a well made rava laddoo - soft ball of sweet powdery goodness - which never fails to satisfy me. I don't like the moong dal laddoos and besan laddoos as much.

Then when they were done, my mind went back to the conversation I had with my cousin on the way back home - she told me about a sweet she was making this year. It's called 7 cup barfi apparently, because it has 7 cups of ingredients - all the same measure. I was quite intrigued by it since I hadn't heard of such a sweet before. I usually make mysore pak so I decided to try this one instead. Was too late to call her, but the measures she told me had stuck in my head so I made it on that basis. 1 cup ghee, 1 cup gram flour, 1 cup coconut, 1 cup milk and 3 cups sugar (I used 2.5 cups and it was still quite sweet).

This is a good barfi to try as a beginner - I should have started with this instead of the mysore pak I tried the first time itself....the ingredients are all supposed to be mixed together and then cooked down to the barfi stage. I decided to roast the gram flour before mixing though, just to be on the safer side.
Make sure you add the other ingredients only after you mix the gram flour with the milk completely, till well blended and smooth without any lumps. The cooking takes about 30 minutes on a medium flame stirring constantly. The mixture will come together and leave the sides of the pan and become very thick. When scooped with a spatula or spoon it will not drop easily from it. Put of the flame at this stage and stir a few secs more before pouring into a greased tray.

For those who fear the whole "mithai/bakshanam" making process - try these recipes. They are simple and took me just an hour to make both. BUT if you, like me, are a miserly user of ghee and sugar, be warned that I disconnected that part of my brain and went ahead and used a whole cup of ghee in each of these recipes. Past experience has shown that rock hard roundels and squares are not what you want on Diwali!

Wishing you a very Happy Diwali!!


Rava Laddoo


Semolina (sooji / rava) - 2 cups
Sugar - 1.5 cups
Ghee - 1.5 cups (melted)
Cardamom (elaichi) - 4-5
1/4 cup raisins and cashews

1. Add 2 tsp of the ghee to a heavy pan and lightly fry the cashews ansd raisins for about 3 minutes - the raisins will plump up and the cashews will turn light brown. Remove and keep aside.
2. Add 2 more tsp of ghee to the pan and lightly fry the rava for about 5 minutes on a low flame, constantly stirring. A light aroma of roasted rava is enough and it shouldn't turn brown.
3. Transfer the rava to a plate where it can cool.
4. Remove the cardamom seeds and mix it with the sugar and grind in a mixie till almost powdered.
5. Add the cooled rava to the mixie and grind till the sugar is completely powdered and the rava is still a little bit coarse.
6. Remove from the mixie into a separate dish.
7. Take a large plate - take about one third of the rava and add the warm, melted ghee in tablespoons to the rava - roughly a little less than half a cup should do. You can always add some more later if needed.
8. Take about 2 raisins and half a cashew for each laddoo and combine it with the rava and melted ghee and make small balls. If the mixture has too much of ghee, add a bit of the rava sugar mixture.
9. Once this is done, repeat with another one third of the rava and another measure of ghee and then again with the last portion of rava and some more ghee.

Don't panic if the laddoos are not formed well, just add a wee bit of warm ghee and it should come together.

7 Cup Barfi

Chickpea flour (besan) - 1 cup
Freshly grated coconut - 1 cup
Milk - 1 cup
Ghee - 1 cup
Sugar -3 cups ( I used 2.5 cups)

1. Roast the gram flour in a tsp of ghee for 3-4 minutes and cool. Mix into the milk till well blended and without lumps.
2. Mix the rest of the ingredients with the milk and besan, transfer to a heavy bottomed pan and cook on a medium flame.
3. After approximately 20 minutes, the mixture will start leaving the sides and become quite porous and semi solid. When scooped up with the spatula, it will not drop easily - at this stage when it starts coming together, remove from flame and pour into a greased tray and flatten with the back of a greased cup.
4. Cut into diamond or square shapes after a few minutes and let cool completely.

A quick search on the net told me that this is quite a popular sweet with many variations for the ingredients of the 7 cups! Take your pick and sweeten up your Diwali celebrations!

Monday, October 5, 2009

Handvo - Spiced Savoury Lentil Cake

,I love to cook from scratch - there I said it. In this world of convenience food and TV dinners, it may seem like a complete waste of time to do things from scratch, but I have to admit I like the whole process of shopping for the ingredients, getting them together and then creating something out of it.

I would be the first one to protest against spending a minute more than necessary in the kitchen on a daily basis. But as someone who loves cooking, there are times when you are in the kitchen by choice rather than by compulsion. Those are the times when I love to experiment and try new things, sample new flavours and play around with textures and tastes.

So, though I have made this "instant" handvo a lot of times and love the fact that it's so easy to rustle up a tasty breakfast, I always wanted to make the handvo from the traditional mix of whole grain flours. Well, thanks to my dear friend Arch, who has the delightful blog The Yum Factor, I got a goodish amount of the flour used to make handvo - straight from Ahmedabad. Her poor hubby was made to cart the flour along with drumsticks and fresh sweetcorn - the things we foodies do!! Hopefully the evening spent with us made up for the courier service :)

The handvo made this way is markedly different from the instant version, not to mention that it is that much more healthy because of the whole grain flour used. I added grated bottlegourd (dudhi/ghiya) and carrots as well as some of the fabulous sweet corn. I baked some of the batter (without the green chilli paste) in muffin tins, to send in my daughter's lunch box and she loved it! And the fact that it is baked makes it a must-have on my list atleast!

I followed the recipe from Arch and it turned out beautifully! Cut into squares and served with green chutney.

Monday, September 28, 2009

Cheesy Pasta Bake

Mac & Cheese has somehow not held me in thrall though this largely American dish seems to be a sure fire crowd pleaser. I used to be mystified about the various recipes that peppered the foreign magazines my circulating library in Chennai delivered. There was “classic Mac n Cheese”, “Mac n Cheese with a twist”, “Mom’s secret recipes” – I couldn’t imagine the to-do over what is essential cooked macaroni baked with a rich cheese sauce. Apparently, this dish became even more popular when Kraft introduced its instant version, packaged as a “meal in a box”, where the cheese sauce was made from powder base – this idea got a big boost with the World War II rationing and working women which meant that meat, dairy products and time were all in short supply.

Now, I’m no food snob and actively encourage the “to each his own” attitude; I suspect that the blandness of this dish is what makes me stay away. We usually like a nice pesto pasta and an Arrabiata sauce is also a great favourite with us. My daughter who dotes on pasta usually gets a version which has lots of veggies in it, a mild tomato sauce which is finished with a dash of milk and gratings of cheese.

But there are those days when you crave carbs and lots of cheese – okay, okay, not you, It’s just me! But I do. This cheesy bake was made on one such day. I did put in veggies though, since I couldn’t imagine eating just pasta and cheese and also added a couple of tablespoons of pureed tomatoes to give it some more flavour. It's a modified version of Mac & Cheese I guess....

It was deliciously satisfying to cut into that cheesy white sauce covered bake…..so tell me, what do you do when the craving for carb strikes? What is the dish that acts as an immediate remedy? – is it rice and sambar? Or khichdi? Or aloo paratha?

Cheesy Pasta Bake

Saturday, September 19, 2009

Whole Wheat Crust Pizza


I'm getting progressively better at making pizza from scratch - it's such a joy to bite into a lovely thin crust pizza, choc-a-bloc with toppings of our choice. As much or as little cheese as we want - no rationing of olives....as you can see I'm not too much of a fan of store bought pizzas!

On an average, we order pizzas about once every 4 months; we almost never go out and eat pizza - though after coming to Delhi we have found a couple of Italian restaurants which serve some great thin crust pizza - Vera Pizza at Tonino's is one of them, though for some reason the M.G Road outlet is better than the Greater Kailash one.
Aming the delivered Pizzas, loved Smokin' Joes when I was in Mumbai and when they started out Pizza Express in Chennai was very good. Slice of Italy in Delhi is also a good bet on most days.

The first time I ate one of the international "chain" pizzas was the day I got married. I was determined we wouldn't starve at our reception while seeing people all around us stuff their faces, so we ordered up a pizza to our hotel room from a brand new outlet downstairs and had it while I was getting my make up and hair done! The pizza was thick and doughy and I hated it. It was a long, long time before I had another one.


Its a pleasure then, to sink your teeth into one of these babies. Here it is before it went into the oven - this was the second one and since I had already one baking in the oven in my one and only metal pan, I put the second half of the dough into a shallow oven proof glass pan. But I won't be repeating it because the glass doesn't seem to be a great idea. The pizza took longer to cook and the glass was hot when I brought it out that I burnt my arm in two places! OUCH!!!

I stuck to the recipe I have been using from Jugalbandi with just a few adjustments.

Closer to perfection each time I make it, this time was very satisfying especially since the yeast did not give me any problem. I used olives, sweet corn, cherry tomatoes, bell peppers and onions. The sauce was store bought this time since I didn't have the time to make this delicious roasted pepper sauce. But it was good nevertheless! Try it out and you will be a convert in no time!

Tuesday, September 15, 2009

Spring Cleaning - Travel cleanses the mind!

Been doing a bit of cleaning up on my blog - first to be attacked was the tags. Though I take a lot of care while posting itself to make sure that I stick to a limited number of tags, turns out there were many which were quite superfluous and had only one entry under them, while there were some categories which weren't tagged at all - one pot meals (thanks A!) and Tamil cuisine for e.g - both of which I have quite a few recipes posted. So, I added a few and deleted a lot - some of the categories which have only one post under them are because of my aspirations to post more on the same - like stir fries, couscous and Mexican.

I also made sure my list of recipes has been updated - so just one click on the Recipe Index (you can find it on the right side of the blog) takes you to the recipes arranged according to different categories - Soups, Salads, Main Course, Rice, Breads, Chicken, Meat & Fish, Cakes, Desserts, Indian Sweets etc

There's lots more to be done; starting with changing the look of the blog to considering moving to wordpress. Just don't have the time or the bandwidth to do any of that right now - a full time job and home have me stretched out as it is.

Do let me know if you have any suggestions or comments or would like to see more of a certain kind of cuisine/recipe.

In the meanwhile, in case you are wondering what these photographs are about, I'm sharing some pics of our recent trip to Bhimtal Lake. This is a picturesque place about 300km from Delhi very close to the more famous Nainital Lake. We stayed at a beautiful place called Fishermen's Lodge - being the off season, we were the only guests there apart from one other couple. The service was warm and personalised, the food was excellent and the views of the lake were
spectacular! The weather was just right, there were no crowds and even when we went boating we had the entire lake to ourselves! My 4 year old daughter was thrilled - she wasn't being told to keep her voice down or to sit still at the table or not jump on the wooden deck. We walked, curled up in a corner with books, packed picnic lunches which we ate on the banks of neighbouring Naukuchiyatal and Sattal lakes. Spring cleaning for the mind - we came back all relaxed and refreshed! :)


Sunday, September 6, 2009

Pasta tossed with Roasted Vegetables


As far as this dish is concerned - what you see is what you get. I don't even think you need a recipe for this one - its that simple! As I have mentioned many times before, I love oven roasted vegetables.....and of course I simply adore pasta. So, putting them together was the easiest thing to do.
I used broccoli, babycorn, cherry tomatoes, onions and bell peppers. Feel free to substitute with any other combination that you would prefer, including zucchini, yellow or red peppers and courgettes. Toss the chopped vegetables (1 " pieces) in a tablespoon of oil mixed with dried herbs and salt and roast in a pre heated oven for about 15-20 minutes. The vegetables will still be crunchy but have a nice sweet flavour from the roasting.

Once the vegetables have been roasted, heat up olive oil in a pan, saute some garlic and then toss some cooked pasta (already cooked, drained and tossed with a tsp of oil) and vegetables together in the pan for a few minutes. Since I already add herbs while roasting vegetables, I just mixed in some paprika powder and basil leaves additionally. A generous sprinkling of grated parmesan and you have a delicious, light meal ready!

Sunday, August 30, 2009

Fish in Hot Garlic Sauce

I am posting a Chinese recipe after a long time; earlier posts include this Burnt Ginger Rice, Sizzling Sesame Noodles and Vegetables in Hot Garlic Sauce. This is the first time I have cooked fish Chinese style; though we love Oriental cooking a lot and enjoy trying new dishes when we eat out, Chinese cooking at home is usually a last minute idea and so restricted to pan fried noodles and a vegetable stir fry. This time though I planned Sunday lunch to incorporate some nice sole I had at home. Once I decided to cook it Chinese style, making a vegetable fried rice to go with it was easy business.

The fish was marinated in lime juice and then patted in cornflour and fried. The sauce was extremely easy too – finely chopped ginger and garlic, oyster sauce and red chilli paste went into it and it was thickened with cornflour. The fried fish was put in at the end and finished with vinegar and freshly crushed black pepper. The whole dish took me about 25 minutes to cook from start to finish.

I usually don’t fry fish, so this was a first for me – but it wasn’t greasy like I expected and needed to remain in the hot oil for just under 4 minutes. This dish is definitely a crowd pleaser – the oyster sauce gives it a nice consistency and the fresh ginger and garlic add great flavor.

Fish in Hot Garlic Sauce


Fish fillets - 300 gms
Cornflour - 4-5 tbsp
Onion - 1
Ginger - 1 " piece
Garlic - 3-4 cloves chopped finely
Green chillies - 3-4
Oyster Sauce - 2 tbsp
Red chilli paste - 1 tbsp
Sugar - 1 tsp
salt to taste
Chilli vinegar - 1 tbsp
Freshly crushed peppercorns - 1 tsp
Oil - 3 tbsp

1. Clean and pat dry fish, cut into 2 " pieces and marinate with lemon juice and salt for about 10 minutes
2. Heat sufficient oil in a wok, roll the fish pieces in 3 tbsp cornflour and deep fry for 2-3 minutes. Drain and keep aside
3. Finely slice onion, garlic and ginger; slit the green chillies
4. Dissolve 2 tbsp of cornflour in one cup of water. Mix the oyster sauce, sugar and salt with one cup of water
5. Heat 3 tbsp oil in a wok, add the onion, green chillies, ginger and garlic and stir fry for a minute
Add the red chilli paste fry for one more minute, then the oyster sauce mixture and bring to boil.
6. Add the blended cornflour and cook for 2 minutes till the sauce starts to thicken.
7. Add the fried fish pieces and cook for a minute more, adding some more water if needed.
8. Stir in vinegar and the crushed pepper ; serve hot with Chinese Fried Rice.

Wednesday, August 19, 2009

Pumpkin & Bean Casserole


Another lovely one pot meal from my trusted Good Food 101 Healthy Eats. As I have said before, the recipes from this book make for quick and healthy weekday meals, at the same time very delicious. There is this Egg curry which is made with spinach, a lovely chicken casserole , a delicious Lemon Chicken & Cauliflower Pilaf each one had that "something different" factor about it which helped break the monotony of our everyday meal.

This casserole recipe has black eyed beans cooked with pumpkins into a lovely stew kind of consistency with herbs and spices and then baked with a lovely topping. The original recipe called for a breadcrumb, walnut and herb mixture, but I couldn't resist going for a mashed potato topping which one usually finds in a cottage pie recipe. Also, I have done the bread crumb topping before for this dish and we found it turned out too dry for our liking....I know I'm probably doing something wrong, but right then the mashed potatoes beckoned! ;) Unfortunately, I didn't take a photograph of the finished dish after it was baked with the lovely crust.

So, if you have been wondering what to do with those black eyed beans in your pantry besides the usual Indian dishes we make; or if you have a hunk of pumpkin sitting in the fridge and don't want yet another bowl of soup - try out this recipe. Some bread on the side to go with it and you are all set.

This casserole of goodness goes to that wonderful event My Legume Love Affair (MLLA) which is the brain child of Susan of The Well Seasoned Cook and this month's edition has come back to her blog after being hosted by many enthusiastic members of our food blogging community.

Pumpkin & Bean Casserole
(adapted from BBC Good Food - 101 Healthy Recipes)


Ingredients:

2 cups cooked black eyed beans (chowli/lobia/karamani)
(Soak approx. 1.25 cups of dried beans in water overnight, drain the water and cook in fresh water in a pressure cooker or on the stove top till tender)

2 tbsp olive oil
Onions - 2 chopped
Garlic cloves - 4 finely chopped
Green chillies - 2 , finely chopped
2.5 cups fresh tomato puree (the original recipe called for passata, you could use store bought tomato puree)
1 " stick cinnamon
3-4 cloves
400ml white wine
400 ml vegetable stock (I used a stock cube dissolved in 400ml warm water in which the beans were cooked)
350 gms pumpkin (kaddu/sitafal/sigappu pushnikai), peeled and cut into 2 " cubes.
red chilli powder - 1 tsp
salt to taste

For the potato topping:
4-5 big potatoes, boiled and mashed (I ran them through a potato ricer)
2-3 tbsp milk
salt to taste
freshly crushed black pepper

Method:
1. Heat the olive oil in a pan, add the onions and saute for 10 minutes till lightly browned. Add the garlic, green chillies, red chilli powder, tomato puree, wine, vegetable stock, salt and pepper and bring to boil.
2. Reduce heat, simmer and cook uncovered for about 20 minutes. Add the chopped pumpkin and cook for another 15 minutes.
3. Pre heat the oven to 180 C, add the beans to the pumpkin and tomato gravy and mix. Transfer the entire pan into a large baking dish or two smaller ones.
4. You can now opt to cover the casserole with the original recipe's suggestion of a crumble mixture (breadcrumbs, walnuts, herbs and oil) or my choice which was a mashed potato topping.
5. Combine the ingredients for the potato topping together and then spoon the topping over the beans casserole carefully, taking care not to press down too hard.
6. Bake at 180C for 20-25 minutes till the topping is golden brown on top. Serve with warm bread.


Friday, August 14, 2009

Parripu Payasam for Janmashtami - Lentil & Coconut Milk Dessert

For those of you who celebrate Janmashtami or Krishna Jayanthi – hope you have a joyous celebration! I am not a very ritualistic person, so celebrations at our home are usually more about having faith and giving thanks and rather than adhering to the actual rituals to the T. The story of Krishna’s birth tells us that he was born at midnight, so celebrations in Tamil Nadu usually happen the evening before…..but yesterday being a working day and today being the holiday in the North, it was more convenient for us to do the small pooja this morning.

I was glad I decided to do that, since I could spend all that time with my 4 year old daughter and answer every question of hers – from the garland of flowers, to polishing the silver lamp, to making the cotton wick, pouring oil into the lamp, drawing the rangoli, making the small “padhai” or Krishna’s feet leading from the door to the pooja room, telling her how I made the glass painting of Krishna. I guess rituals like these are more about family traditions for us and bind us together in yet another way….atleast for me it brings me closer to my family as much as it does to God.

The traditional offering for this festival that I remember when I was growing up, was “seedai” – small round balls of rice flour dough, delicately spiced (as well as sweetened) and deep fried to crisp, crunchy balls. None of that today, no time to make and nowhere to buy near our home – this is when I miss Grand Sweets in Chennai! And of course, there has to be white butter – the Makhan Chor’s favourite – and milk as well. We had freshly churned butter at home but that was more coincidence than planning! My daughter and I both enjoy eating “white” butter on our toast and I manage to collect enough cream over 3 weeks to get a bowlful.

Since hubby was working and I wanted to have the pooja before he left, I made a simple Parippu Payasam for the neivedyam. Payasam refers to a milk based sweet which is made in South India – also called Kheer in the North. It is usually a creamy dessert made with milk which has been thickened and sweetened and has either vermicelli or sago or rice added to it with raisins and other dryfruits.

Parippu Payasam is quite different in that it is made with lentils (mung dal) which have been roasted and then cooked till soft and then finished with jaggery and coconut milk. What made this version even more special was that I made it with jaggery which I had brought back with me from my last field trip to the cane fields of Uttar Pradesh. I was presented a box of jaggery “mithai” – basically very good quality jaggery which was cut into squares and had loads of almonds and pistachios in it. I had never seen anything like that before! There was no way I was going to have it the way it was recommended by the kind gentleman – “100gm everyday like a sweet - good for health”!

So, I used it to sweeten the payasam – the dry fruits were a nice addition, I would have usually just fried raisins and cashews in ghee and added it to the payasam, but the almonds and pistachios gave a nice crunch to the creamy consistency.

Parippu Payasam

Ingredients:
1 cup moong dal split
1.5 cups thick coconut milk
1 cup grated jaggery
1 tsp elaichi powder (cardamom powder)
1 tbsp raisins and cashew nuts
1 tsp ghee

1. Roast the moong dal for about 5 minutes on a low flame till it gives out a nutty fragrance taking care it doesn't burn.
2. Cook the dal in a heavy bottomed pan in about 4 cups of water (just enough) till soft and can't hold its shape.
3. Then add the grated jaggery to it and half a cup more of water if needed so that it melts.
4. Put in the coconut milk and cook on a very low flame for about 4-5 minutes, taking carre it doesn't split.
5.Meanwhile, fry the raisins and cashewnuts in ghee and then add to the payasam along with the elaichi powder and remove from heat.
6. Serve warm or cold.

Saturday, August 8, 2009

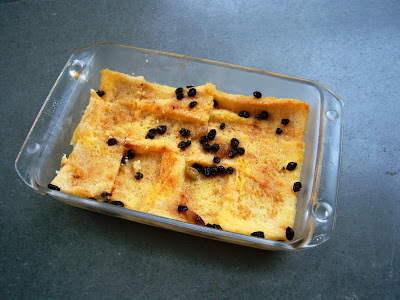
Bread & Butter Pudding


Foibles - we all have them don't we? The dictionary defines the word as " a minor weakness or an eccentricity". And who indulges our foibles better than family and friends? My mother knows I love thick, well set curd and always made sure (still does) that I am the first to "cut" into the curd bowl at home. When we came back from vacations she would rush to the neighbour's house to borrow some "starter yoghurt" so that there would be curd for me by the end of the day. The friend who loves pink in any shape or form - I always keep an eye out for something she may like. My best friend has started picking up coaster sets from the places she visits, knowing that I like collecting them.

The husband of a dear friend in Delhi loves butter and cream - so much so my friend had stopped keeping any butter at home until recently when having children meant that she couldn't go without. The combinations he could come up with were quite creative to say the least - butter in tea, a dollop of cream on his cold coffee..... So when I was wondering what to gift him for his birthday, I remembered my friend telling me how as a child, he enjoyed having bread and butter with sugar. Something which even I remember my Dad making for me when I was a little girl.

This bread and butter pudding seemed perfect for him - its a recipe I have made many times in the past 10 years and has never failed to please. One of the times I made it for a potluck, an acquaintance commented how the taste took him straight back to his Ooty boarding school days. I don't remember where this recipe is from - probably one of those Good Housekeeping magazines and I have adapted it over the years to make it perfect for our taste...its simple, hardly takes an hour from start to finish and is absolutely delicious! I made this recipe this time, in two batches - one to gift and a smaller one for my daughter - the second batch had a little less milk-egg mixture to soak and looks drier than it actually is. But it is quite creamy and very satisfying.

So, go ahead, indulge yourself or your loved one - give into your foibles!

Bread & Butter Pudding
Bread - 2 slices
Butter - enough to butter the 3 slices generously
Eggs - 1 plus one egg yolk
Milk - 300ml
Castor sugar - 2 tbsp
Demerara sugar - 2 tbsp
Vanilla extract - 1 tsp
Raisins & sultanas - 2 tbsp each
Cinnamon powder - 1/4 tsp

1. Butter the bread slices and cut each slice into quarters. Arrange the slices, buttered side up, in a shallow oven proof dish.
2. Sprinkle the raisins and sultanas on top.
3. Mix the eggs, castor sugar, milk and vanilla essence and strain if there any "bits". Pour over the bread, sprinkle the cinnamon and demerara sugar and soak for 15-20 minutes.
4. Pre heat the oven to 180 C and cook the pudding for 45 minutes till the custard is set and the top is a nice golden brown.
5. Serve warm or cold.

Tuesday, July 28, 2009

Ratatouille


Ratatouille is a rustic vegetable stew which has its origins in the South of France - the region of Nice to be precise. It also goes by the name of Ratoutille Nicoise for that reason. This dish can't get any simpler- it literally means to stir together. What does one stir together - vegetables like eggplants, zucchini, bell peppers, courgettes, tomatoes - all slow cooked together till the flavours meld and the juices combine.

This dish is usually cooked on the stove top for upto an hour; but one of my favourite weekday cookbooks - Good Food - 101 Healthy Eats - has a nice recipe which cooks up fast and turns out delicious too. Though this could potentially be a convenient fridge clearing recipe, I would recommend using fresh vegetables as far as possible.

I'm sending this fabulous recipe to this month's edition of Heart of the Matter - Budget Friendly Recipes; this event which is focused on recipes which are heart friendly ("low in saturated fats (lean meats and fish), be low in salt (sodium), and abundant with vegetables or fruit") is hosted by Michelle of the Accidental Scientist. and Ilva of Lucullian Delights. This month's edition is about trying to eat food which is healthy but at the same time doesn't pinch our pockets in the time of recession. What better dish than this ratatouille which has just vegetables and no exotic, expensive ingredients which may make us think twice?


Ratatouille
Adapted from Good Food - 101 Healthy Recipes
Ingredients:
2 red or yellow peppers ( I used 1 yellow pepper and 1 green pepper)
4 large tomatoes
1 large aubergine (bharta baingan), cut into large chunks
4 small courgettes (I used zucchini) , sliced thickly
1 onion, sliced thin
4 garlic cloves, crushed
1 tbsp red wine vinegar
1 tsp sugar
1 tsp paprika powder
1/2 tsp cumin powder
salt to taste
1 tbsp coriander leaves chopped
2-3 tbsp olive oil

Method:
1. Peel the peppers (if possible) and cut into 1" squares. I was able to peel the peppers because they were fairly large and firm. Next time I will skip this step!
2. Blanch the tomatoes in boiling water for 30 seconds, plunge into cold water immediately. Peel, chop and deseed. Make a small cross on the base of each tomato before blanching to enable the skin to come off easily.
3. Heat 2 tbsp olive oil in a large frying pan and fry the aubergines for about 5 minutes, till soft. Remove and keep aside
4. In the same oil, fry the courgettes till golden, adding a little more oil if necessary. Fry the bell peppers, onions, paprika powder and garlic.
5. Add the vinegar and sugar, the tomatoes and coriander as well as the aubergines with some salt, pepper and cumin powder and cook for 10-15 minutes, till the vegetables are cooked but not mushy.
6. Serve warm with soup on the side.

Tuesday, July 21, 2009

Dad's Spanish Omelette

Sunday breakfasts cooked by Dad were really special. While he was in Iran, he learnt to make a mean Spanish omelet from the Swedish engineers he worked with there. The last time he made this for me was on my birthday 4 years back and he hadn’t lost his touch. It was simply delicious – thick wedges layered with potatoes, stuffed with slowly browned onions and capsicums, topped with cheese. Hmmm… reminds me, I should ask him to make it again the next time he visits.

When I grew up and started reading more about food, I found that in Spain this is called a “tortilla” and is widely served as a snack or a light meal in Spain – especially in Tapas bars. Quite a different concept from the breakfast dish I had always known it as. In Britain it is called Spanish omelet, while in Italy there is a version which is called “Frittata”. They are all flat open faced omelets with a large variation in the fillings and while the bottom is cooked on the stove top, the top is finished in the oven. Read more here.

I made this recently on a Sunday morning (for some reason I can’t wrap my head around making this on any other day! I guess the tradition continues...) Along with the potatoes I also tossed in some sliced sausages and topped it with feta cheese, dried herbs and fresh coriander. The combinations for a frittata are endless - feel free to experiment with bell peppers, mushrooms and any other ingredient you fancy.

Frittata cooking on the stove top

Go easy on the salt if you are using feta cheese since it is naturally salty. Even my daughter gets to share this lovely breakfast because I sprinkle the crushed pepper and some chilli flakes only on 3/4th of the frittata leaving one wedge for her to enjoy.

Frittatas usually use anywhere between 6 to 10 eggs - thats how you get those thick wedges which you can cut. Which is why I usually make these when we have friends staying over with us....makes for a nice brunch of sorts without too much time spent in the kitchen. This time, since it was just the three of us (2.5 actually!), I used 3 eggs. I don't have a smaller non stick pan so I used the normal one which is why it is much thinner than usual.

When making the frittata with 6 eggs or more, I use a round oven proof tin - first on the stovetop and then later in the oven to set the top. This time I put the non stick pan inside the oven - not a good idea at all.
a. Non stick pans are as such a bad idea because of the teflon coating (am trying to find some good cast iron frying pans I can season and use) and one inside the oven isn't a good idea either.
b. I kept in there for about 3-4 minutes, but it might melt the plastic handle of the frying pan.

So, what I'm going to do in future (and would suggest the same for anyone trying this) is to use an oven proof pan which I can also use on the stove top. Think pie pans, roasting tins....

I am sending this recipe on to Family Recipes - the event which brings memories of family, food and fun - the brainchild of Shelby and Laura.

Dad’s Spanish Omelet

Ingredients:

Eggs - 6

Milk - 1 tbsp

salt and pepper to taste

Potatoes - 2, sliced thin and cooked in water for about 8 minutes, till almost done

Mushrooms/sausages/bell peppers - 1/2 cup sliced thin

Red chilli flakes/paprika powder - 1 tsp

Fresh coriander & mint - 1/4 cup chopped

Dried herbs (optional) - 1/4 tsp

Feta cheese - 100 gm

Oil - 1 tbsp


Method:

1. Heat oil in an oven proof tin and arrange the parboiled potato slices at the bottom of the tin and cook each side till golden, about 5 minutes.

2. While that is cooking, beat the eggs and the milk along with the salt and pepper. When the potatoes are almost done, add the mushrooms/sausages/bell peppers to the pan and cook on low for about 5 minutes till they wilt.

3. Pour in the egg mixture and wait till it spread evenly. Sprinkle the fresh herbs, dried herbs, red chilli flakes and feta cheese. Pre heat the oven to 180C

4. After about 2-3 minutes, the egg would have set and the bottom would be almost cooked; Put the tin into the oven (or under the grill) and bake for about 5 minutes till the top is cooked and golden. The cheese will also have melted. Serve warm, cut into wedges along with a hunk of bread on the side.

Saturday, July 11, 2009

Divine Chocolate Cake


A dear friend in Chennai, used to make this absolutely divine chocolate cake - a bit fudgy at the centres and the lovely rich taste of chocolate in very bite. We loved having it at every celebration - birthday, Christmas and other special occasions. I had taken the recipe from her but never really bothered making it - why mess with perfection! But I missed it a lot after moving here two years back and finally decided to make it myself.

The intense richness of this cake, I believe, comes from pouring the boiling water over the cocoa and coffee powders. You know the perfect chocolate cake recipe you were looking for? - well this is it! I will be experimenting with a whole wheat & low fat version, but I think we should all be a little decadent sometimes and indulge ourselves :)
I am sending the first picture to Click - Bi colour this month - the popular photography event hosted by Jai & Bee of Jugalbandi.
Divine Chocolate Cake

Ingredients:
Refined flour (maida) - 1 1/4 cups
Baking soda - 1/2 tsp
Baking powder - 1/2 tsp
1/2 cup cocoa powder, (I used Cadbury's)
1 cup boiling water
Vanilla essence - 2 tsp
Butter at room temperature - 1.25 cups
Castor sugar - 1 cup
Eggs - 2
Method:
1. Take a largish bowl and beat the butter in it with an electric mixed on medium for about half a minute.
2. Add the sugar gradually and cream together till shiny and fluffy, about 5 minutes. Add the eggs one at a time and beat the first well before adding the second one.
3. Meanwhile, heat the water till it is boiling and then pour over the cocoa powder in a bowl. Mix well till dissolved. Cool and then mix in the vanilla essence.
4. Sieve the flour, baking soda and baking powder together. Add the flour mix a little at a time to the butter sugar egg mixture, alternating with the cocoa mixture, beating continuously with the mixer on medium continuously. When it is combined well, beat on low for another half a minute.
5. Pour the cake batter into 2 pans (I used a 8" round pan and a smaller rectangular pan) which have been lined with parchment paper on the bottom and greased and floured on the sides. If not using parchment paper on the bottom, I would recommend heavily greasing and flouring the bottom instead. The cake turned out really soft and broke a bit when I tried to turn it out onto a plate.
6. Pre heat the oven to 190C and bake for about 25 minutes - a toothpick inserted should come out moist but not uncooked. Cool completely before attempting to take it out.
7. Warm slightly before serving.