Showing posts with label stir fry. Show all posts

Sunday, February 20, 2011

Kadgi Sukke (Green Jackfruit Stir Fry)


Sukke is a Konkani preparation of vegetables - a stir fry with spices which have a coconut and tamarind base. One of my favourites of Konkani cuisine - something I got acquainted with at my best friend's house when I was in college. I practically lived there when I was doing my post graduation - it was like coming home when I went over there on the weekends. And definitely the food was such a relief from the terrible hostel food and then our own cooking when I was living in a flat with 4 other girls.

I simply love jackfruit - have you eaten it drizzled with honey? its like ambrosia. But I have never cooked unripe jackfruit before - so when I saw it all nicely cut and cleaned in packets at my local vegetable vendor, I decided to give it a go. The original idea was to try the kathal biryani I had seen in Pratibha Karan's Biryani book, but then I remembered this dish and suddenly started hankering for that combination of sweet, sour and spicy with the meat-like consistency of jackfruit. This is Sandhya Aunty's recipe for sukke - I love her cooking :)

This was Saturday lunch for us - dal, roti/rice, kadgi sukke, milagu rasam and papad. The milagu rasam (a thin soup which is liberally spiced with black pepper-recipe in another post) was perfect for the weather and for hubby who was coming down with a cold. Happiness on a plate.


Kadgi Sukke (Green Jackfruit Stir Fry)

Tender, green jackfruit, chopped in 1" piecessalt, turmeric powder
jaggery - 2 tbsp

5 red chillies
1 tbsp coriander seeds
1/4 tsp fenugreek seeds
2 tsp tamarind paste
3/.4 cup coconut grated

Mustard seeds - 1 tsp
Currry leaves - handful
Coconut oil - 2 tsp

1. Clean and cut the jackfruit pieces in to 1' pieces and keep aside. Cook the pieces till done, in just enough water and turmeric powder - about 8 minutes.
2. Roast the red chillies, coriander seeds, fenugreek seeds in half a tsp of oil, then grind to a paste along with the tamarind and the fresh coconut.
3. Heat the coconut oil in a pan, add the mustard seeds to it-when it pops, add the curry leaves.
4. Add the masala paste and the cooked jackfruit and simmer together till well blended and almost dry. Add the jaggery and mix well.

Tuesday, January 19, 2010

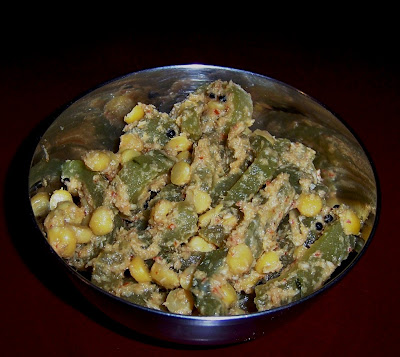
Bitter Gourd Stir Fry with Peanuts

Bittergourd - did the word make you flinch? or did it make you wonder whether there was one more recipe you could add to your repertoire?

This is one vegetable which you either love or hate - there is no middle way. I love bittergourd - my parents (especially Mom) do too and I guess they passed it on to me and my brother. I got lucky in that hubby also loves bitter gourd - my brother wasn't as lucky - SIL hates it!

So we eat pitlai, pavakai kozhambu, porial, stuffed bittergourd - the usual suspects in a South Indian home. Other than that, I have this recipe for a mezhukkupuratti (Kerala style stir fry) from Sig which I have added - both of us love the crispy, coconutty flavours of this dish.

Indosungod of Daily Musings (love her posts which sit up and make you think!) posted this recipe from Sukham Ayu - the second cookbook by the wonderful duo who gave us Cooking with Pedatha. I knew I had to try it out the moment I saw it, and I wasn't wrong.


Made this the same day and stuck to the dry version. The combination of garlic, onions, peanuts and amchur make for a lovely flavour and I think the best part of this is how the bitter gourd retains its flavour and shape (I cooked it for about 12 minutes initially and then another 5 minutes after adding the spices and it still had a little bit of crunch to it) with the spices just complementing its taste. I left out the jaggery since both of us don't mind the bitterness and in fact don't like the sweet taste of jaggery to "mar" the bittergourd.

We had this with a dal - moong dal(split green gram lentils) cooked with turnips and tempered with finely chopped onions and tomatoes - and rice. I had used five bitter gourds thinking we would have it for lunch the next day - there was hardly any left! This is actually good enough to snack on - maybe making it a bit crisper if needed.

Recipe for Bitter Gourd Stir Fry with Peanuts - HERE

Friday, April 11, 2008

Parwal Masala (Wax Gourd Stir Fry)


Parwal(potol/wax gourd) is one of those vegetables which don't even have a local name in certain regions where they are not traditionally grown while in other regions you can find them in every kind of preparation. So while tendli or kovakai is quite popular in the South and in Maharashtra, it isn't in the North. On the other hand, parwal is not a local vegetable in Maharashtra and the South, but the North and North East use a lot of it in their cooking (its is even made into a mithai in Bihar and UP!).

Parwal (Trichosanthes dioica) is basically a mini gourd - one of the family of bottlegourds (lauki/sorakai/ghiya), snake gourds (padwal/podalangai) and ivy gourds(tendli/kovakai/kundru). I love this vegetable - the crunchiness of the seeds when they are cooked and the sharpness of the edges when they are fried to a crisp.

But there are many who consider this and the other members of its family, including the tinda and the petha (ash gourd/pushnikai) to be poor summer substitutes for the rich winter fare of cauliflowers, carrot, peas and beans.

Dubbed as "patient food" by some and "peasant food" by others, its precisely their lightness on the stomach which makes them so perfect for the summer! Its low calorie and high water content makes them easy to digest and even easier to prepare. Rich in Vitamin C, dietary fiber, riboflavin and zinc and low in cholestrol and saturated fats, this vegetable is recommended by traditional healers in Chattisgarh for women who have just delivered a child, for its unique healing properties and tonic effect.

Pick green vegetables which are not very big or too soft which might mean they are mature and the seeds will be hard. The younger vegetables will be a tad lighter green, firm to touch and when you cut them open vertically, you will find creamy yellow flesh inside with tender seeds half buried. For some perfect photos of this vegetable see Indira's pictorial here.

I remember my mother making this as a spicy preparation all crisp and crunchy - so many years back in Mumbai. So I picked this up on the weekend (probably the first arrival in the market this summer) and decided that I would cook something special for myself (hubby doesn't like the crunchiness!). I had asked my best friend who was coming to Delhi on work to bring some Goda masala and when she gave it to me I knew that it was going into the parwal!

Goda masala is another childhood memory - eating half my daily meals at our neighbours house when I was a child means that the smell of this mix of spices is hard wired into my memory. What gives it its distinctive taste is dagad phool - an aromatic spice which is actually a lichen. Some recipes also call for nagkeshar - but then its like our sambar powder recipes I guess - as many recipes as the families who make them! Read more about Goda Masala and its preparation here and here.

Alu parwal is a favourite in the North while it is given pride of place in Bengal in a simple tarkari preparation called potoler dalna. Other versions I have seen is to make it with a saunf and onion tadka or a a gravy with onions and tomatoes.


What I did was to include some garlic, onions, spice powders including Goda masala,curry leaves and simply stir fry till it was nice and crispy, its edges curling up and the seeds getting all crunchy. Served with chana dal and ghiya and hot phulkas, it was simply heaven on a plate!


I am sending this dish on to Weekend Herb Blogging which is being hosted at Jugalbandi this week. This event which shines the spotlight on any herb, vegetable, fruit or flower and is the brainchild of Kalyn .


Parwal Masala


Ingredients:

Parwal (wax gourd/potol) - 1/2 kg
Onion - 1 chopped
Garlic crished - 4-5 cloves

Oil - 1 tbsp
Cumin seeds (jeera) - 1/2 tsp
Mustard seeds (rai) - 1/2 tsp
Curry leaves - 5-6
hing - pinch

Turmeric powder (haldi) - pinch
Red chilli powder - 1 tsp
Goda masala - 3/4 tsp
Salt - to taste

Method:

1. Heat oil in a non stick pan or kadai, add the mustard and wait for it to splutter. Put in the cumin seeds and then the curry leaves and the hing.
2. Add the garlic, give it a stir for half a minute and then put in the chopped onions and saute till transluscent.
3. Meanwhile, wash and chop the parwal into half vertically and then again into halves. Some people like to lightly scrape the skin, I leave it as it is.
4. When the onions are done, add the parwal and the spice powders including turmeric.
5. Fry for about 5-8 minutes, then cook covered for another 5 minutes till the parwal is cooked, stirring in between. Uncover and cook on low flame till the parwal turns crisp and its edges start curling.
6. Serve hot with dal and phulkas or rice.


Monday, March 10, 2008

Urulai Roast (Crisp Golden Potatoes)


It's been a long time since I made this dish - another one of MIL's traditional recipes which is a favourite at home. It was the perfect accompaniment to the Vendakkai Kozhambu with steamed rice, we had for lunch sometime back.

The thing I love about this dish is that its crisp brown crust gives the impression that its a product of many hours of slaving over the stove. That, or a lot of oil. Or both.

Well, the trick to this dish is simple (lots of oil and lots of time in the kitchen over one dish is simply not my style!) - the recipe uses a puree of onion and tomato and that gives the golden brown coating to the potato! Be warned, this is an addictive dish, so don't make it in small quantities.

I am sending this to Sia's Ode to Potato event ; I never did send her a pic of the mutton kurma I sent earlier; didn't get around to making it again....
This classic recipe is just perfect for an ode to the ubiquitous tuber!

Urulai Roast


Ingredients:

Potato - 4-5 big
Onion - 1 big
Tomato - 1 medium
Chilli powder - 1 tsp
Turmeric powder - 1/4 tsp
Coriander powder - 1 tsp
Salt to taste
Oil - 1 tbsp

Tempering:
Mustard seeds - 1 tsp
Curry leaves - 6-7
Urad dal - 1/2 tsp


Method:

1. Boil the potatoes in a pressure cook for 8-10 minutes (2 whistles). Cool, peel and chop into fairly big pieces. The potatoes should be just cooked and not falling apart.
2. Puree the onion and tomatoes in a blender.
3. Heat oil in a non stick pan, add the mustard seeds and when they splutter, add the urad dal , when it changes colour add the curry leaves.
4. Pour in the puree, add the chilli powder, coriander powder and turmeric powder and fry for 6-8 minutes till the tomato onion puree loses its rawness and dries up a bit.
5. Add the chopped potatoes and salt and continue frying on a low flame, taking care not to stir too much, instead jiggling the pan to break them up and turn them.
6. Keep on a low flame for about 20-30 minutes giving it shake once in a while; the puree would have turned a nice reddish brown and crusted each potato piece.
7. Serve warm with steamed rice and sambar or chapattis and dal.

Depending on the type of onion used, this dish could have a hint of sweetness to it.

Thursday, January 17, 2008

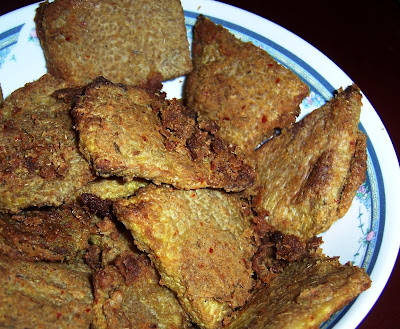
Roasted Yam Squares (Karunailkizhangu Varuval)


Yam (karunaikizhangu in Tamil, chenai in Malayalam, suran in Marathi or zaminkand in Hindi) is what we call it, but it is actually Elephant foot yam (Amorphophallus campanulatuss) - a member of the aroid family. See pics here


Yam, a starchy tuber, which is a member of the Dioscorea family, is very different from elephant foot yam and is popular in Latin America and Africa. It's name is derived from the African word "njam or djambi" which means "to eat". Pics and more info on this here.

To further complicate matters, not only do we call elephant foot yams as just plain "Yams", but those in the US refer to sweet potatoes as Yams! More on the differences here.


Now that I have cleared up that part (more for me actually, since I had my own confusion going on the difference between chenai and karunaikiliangu!), lets get on to the important stuff - eating!


Elephant yam, I have found, is restricted to specific cuisines in India. Even in Tamil Nadu where it is widely available, many people don’t like it too much and avoid eating it.

Some times when peeling the thick skin of this root vegetable, the back of the hands may itch and this puts off many people. I believe, after cooking yam for so many years, that the itching is not common and is restricted to certain types of yam or their quality. A safe way to avoid this is to apply a bit of coconut oil on the hands before peeling and handling it.
Some people recommend boiling it in tamarind extract so that one doesn't suffer from itchiness of the tongue or throat - which is also supposed to happen with this vegetable, something I haven't experienced.


The best way to buy yam is to ask the vendor to cut about ¼ - ½ a kilo from a full yam – the cut portion should be white and moist. It can be stored outside the fridge but is best consumed within 2 days of being cut, else it will dry out. The cut portion will discolour a bit due to oxidation, but that can be sliced away before cooking. It should be cooked thoroughly before eating since it contains calcium oxalates.

Cooked the right way, the vegetable tastes delicious – I like it best when it is a bit crispy on the outside and soft on the inside.
MIL’s recipe is what gets done in our house – I don’t feel the need to change a thing. Yam is cut into thick squares and cooked in a ground masala paste before being slow cooked on a tava till crisp – I finish it off under the grill – consumes less oil and I still get a crispy exterior.

The masala with fennel in it adds the most delicious touch to this dish.


Roasted Yam Squares


Ingredients:
Elephant Yam / Karunaikizhangu / Suran – ½ kg

Masala
Fennel seeds (Saunf) – 1 tbsp
Red chillies – 4-5
Grated coconut – ¼ cup

Oil – 2 tbsp

Salt to taste


Method:
1. Peel thick skin of yam with a sharp knife and wash well to remove any traces of mud.

2. Cut the yam into thick 2 “squares – about ¼ of an inch thick.

3. Boil the yam slices in a large vessel of water with a pinch of turmeric and half tsp salt till half cooked – about 5-6 minutes. If it cooks too long it will break when it is cooked again with the masala.

4. Drain water and keep aside. Grind the ingredients of the masala paste with a little water to make a thick paste.

5. Take a wide non stick pan, heat 1 tbsp of oil in it, add mustard seeds – when they pop add the curry leaves and the masala paste. Fry for about 3-4 minutes.

6. Add the par boiled yam squares to the pan and mix carefully till the paste coats them well.

7. Add salt and cover and cook for about 5-6 minutes till the yam is just cooked. Do not stir too much; the pieces might break.

8. Once the yam pieces are cooked, take a oven proof pan and lightly grease it, arrange the yam pieces on it in one layer and drizzle ½ tbsp oil over them.
Grill in a pre heated oven at 180C for about 7 minutes; then remove, turn over the slices, drizzle ½ tbsp of oil and grill again for another 5-6 minutes till both sides are brown and crisp.

9. Alternatively, arrange the yam pieces on a heavy griddle and cook them over a low flame till they are brown and crispy, drizzling oil 1 tsp at a time as needed.

10. Serve warm as an accompaniment with rice and sambar.


Monday, November 26, 2007

Podalangai Masala (Snake Gourd & Lentils)

One of the recipes I learnt from my MIL was one which was prepared, not in her maternal Mudaliar home, but by her MIL who was from Thanjavur. The base recipe for the masala was used with some other vegetables like raw banana and yam, but I liked it best when it was made with snake gourd.

Snake gourd otherwise has limited preparations that I know of, the bland poriyal category – for which I feel it isn’t crunchy enough; the chana dal kootu or dal – where it usually completely loses its character and merges with the soft lentils- and the stuffed version which is quite time consuming.

This preparation allows the snake gourd to retain it colour and at the same time spices it up with the aniseed flavoured masala. Traditionally it is a dry accompaniment to the sambar/kozhambu, rasam meal, but I have found that it also pairs well with chapattis and my husband loves carrying it in his lunch box.


The chana dal to snake gourd proportion can be adjusted according to one’s preference, I prefer more snake gourd to chana dal so that the spiciness isn’t dulled by the dal.


Podalangai Masala (Snake Gourd & Lentil Vegetable)


Ingredients:

Snake Gourd – ½ kg
Chana Dal (Split Bengal Gram) – ½ cup (soaked for 1 hour)
Masala:
Dried red chillies – 4
Aniseed (Saunf) – 1 tbsp
Grated coconut – ¼ cup
Salt – to taste
Tempering:
Oil – 1 tbsp
Mustard – 1tsp
Curry leaves – 5-6

Method:

1. Wash and peel the snake gourd, then slice it vertically into half. Remove pith and seeds and cut into semi circles horizontally.
2. Cook the chana dal in water till just tender, it should not get overcooked and mushy. You can cook this on the stove top or in a pressure cooker for just one whistle. Ideally, it should still have a little bite to it so that it can cook some more with the masala and the snake gourd.
3. Grind the masala ingredients to a paste adding a little water adding as little water as possible.
4. Heat oil in a kadai/wok; when hot add mustard seeds and when they pop add the curry leaves.
5. Add the chopped snake gourd and stir fry for 3 minutes on high. Then reduce flame, add the masala and fry for 3 minutes more.
6. Add salt and ½ cup of water or just enough to cover the snake gourd, cover and cook on low for 3-4 minutes till the snake gourd is half cooked.
7. Add the cooked chana dal to the half cooked snake gourd, adjust salt and then cook for another 5 minutes till the snake gourd is fully cooked and the masala becomes dry and chana dal is soft and mixes well with the vegetable and masala. Add a splash of water if needed.If there is excess water; increase the heat so that it dries up.

Note: The chana dal shouldn’t get mashed, so if it is already very soft after cooking, then it should be added right at the end to the vegetable and not stirred too much, so that it remains whole and doesn't fall apart.


Phulkas, Masur Dal and Podalangai masala

Edited to add: Some people asked me about snake gourd and how it looks etc, so I am posting a pic of the one half I had left, unpeeled and the insides too.


Monday, November 12, 2007

Beetroot Poriyal (Foogath)

There’s something really satisfying about porials (also called foogath), something I have been able to appreciate only in the last decade or so. The tiny chopped vegetables, sautéed in minimal oil, tempered with mustard and curry leaves, steam cooked till just tender and crunchy and then finished with a garnish of grated coconut.
Beans, carrot, cabbage, beetroot, chow chow, snake gourd – all these taste just right to me cooked this way, their colours still intact. Cabbage, in fact, I used to hate till I figured out that it was the overcooked, wilted, turmeric yellow appearance that I disliked, but loved it when it was all crisp, white and delicately flavoured. I learnt to like these veggies when Maragatham cooked for us – she was our neighbour's cook who cooked for us for about a year and she used to turn out perfectly cooked porials time after time.

I think most Indian cuisines have this in various versions - upkaris/shaak/poriyal

My daughter seems to have caught on much earlier than I did – she loves porials and will often ask for more while refusing another spoonful of rice – I happily give in.

The other day,I made puli kozhambu and cooked beetroot porial to go with it. I have always thought of porials as being the perfect foil to fiery kozhambus, sort of balancing the spice and sourness with their nutty flavor.


Beetroot porial


Ingredients:

Beetroot – ¼ kg
Mustard – 1 tsp
Chana dal - ½ tsp
Urad dal – ½ tsp
Curry leaves – 5-6
Green chillies - 2
Salt to taste
Oil – 1 tsp
Grated coconut – 2 tbsp

Method:
1. Wash beetroot, peel and chop finely.
2. Heat oil in a kadal, add the mustard seeds, when they begin to pop, reduce the flame and add the green chillies, chana dal and urad dal and wait till they brown a bit – ½ minute. Add the curry leaves and stir.
3. Add the chopped beetroot and salt and mix well on high for 1 minute, reduce flame, sprinkle 2 tbsp water, cover and cook on low for 4 minutes. Remove lid, check if cooked, sprinkle some more water if not and cover and cook for another 2-3 minutes till just tender.
4. Add grated coconut just before removing from fire.


Note: The key to a good porial is to make sure the vegetables retain their colour and texture and are not overcooked. Less oil and steam cooking helps in this, as does cutting them finely so that they cook faster and more evenly.