Showing posts with label vegetables. Show all posts

Tuesday, January 24, 2012

Spicy Punjabi Winter Vegetable (Gobi,Shalgam,Gajar ka Achaar)

Finally - yes, finally - managed to make these two wonderful winter pickles so typical of North India. I have had this Punjabi winter pickle quite a few times after coming to Delhi and loved the crunch of the vegetables in that piquant sweet and spicy mixture. I have been eyeing Anita's recipe for it for some time now and as soon as the fresh winter vegetables started flooding the market and the prices hit rock bottom, I made sure to buy a couple of kilos and get down to pickling before it was too late.
 

We don't normally enjoy sweet pickles but Anita's recipe is really, really good - not overwhelmingly sweet but just the subtle touch which is needed to offset the warm spices of cardamom and cinnamom added to it. Its almost like a vegetable you can have on the side with practically everything rather than an actual pickle!.
For step by step instructions and the complete recipe - look here in A Mad Tea Party. I used the same proportions but halved the quantities of all ingredients.

In addition to the slightly sweet one, I also made a spicy one based on my neighbour's mother's traditional pickle - Aunty is not doing too well and this is probably the first year she wasn't able to make her pickle and kanji - get well soon Aunty, we are all rooting for you!


 The important thing to remember is to make sure the vegetables are cut into roughly the same sizes and are easy to eat rather than in huge chunks. Also, they should be dried thoroughly before pickling. The spoons you use should be clean and dry and the bottles as well. Moisture can make pickles spoil very soon. The vegetables are usually left out in the winter sun during the dayfor a week or so but since they are anyway enjoyed crunchy it doesn't matter if they don't get "sun cooked". I think the sunning may have been more to ensure that there is no spoilage?

I am sending to this Indrani's event - Spotlight - Winter Vegetables


Spicy Punjabi Winter Vegetable (Gobi,Shalgam,Gajar ka Achaar)

An authentic Punjabi recipe given by Aunty K

Cauliflower, Radish and Carrot - 1 kg totally - about 300gm each of the radish and carrot - 500gms for the cauliflower because the stems will come off.
Red chilli powder - 10gms (about 1 tbsp)
Salt - 30gms (about 2 tbsp)
Mustard Powder - 1 tbsp
Mustard Oil - 2 ladlefuls (about 200ml)

(I also added a tbsp of freshly crushed ginger and garlic which I fried for a minute in a tbsp of the mustard oil before adding to the vegetables)

1.Wash the vegetables thoroughly. Cut the stalks off the cauliflowers. Lightly peel the radish and carrots after chopping off the tops and tails.
2. Cut the carrots into 2" long batons, separate the cauliflower into medium sized florets and cut the radish into slices roughly the size of the carrots.
3. In a large vessel, bring to boil a litre of water and then blanch the cut vegetables for 3 minutes.
4. Drain and then spread on a clean cloth and dry in the sun completely.
5. Combine the mustard powder, salt and chilli powder in a large bowl and then rub onto the dried vegetables. Spoon into a large, clean glass jar.
6. Heat the mustard oil till smoking point and then turn off the flame. Cool slightly and pour into the jar over the vegetables.
7. Close the jar (or cover with muslin cloth) and keep in the sun for 2 days.Shake and mix well.

These are best eaten in a couple of months when the vegetables are still crunchy - serve with paranthas, khichdi, curd rice, dal chawal - actual anything!

Monday, December 19, 2011

Mushroom, Miso, Tofu Noodle Soup


One of  my dear friends who is now in Hong Kong sent me a packet of miso paste (among other goodies!!). I have heard a lot about miso and even had it in a lovely miso soup in a Japanese restaurant called Ai in South Delhi. The umami flavour it imparts to a dish is amazing.

Miso is made out of fermented soybeans, salt and the same bacteria which is used in making soy sauce and sake. This bacteria, I coincidentally found out, boosts the good flora required for digestion in the intestinal tract - which means its particularly good for me! It is also supposed to be good for the immune system - so perfect to keep those sniffles away just when they are about to begin. Read more here.

I used mushrooms, spinach and tofu to make a very flavourful vegetable miso soup and added noodles so it became a nice one pot meal. Perfect for a cold, winter's day but light enough for the summer as well. The miso did really add a very unmistakable flavour to the soup and left you wanting for more - I suggest larger quantities next time!

Mushroom, Miso and Tofu, Noodle Soup
   
Miso paste – 1 tbsp
Spinach – 1 cup sliced into small strips
Carrot -1,  sliced into rounds
Mushrooms – 100gms, sliced
Tofu – 100gms, cubed
Noodles -150gms (I used egg noodles, you could use Udon or Soba)
Onion – 1 medium , sliced
Spring onions – 2 sliced (white part, reserve green for garnish)
Ginger – 1” piece, minced
Garlic – 4 cloves, minced
Green chillies – 2 slit
  1. Heat 1 tsp oil in a large pan and sauté the onions, chillies, garlic and ginger for a minute.
  2. Add the carrots, mushroom and sauté 1 minute and then add 8 cups water and bring to a boil. Add ¼ tsp salt and simmer, covered, for 3-4 minutes.
  3. Add the noodles to the boiling water and cook as per package instructions.
  4. Meanwhile, dissolve the miso paste in 3 tbspof the soup from the pan and add back to the pan.
  5. Taste and add more miso to the soup if you require a stronger flavour.
  6. Add the tofu cubes, spring onion slices and the spinach and cook for another 2 minutes.
  7. Serve noodles in soup bowl and then ladle the soup over the noodles. Garnish with spring onion greens.
This is a superb soup to have anyway, so if you don't have the miso paste, just make it using a stock cube and it should be a comforting, delicious meal.

    Tuesday, December 6, 2011

    Murungakkai Kathirikai Thokku (Drumstick Eggplant Curry)


    It's only after posting on the blog that I realise how many of my MIL's recipes have been included in our home cooking routine. I'm glad of course, since its always a good thing to carry forward traditional recipes so they aren't forgotten, but its happened very unconsciously. The Mudaliar style of cooking was a bit different from what I had been used to growing up and since I love trying new things I ended up liking quite a few dishes (ok, still can't deal with the omelet with sambar rice combinaton which is a favourite in some of his cousin's homes!) from her repertoire. This Brinji and this Urulai Roast are great examples of the delicious dishes she turns out and much appreciated in our home as well as whoever has tried it out. And of course that one pot wonder called Bisebele Bhath!


    The dish I have posted today features an unusual (to me atleast, since I hadn't come across it before) combination of drumsticks and eggplants. Drumsticks (for those in the West who may not know about it) are a vegetable (Moringa Oleifera  from the Tamil word Murungakkai) of the genus Moringa. They are thin and slender stick shaped (hence the name) - hard outside and fleshy inside. They are rich in calcium and phosphorus. The leaves are cooked and eaten too when tender and are known to increase breast milk production in lactating mothers. The flowers too are cooked and in some places the roots as well.

    Drumstick Sambar is one of my favourites - the flesh takes on the flavours of the tamarind and spices and its just great to scoop it out along with the soft seeds and savour the taste. This dish combines the drumsticks with eggplants in a slightly spicy, tangy, tomato based curry. Its a semi gravy dish we call thokku (and usually much thicker than what's in the pic; this was for the lunch box so made it with a litte more curry than usual). MIL adds sambar powder to the spice mix andI feel it really brings out the flavours. The soft eggplant along with the drumstick make for a great combination, especially dunked in that lovely curry. A must try!

    Murungakkai Kathirikai Thokku (Drumstick Eggplant Curry)


    Ingredients:

    Drumstick - 1 big or two small, cut into 2-3 inch pieces
    Eggplant (Brinjal) - long variety, cut into long fingers and dunked in salted water to prevent browning
    Onion - 1 big, chopped
    Tomatoes - 2 medium, chopped
    Tamarind extract - 5-6 tbsp (if using readymade pulp, 1tbsp should do)
    Chilli powder - 1 tsp
    Coriander powder - 1 tsp
    Sambar powder - 1/2 tsp
    Turmeric powder - 1/4 tsp

    Tempering:
    Mustard seeds - 1 tsp
    Curry leaves - a handful

    Oil - 1 tbsp
    Salt to taste

    1. Heat oil in a wide, heavy bottomed pan. Add the mustard seeds and when they pop add the curry leaves. Meanwhile par boil the drumsticks in water for about 5 minutes (they should not be fully cooked)
    2. Put in the onions and saute till soft. Add the tomatoes and fry till pulpy, then add the spice powders - chilli, coriander, sambar and turmeric - and saute on low till the oil shows through - about 5-6 minutes
    3. Add the eggplant and fry for 3-4 minutes till they soften a bit, then add the drumsticks and salt and 1/4 cup of water. Bring to a boil and then simmer, covered, for another 5-7 minutes till the vegetables are cooked through but not squishy.
    4. Add the tamarind juice and some more water if needed and simmer uncovered on a medium flame for another 5 minutes till the raw smell goes away and the curry thickens.
    5. Serve with rotis or rice.

    Sunday, November 13, 2011

    Bisibele Huli Anna (One Pot Meal of Spiced Rice, Lentils and Vegetables)


    I was introduced to this beautiful dish in MIL's home - she had learnt it while living in Bangalore when FIL was posted there in the 70s. This is a dish from Karnataka and she explained to me that Bisibele Huli Anna in Kannada literally meant -" piping hot lentils, tamarind and rice". Hubby loves this one pot meal and MIL is an expert at turning this out in the rice cooker at short notice for guests, for a meal which receives a lot of praise.

    There is an interesting anecdote I have regarding this dish. In the early days of our marriage, sometimes when I was tired at the end of a long day I would ask hubby as to what he would like to eat he would say "why don't you just cook Bisibele Bhath"? It puzzled me why someone who was usually looking to save me from spending too much time in the kitchen, suddenly asking me to make something which is a lot more work than normal. I figured out after a long time that he thought that Bisibele Bhath was just sambar and rice cooked together - which was of course much easier wasn't it? sorta like making khichdi?!! I had to explaint to him that it was much more complicated than that and actually involved grinding a spice mix from scratch.

    Talking about the spice mix - I disagreed a lot with MIL about the spice mix she uses and finally after doing a bit of research and cooking the dish a few times, came to a mix of spices which I feel is the best tasting for this dish. I basically don't like it too heavy on the whole spices like cinnamon and cloves and tone them down taking care not to tone it down so much that the dish tastes bland - it has lentils and rice after all as the main ingredients, so don't want it becoming just a plain khichdi. I'm also particular about the vegetables I use and don't agree with MIL's tendency to put in whatever's at hand - including bottle gourd (dudhi/lauki) and wax gourd (parwal) sometimes! I tend to stick to carrots, beans, peas and potatoes. I know - shocking for someone who otherwise substitutes with such ease!

    What my MIL excels at is the exact ratio of lentils, rice, tamarind and spice mix - it took me sometime to get that right so as to not end up with a stodgy dish or worse, one that had too much tamarind or was too spicy. I now realise that its quite easy to make it as long as one breaks it down to its components - the dal and rice cook together and then cooked again with the spices, tamarind juice and vegetables till it all melds into a beautiful symphony of flavours and a delicious one pot meal.

    We had this for Sunday lunch along with these Crispy Potatoes or Urulai Roast - another speciality of MIL's.  We were joined by our neighbours from upstairs for lunch that day so the company made it an even nicer meal.

     Just a reminder that I have a Giveaway on my blog and its the last couple of days to participate - so hurry over and leave a comment to win a beautiful cookbook!

    Bisibele Huli Anna


    Rice - 1 cup
    Tur Dal (Arhar/Tuvaram parripu) - 3/4 cup
    Tamarind - small lime sized ball soaked in a cup of water
    Vegetables - diced carrots, beans, potatoes, peas - 2 cups

    Oil - 1 tbsp
    Ghee - 1 tbsp and some more to serve
    salt to taste
    turmeric powder - 1/2 tsp
    Coriander leaves

    Spice Mix:
    Red chillies - 4-5
    Coriander seeds - 1 tbsp
    Cumin seeds - 1 tsp
    Methi seeds - 1/4 tsp
    Black Pepper - 1/2 tsp
    Cinnamon - 1
    Cloves - 2-3
    1 tsp chana dal
    1 tsp urad dal
    1/2 cup grated coconut

    Tempering:
    Mustard - 1 tsp
    Hing (asafoetida) - pinch
    Curry leaves - 5-6

    1. Cook the rice and lentils together with the turmeric, in a pressure cooker - use a little more water than usual so they are cooked well and a little mushy.
    2. Meanwhile roast all the ingredients for the spice mix, except the coconut, in a tsp of oil and then add the grated coconut at the end and roast for 2 minutes more. Cool and grind to a fine paste.
    3. Extract the tamarind juice and keep aside.
    4. In a heavy bottomed pan, add the ghee and oil and when hot, add the tempering ingredients. When the mustard pops, add the spice mix and vegetables and fry.
    5. Sprinkle some water and cover and cook till the vegetables are par boiled.
    6. Then add the cooked rice and lentils, one cup of water as well as the tamarind juice and salt and bring to a boil. Lower flame and simmer for about 10-12 minutes till well blended but still runny and not dry. Add some more water if needed.
    7. Serve hot with a drizzle of ghee on top. Garnish with coriander leaves.

    Tuesday, October 4, 2011

    Vegetable Biryani - The Party Pleaser

    This is one of the first biryanis I tried when we started entertaining and I wasnt still comfortable cooking meat or chicken. So I would stick to a chicken curry and stay safe with the rice.  Plus in Chennai, we had friends who were vegetarians and it made sense to have one main which everyone could enjoy. More convenient for me as well to come home after work and just concentrate on a few things for dinner. 

    But this biryani is definitely magical - good times assured and some very satisfied diners. Every. Single. Time. Don't take my word for it - go ahead and try it. I used to think it may have been all that rum and cola we DINKS were consuming - but no, its improved its reputation even as our choice of drinks has become a little  more diverse and refined. And now, since my repertoire has expanded in the past 14 years, I make this as a Sunday lunch as well - its no longer a "party dish" alone. 

    I do have a confession though - part of this dish's popularity is aided by the addition of a ready made ingredient - Parampara Biryani Masala. It doesn't completely rely on it, but the taste definitely improves with the addition. You could replace with some other commercial biryani masala - I have tried Everest which works well too. 

    This is going to Tickling Palates' event Hibernative Foods - she says our ancestors instinctively prepared foods which matched the seasons. Which is why, she says, the festival season from Dasera to Diwali during the cooler months, sees a surfeit of protein rich and fatty foods like sweets and savouries. So, the brief for this month was to prepare food rich in proteins as well as fat. Biryani of course is definitely a winter dish with its warming properties....and its a rich dish with protein and fats in the form of the vegetables, ghee and yoghurt.


    Rice - 2 cups
    Cloves - 3-4
    Cardamom - 2-3
    Cinnamon -2 sticks
    Bay leaves - 1
    Oil - 2 tsp
    Salt


    Onions - 2 big, sliced thin
    Tomato - 1 meidum chopped
    Chopped veggies - 2 cups (carrots, beans, peas, mushrooms, bell peppers)

    Yoghurt - 1 cup
    Ginger garlic paste - 2 tsp
    Green chillies - 3 slit long
    Red chilli powder - 1/2 tsp
    Biryani masala - 2 tbsp (Parampara paste is what I use)
    Coriander leaves - 1 tbsp chopped
    Mint leaves - 1 tbsp chopped
    Ghee / oil - 3-4 tbsp
    salt

    1 Cook basmati rice in lots of salted water along with bay leaves, cloves, cinnamon, cardamom,cardamom and oil till it is three fourth cooked. Drain the rice, fluff with a fork onto a platter and keep aside.
    2 Heat the ghee or oil in a heavy bottome pan, add the sliced onions, saute for 8-10 mts till nice and brown. Reserve half of the onions for garnish.
    3 In the same pan, add the ginger garlic paste,green chillis, mint leaves and coriander leaves lightly fry for 2-3 minutes.
    4. Add the red chilli powder and biryani masala along with the chopped tomatoes and fry for 3-4 minutes.
    5. Add the yoghurt and salt and mix well. Cook for 5 minutes till the masala comes together well and then add the vegetables, fry 2 minutes and cover and cook till just tender. Turn off flame and keep aside.
    6. .In a baking dish, smear some oil at the bottom and arrange half of the par boiled rice in an even layer.
    7. Take the vegetable yoghurt masala mixture and spread evenly over the rice
    8. Spread the remaining rice over the masala, top with the fried onions and some more of the coriander and mint leaves.
    9. Cover with foil and bake in a pre heated oven at 190C for about 30 minutes. let rest uncovered for about 5 minutes before removing the foil.

    Sunday, February 20, 2011

    Kadgi Sukke (Green Jackfruit Stir Fry)


    Sukke is a Konkani preparation of vegetables - a stir fry with spices which have a coconut and tamarind base. One of my favourites of Konkani cuisine - something I got acquainted with at my best friend's house when I was in college. I practically lived there when I was doing my post graduation - it was like coming home when I went over there on the weekends. And definitely the food was such a relief from the terrible hostel food and then our own cooking when I was living in a flat with 4 other girls.

    I simply love jackfruit - have you eaten it drizzled with honey? its like ambrosia. But I have never cooked unripe jackfruit before - so when I saw it all nicely cut and cleaned in packets at my local vegetable vendor, I decided to give it a go. The original idea was to try the kathal biryani I had seen in Pratibha Karan's Biryani book, but then I remembered this dish and suddenly started hankering for that combination of sweet, sour and spicy with the meat-like consistency of jackfruit. This is Sandhya Aunty's recipe for sukke - I love her cooking :)

    This was Saturday lunch for us - dal, roti/rice, kadgi sukke, milagu rasam and papad. The milagu rasam (a thin soup which is liberally spiced with black pepper-recipe in another post) was perfect for the weather and for hubby who was coming down with a cold. Happiness on a plate.


    Kadgi Sukke (Green Jackfruit Stir Fry)

    Tender, green jackfruit, chopped in 1" piecessalt, turmeric powder
    jaggery - 2 tbsp

    5 red chillies
    1 tbsp coriander seeds
    1/4 tsp fenugreek seeds
    2 tsp tamarind paste
    3/.4 cup coconut grated

    Mustard seeds - 1 tsp
    Currry leaves - handful
    Coconut oil - 2 tsp

    1. Clean and cut the jackfruit pieces in to 1' pieces and keep aside. Cook the pieces till done, in just enough water and turmeric powder - about 8 minutes.
    2. Roast the red chillies, coriander seeds, fenugreek seeds in half a tsp of oil, then grind to a paste along with the tamarind and the fresh coconut.
    3. Heat the coconut oil in a pan, add the mustard seeds to it-when it pops, add the curry leaves.
    4. Add the masala paste and the cooked jackfruit and simmer together till well blended and almost dry. Add the jaggery and mix well.

    Sunday, January 16, 2011

    Anita's Gogji Nadir (Turnips and Lotus Root)- Kashmiri cuisine in my kitchen


    Gogji Nadir is this subtle dish from Kashmiri cuisine which combines turnips(shalgam/nulkol) and lotus root (kamal kakri/bhein)- a combination that I have never had before. In fact, these two vegetables don't make an appearance very often in my shopping bag - turnips, I do buy for about two months during winter because they make a good addition to the vegetables we eat. They are almost like potatoes in that sense - easily adaptable and go well with many other vegetables. But lotus stem I tend to ignore for the most part - most of the recipes I have tried just involve frying them till crispy; I do love the baked recipe on Jugalbandi though.

    But the moment I saw this dish on Anita's blog, I knew I had to make it. The recipe is simplicity itself - less than 5 ingredients - and gets made in a jiffy. The fact that you are using vegetables which are in season makes it unnecessary to smother it with a lot of spices - the crisp flavours  of the vegetables shine through in this dish and the broth is light and inspiring. There's just some chillies,mustard oil, asafeotida and it all comes together quite nicely. The soft turnips go well with the crunch of the lotus stem - I guess you could substitute with other veggies (Anita recommends a kohl rabi combination with lotus root for another dish called Monji Nadir), but even I, who am not a stickler for recipes, would really recommend sticking to this combination. By the way, did I tell you that we had a mini blogger meet last month? Manisha (from Indian Food Rocks), Anita and I met at Anita's place for lunch - en famille - and we had a great time talking about food, eating food and then talking some more! It was great fun and yes, Anita does cook like a dream - her Mutton Kalia was just outstanding with the stew simmered till the meat was falling off the bone!

    Anita's recipe has detailed pictures including exactly how the vegetables are cut for this dish - I just added one more chilli and a pinch of coriander powder. Simply Superb. Try this - the winter in Delhi has been severe for a couple of weeks, but over the weekend it looked like it might end very soon, so I am going to make this a few more times while I have fresh vegetables around. The fact that turnips are cheaper than onions and tomatoes helps as well!

    Anita's Gogji Nadir (Turnips and Lotus Root)
    Adapted from this recipe from A Mad Tea Party

    Sunday, September 12, 2010

    Jhaal Jhol - Mixed Vegetables in a Spicy Mustard Curry and Mustard, Lemon and Coriander Grilled Chicken


    I follow Bong Mom's Cookbook very closely - seem to identify with the general disregard for rules where cooking is concerned, her penchant for adaptation and the close relationship she shares with her daughters. Plus she spins some fabulous golpo :)

    I have been able to try more than a few recipes from her repertoire - especially Bengali cuisine. I have made a couple of the fish recipes, but the vegetarian recipes fascinate me with their lilting names - Charchari, Tara Tari Paanch Mishali, Shorshe Begun.....they call out to me to discover what they must taste like. So, one Sunday afternoon, while we were lying sprawled around the house after a heavy breakfast of puris and kurma - "pythonish" - as the household idiom goes; I wondered what to cook for lunch. Something light...hmm, maybe rasam, rice and a porial. Naah....not porial today - too bland for what I was craving right now this cool, rainy day in September. No coconut based masalas after the kurma in the morning....so what else can I make. I open the refirgerator and meditate in front of the crisper until the 'fridge beeps indignantly at being left open for so long. I look at the summer vegetables we have - now restricted to the gourd family since we have already eaten cauliflower, potato and carrot in the kurma.

    And then I think of the other cuisine with a penchant for using as much of a variety of vegetables as we do in the South - ridge gourd, bottle gourd, bitter gourd, radish, pumpkin - Bengali cuisine. And not only do they love all the variety but they also like to mix it up together into one dish - all the better to have a perfect melange of sweet, sharp, bitter and sour flavours.

    I remember my Bong friend here making a maacher jhol- a thin, light curry which had the pungency of mustard underlying it. And then I thought of the Charchari on Bong Mom's blog as well. As always I wanted everything; I wanted the mixed vegetables in a jhol like curry rather than the semi-dry consistency of the Charchari and I wanted the pungency of the mustard as well. So I adapted this recipe  - Borar Jhol/Jhaal Whatever (her title, not mine!)- secure in the knowledge that since she herself had adapted the recipe from her Mom's repertoire, she wouldn't mind. Especially, since I did stick to her Mom's tweak to the original recipe to make it jhaal (spicy) - so what if the daler bora (lentil fritters) were replaced with mixed vegetables? Wasn't the bora itself a replacement for the fish in Macher Jhol?

    Armed with these justifications, I ground the mustard paste (shorshe bata) - managed to avoid the bitterness that she cautions may happen while using a blender. My theory is that a low wattage blender (like a coffee grinder) may overheat if run for too long and therefore turn the paste bitter. So if you are using one, grind it on slow, with breaks in between.
    I also used yellow mustard seeds since I find that black mustard seeds tend to be bitter sometimes. I used 4 tbsp of yellow mustard seeds soaked for 20 minutes in warm water along with 1.5 tbsp of poppy seeds (khus khus) and ground together with 2 green chillies to a smooth paste adding two tsp of water at a time. Be patient.

    For the vegetables, I diced raw bananas, egg plant, bottle gourd and ridge gourd - didn't have pumpkin or bitter gourd which I would have loved to include. I did not steam them separately and instead cooked them in the curry itself after frying them for 3 minutes - this way they didn't get overcooked and mushy, as gourd vegetables sometimes do, and also absorbed the spice paste beautifully.

    The jhaal jhol was amazingly flavourful - the mustard-chilli paste gave the right amount of heat to the dish for us; though for people who find it too spicy, they can omit the red chilli powder - Bong Mom says she usually doesn't use red chilli powder for preparations with the mustard paste. The mustard paste in this case was an addition made later by her mother to the dish - something which according to me, takes this dish from simple to sublime! We had this mixed with rice and it was lip smackingly delicious. This one is going to become a staple in our house.

    Recipe adapted from this one


    Tempering of nigella seeds and asafoetida as per the recipe, then the onion and tomato (I used 1 medium one each, chopped fine) and 1 tsp of ginger garlic paste (since I didn't have ginger paste).
    Skipped the potato and turmeric and went straight on to the coriander, chilli and cumin powders.
    Then the diced vegetables (eggplant, bottle gourd(lauki/sorakai/dudhi),smooth ridge gourd (turai) - about 2 cups) fried for 3 minutes and then cooked cover in 1.5 cups of water and salt to taste for about 8-10 minutes. The vegetables should be cooked through and soft but not mushy.

    Remove from flame and serve warm with rice.

    This goes to Nupur's event Blog Bites 7 - the Iron Chef Edition - where we have to pick one ingredient and cook it two ways using recipes from other food blogs. My ingredient of choice for this event is Mustard - something we take for granted in Indian cooking, but one that has many more uses than the basic tempering we are used to.

    The other recipe I have picked is Kalyn's Mustard, Lemon and Coriander Grilled Chicken Breasts - something which I knew would go down very well with us, having cooked similar recipes before. This was the first time I was including mustard though, but seeing that this was from Kalyn's Kitchen, I didn't have a shred of doubt on how it would turn out.


    Kalyn's recipes are all tried and tested and beautifully healthy as well. Her blog is a treasure trove of information on healthy recipes, especially suited to the South Beach diet. Her step by step instructions are a testimony to the time andenergy she spends creating these menus/recipes and meals.

    Her casseroles are a favourite at home and I have tried many of her other one pot meals. This recipe is no exception - the marinade of mustard,olive oil, coriander and lemon juice worked beautifully on the chicken and I also mixed in about a half a tablespoon of the mustard paste which was made for the dish above. I used English mustard instead of Dijon mustard and added a tsp of black peppercorns while grinding the coriander leaves for a little more heat.

    Breast pieces with bone were used instead of boneless pieces. The preparation was also a bit different - I flash fried the chicken breasts for 3 minutes on each side in a frying pan and then baked it in an oven for 35-40 minutes at 180C, turning once half way. The top was nice and crispy while the insides were beautifully cooked and tender. Served this with pasta tossed in a light, sauce with tomatoes and herbs.

    A must try.

    Tuesday, November 18, 2008

    Stuffed Bell Peppers

    I know I have been away for too long - this post has been languishing in my drafts for a whole month!! Blame it on work, travel, school admission stress and having a life outside of the blog! To make up - here is a simple but favourite of mine.

    This post on stuffed jalapenos triggered a long lost memory of some amazing stuffed capsicums my mother used to make when we had just bought our new OTG (Oven-Toaster-Grill) so many years ago. Then the novelty wore off and with it the oven recipes too. My brother and I loved those cheesy potato stuffed morsels encased in the roasted cup of a capsicum. There is something completely addictive in that combination.....

    I instantly abandoned the baingan bharta plan I had in mind for dinner and switched allegiances to the bell peppers instead. Boiled some potatoes, mashed them along with spices, stuffed them into the peppers, topped the peppers with cheese and baked them. In half an hour, there was my childhood memory on a plate - still as delicious as ever! Called my mother and told her about it - she was surprised I even remembered, she says she hardly made it a few times....I wonder what my daughter's favourite memories will be.

    I had some stuffing left over so I decided to add some tomatoes - they were good, but not as good as the peppers. Though I know some people like tomatoes better.

    I am definitely going to try the recipe with the cheese stuffed jalapenos. The different cheeses and jalapenos may be a bit difficult though, so I might do some tweaking of my own. The egg wash and bread crumbs is a good idea though.

    Stuffed Bell Peppers


    Bell Peppers (Capsicum) - 6-8 small
    Boiled potatoes - 4 medium
    Red chilli powder - 1 tsp
    Cumin powder - 1/2 tsp
    salt to taste
    Oil to smear on the peppers
    Grated cheese - 1/2 cup

    1. Mash the potatoes and mix with red chilli powder and cumin powder and salt.
    2. With a sharp knife, cut the tops of the peppers out and scoop out the seeds and stalks from inside without damaging the pepper.
    3. Fill the peppers with the potato stuffing and top with grated cheese.
    4. Smear the outside of the peppers with oil and then bake in a pre heated oven at 350F or 180 C for about 30 minutes, turning once in between.
    5. Its okay if the peppers don't stand upright, if properly stuffed, the stuffing won't fall out.

    Friday, May 16, 2008

    Mixed Vegetable Kadhi

    This is a spin on the classic Kadhi Pakoda. I am not a fan of fried stuff floating in liquid - whether it is dahi wadas or vadai curry, but I do love yoghurt based dishes. So, it was a matter of time before I appropriated this dish and made it my own.

    I love the flavours the vegetables bring to the plain yoghurt and the best part of it is of course the tempering ingredients. They lend an unmistakable touch to the dish and I think there must be some culinary link based on either Ayurvedic or similar principles between the yoghurt based dishes made in different parts of India.

    Otherwise, how does one explain the dhania and methi seeds ground into the Mor Kozhambu of the South appearing in the tempering of the Punjabi Kadhi and Gujarati kadhi (only the methi there though), the mustard and hing in the tempering of these dishes and of course the thickening of the yoghurt with gram flour (besan) in kadhi and the chana dal(bengal gram dal) ground into mor kozhambu.

    Maybe thats where the saying "Ab dudh ka dudh or paani ka paani ho jayega" originated - they were referring to yoghurt all along! :0)

    But coming back to topic - there is a reason yoghurt based dishes are found in almost all regional cuisines of India. Curd or yoghurt is traditionally known to have cooling properties - a much prized quality during the heat of an Indian summer.

    But besides this there is a nutritionally sound reason for including curd in our day-to-day diet. The lactose (natural sugar) found in milk when allowed to ferment into curd, changes to lactic acid - a factor which enhances the absorption of calcium by the body.

    Tempering (tadka/baghar/thalimpu/poppu) is an intrinsic part of Indian cooking and imparts a distinctive flavour to any dish. Do you know its other benefits?
    • The hing (asafoetida/perungayam) used to temper dals makes it easier to digest protein heavy pulses and avoid flatulence.
    • Certain vitamins are only soluble in fat and require a medium for release - e.g vitamin A found in carrots and the carotene in curry leaves(karuvupellai/karipatta).
    • Essential fatty acids required by the body are found in the vegetable oils used for tempering as also in mustard and urad dal.
    So, the next time someone at home complains about the tadka smell remind them of the good it does (the tadka, not the smell!).


    Mixed Vegetable Kadhi

    Kadhi went well with peas pulao and stuffed eggplant


    Ingredients:

    One cup chopped mixed vegetables - I use any three to four of these vegetables- carrot, beans, capsicum, yam, peas, potato

    2 cups yoghurt - whisked smooth
    2 cups water
    One tablespoon gram flour (besan)

    salt to taste
    turmeric

    Tempering:
    Oil - 2 tsp
    Coriander seeds (dhania) - 1 tsp
    Fennel seeds (saunf) - 1 tsp
    Fenugreek (methi) - 1/4 tsp
    Mustard seeds (rai) - 1 tsp
    Red chillies - 2
    Asafoetida(hing) - a pinch

    Method:

    1. Mix the water with the curd and whisk till smooth. Take a little of the mixture and mix in the gram flour so that there are no lumps. Combine this with the rest of the diluted yoghurt along with salt and tumeric.
    2. Take a large pan and add the yoghurt mixture and heat on a low flame.
    3. Meanwhile take a smaller wok and heat the oil for tempering. Add the mustard seeds and when they pop, add the fennel seeds, methi seeds, dhania seeds, red chillies and hing. Saute 1 minute
    4. Add the chopped vegetables to the tempering and saute for 2 minutes, then cook on a low flame for another 5 minutes till almost cooked.
    5. Transfer the tempered vegetables to the simmering yoghurt mixture and continue cooking on a low flame for another 10 minutes till it thickens and the besan is completely cooked.
    6. Serve with chapatis or rice.

    Friday, April 11, 2008

    Parwal Masala (Wax Gourd Stir Fry)


    Parwal(potol/wax gourd) is one of those vegetables which don't even have a local name in certain regions where they are not traditionally grown while in other regions you can find them in every kind of preparation. So while tendli or kovakai is quite popular in the South and in Maharashtra, it isn't in the North. On the other hand, parwal is not a local vegetable in Maharashtra and the South, but the North and North East use a lot of it in their cooking (its is even made into a mithai in Bihar and UP!).

    Parwal (Trichosanthes dioica) is basically a mini gourd - one of the family of bottlegourds (lauki/sorakai/ghiya), snake gourds (padwal/podalangai) and ivy gourds(tendli/kovakai/kundru). I love this vegetable - the crunchiness of the seeds when they are cooked and the sharpness of the edges when they are fried to a crisp.

    But there are many who consider this and the other members of its family, including the tinda and the petha (ash gourd/pushnikai) to be poor summer substitutes for the rich winter fare of cauliflowers, carrot, peas and beans.

    Dubbed as "patient food" by some and "peasant food" by others, its precisely their lightness on the stomach which makes them so perfect for the summer! Its low calorie and high water content makes them easy to digest and even easier to prepare. Rich in Vitamin C, dietary fiber, riboflavin and zinc and low in cholestrol and saturated fats, this vegetable is recommended by traditional healers in Chattisgarh for women who have just delivered a child, for its unique healing properties and tonic effect.

    Pick green vegetables which are not very big or too soft which might mean they are mature and the seeds will be hard. The younger vegetables will be a tad lighter green, firm to touch and when you cut them open vertically, you will find creamy yellow flesh inside with tender seeds half buried. For some perfect photos of this vegetable see Indira's pictorial here.

    I remember my mother making this as a spicy preparation all crisp and crunchy - so many years back in Mumbai. So I picked this up on the weekend (probably the first arrival in the market this summer) and decided that I would cook something special for myself (hubby doesn't like the crunchiness!). I had asked my best friend who was coming to Delhi on work to bring some Goda masala and when she gave it to me I knew that it was going into the parwal!

    Goda masala is another childhood memory - eating half my daily meals at our neighbours house when I was a child means that the smell of this mix of spices is hard wired into my memory. What gives it its distinctive taste is dagad phool - an aromatic spice which is actually a lichen. Some recipes also call for nagkeshar - but then its like our sambar powder recipes I guess - as many recipes as the families who make them! Read more about Goda Masala and its preparation here and here.

    Alu parwal is a favourite in the North while it is given pride of place in Bengal in a simple tarkari preparation called potoler dalna. Other versions I have seen is to make it with a saunf and onion tadka or a a gravy with onions and tomatoes.


    What I did was to include some garlic, onions, spice powders including Goda masala,curry leaves and simply stir fry till it was nice and crispy, its edges curling up and the seeds getting all crunchy. Served with chana dal and ghiya and hot phulkas, it was simply heaven on a plate!


    I am sending this dish on to Weekend Herb Blogging which is being hosted at Jugalbandi this week. This event which shines the spotlight on any herb, vegetable, fruit or flower and is the brainchild of Kalyn .


    Parwal Masala


    Ingredients:

    Parwal (wax gourd/potol) - 1/2 kg
    Onion - 1 chopped
    Garlic crished - 4-5 cloves

    Oil - 1 tbsp
    Cumin seeds (jeera) - 1/2 tsp
    Mustard seeds (rai) - 1/2 tsp
    Curry leaves - 5-6
    hing - pinch

    Turmeric powder (haldi) - pinch
    Red chilli powder - 1 tsp
    Goda masala - 3/4 tsp
    Salt - to taste

    Method:

    1. Heat oil in a non stick pan or kadai, add the mustard and wait for it to splutter. Put in the cumin seeds and then the curry leaves and the hing.
    2. Add the garlic, give it a stir for half a minute and then put in the chopped onions and saute till transluscent.
    3. Meanwhile, wash and chop the parwal into half vertically and then again into halves. Some people like to lightly scrape the skin, I leave it as it is.
    4. When the onions are done, add the parwal and the spice powders including turmeric.
    5. Fry for about 5-8 minutes, then cook covered for another 5 minutes till the parwal is cooked, stirring in between. Uncover and cook on low flame till the parwal turns crisp and its edges start curling.
    6. Serve hot with dal and phulkas or rice.


    Monday, March 10, 2008

    Urulai Roast (Crisp Golden Potatoes)


    It's been a long time since I made this dish - another one of MIL's traditional recipes which is a favourite at home. It was the perfect accompaniment to the Vendakkai Kozhambu with steamed rice, we had for lunch sometime back.

    The thing I love about this dish is that its crisp brown crust gives the impression that its a product of many hours of slaving over the stove. That, or a lot of oil. Or both.

    Well, the trick to this dish is simple (lots of oil and lots of time in the kitchen over one dish is simply not my style!) - the recipe uses a puree of onion and tomato and that gives the golden brown coating to the potato! Be warned, this is an addictive dish, so don't make it in small quantities.

    I am sending this to Sia's Ode to Potato event ; I never did send her a pic of the mutton kurma I sent earlier; didn't get around to making it again....
    This classic recipe is just perfect for an ode to the ubiquitous tuber!

    Urulai Roast


    Ingredients:

    Potato - 4-5 big
    Onion - 1 big
    Tomato - 1 medium
    Chilli powder - 1 tsp
    Turmeric powder - 1/4 tsp
    Coriander powder - 1 tsp
    Salt to taste
    Oil - 1 tbsp

    Tempering:
    Mustard seeds - 1 tsp
    Curry leaves - 6-7
    Urad dal - 1/2 tsp


    Method:

    1. Boil the potatoes in a pressure cook for 8-10 minutes (2 whistles). Cool, peel and chop into fairly big pieces. The potatoes should be just cooked and not falling apart.
    2. Puree the onion and tomatoes in a blender.
    3. Heat oil in a non stick pan, add the mustard seeds and when they splutter, add the urad dal , when it changes colour add the curry leaves.
    4. Pour in the puree, add the chilli powder, coriander powder and turmeric powder and fry for 6-8 minutes till the tomato onion puree loses its rawness and dries up a bit.
    5. Add the chopped potatoes and salt and continue frying on a low flame, taking care not to stir too much, instead jiggling the pan to break them up and turn them.
    6. Keep on a low flame for about 20-30 minutes giving it shake once in a while; the puree would have turned a nice reddish brown and crusted each potato piece.
    7. Serve warm with steamed rice and sambar or chapattis and dal.

    Depending on the type of onion used, this dish could have a hint of sweetness to it.

    Sunday, January 20, 2008

    Shaak - Winter Vegetables Gujarati style


    Growing up in Mumbai, and particularly in an area where there was a predominantly Gujarati population, I ate a lot of Gujarati food - especially in school; my friend's dabbas were the most delicious ones on the block.
    And unlike most of us who carried our lunch boxes packed in the morning, theirs would usually arrive steaming hot during lunch time, delivered by a dabbawalla or a family member.

    What with my Dad being a complete foodie, we were also treated to visits to Thakkers in Central Mumbai, where their unlimited thalis were the most sumptuous meals one could imagine. They would lovingly ply us with those rotlis (small sized chapatis) topped with a generous spoonful of ghee, accompanied by a variety of daals, kadhis and shaak, till we could hardly breathe.
    In summer there would be the dreamy aamras - golden mango pulp from the freshest Alphonso mangoes - to go with fluffy puris. This for me was even more coveted than the shrikhand (sweetened hung curd) which usually accompanied the puris.

    And trains.....yes, trains were an unlikely place, but thats where we got our annual dose of Gujarati snacks, pickles and travel food, when we visited my grandparents down South.

    The journey used to take a good 2-3 days then, and while we had lime rice, curd rice, tamarind rice and potatoes packed to last us for about a day and half surviving on station food and (awful) train "meals" after that, the Gujarati families we met (and became instant friends with their kids sharing Amar Chitra Katha comics and video games!) used to seemingly come prepared to feed the entire compartment for the next 4 days!

    There was farsaan - theplas, khakras et al accompanied with chundo and green chutney, complete meals of rotlis and dry shaak, and of course sweets. What's not to like! especially since after a point the only way to entertain children in closed compartments is to ply them with food and hope that they sleep it off!

    Gujarati cuisine comes from the NorthWestern state of Gujarat and is mainly vegetarian. It changes a lot from the coastal regions to the dryer interior regions, but the cuisine on the whole is centred around wheat breads,pulses and lentils, yoghurt based preparations and seasonal vegetables cooked with spices - either lightly steamed or shallow fried. Many of the dishes have a hint of sweetness to them, but there is a misconception that all Gujarati food is sweet. Sweets are much liked and along with snacks provide for a huge number of interesting regional recipes. While some of them are deep fried, there are also quite a few snacks which are steamed and very tasty. Read more about Gujarati cuisine here and more recipes on one of my favourite blogs; she hasn't posted in a while and I'm hoping she can come back soon....

    Its been a long time since I cooked any Gujarati food....I remember cooking a lot of it when I got married and I used to miss the dhoklas, khandvi etc of Mumbai. I even made undhiyu once for Tamil New Year instead of the traditional 7 vegetable sambar, much to the consternation of MIL :)

    I came across this recipe of Tarla Dalal recently and given that it seemed to be perfect for the winter vegetables available now, I set about making it with a few alterations.

    Initially it sounded a lot like the famous dish Undhiyu - but it's a lot less complicated; the veggies don't need to be stuffed. I haven't come across this dish anywhere else though, atleast not by the name Panchkutyu Shaak - though it says its a traditional Gujarati recipe.

    Purple kand in Delhi doesn't seem to be common and I substituted with elephant yam or suran.
    Broad beans which are in season,instead of french beans also seemed like a good idea.
    I added raw bananas to the recipe and used one big potato instead of baby potatoes and omitted the sugar in the recipe.
    I also did not deep fry the muthias, preferring to steam cook them as in this recipe.

    The dish with its mix of vegetables cooked together in the spice mixture tasted delicious; in some ways it could be compared to an avial, but it was bursting with a lot more flavour and the dhana jeera powder gave it a very distinctive taste.

    Shaak - Winter Vegetables Gujarati Style


    Ingredients:
    Elephant yam or suran peeled and cubed - 1/2 cup
    Broad beans - 1/2 cup cut into 3-4 pieces each
    Ridge Gourd (turai/Peerkangai) peeled and sliced thickly - 1/2 cup
    Peas - 1/2 cup
    Raw Banana peeled and sliced thickly - 1/2 cup
    One big potato - peeled and cubed - 1/2 cup

    Tadka:
    Cumin seeds (jeera) - 1 tsp
    Mustard seeds (rai) - 1 tsp
    Asafoetida (hing)- a pinch

    Grind to a paste - 3 green chillies and 2 ' piece of ginger (cut down on chillies to lessen spiciness)
    Reserve 1 tsp for muthia.

    Dhania jeera powder (a staple in Gujarati kitchens) - 2 tsp
    I used 1 tsp of jeera (cumin) powder and 2 tsp of dhania (coriander) powder

    Turmeric powder - 1/4 tsp

    Grated coconut - 1/2 cup
    Chopped coriander - 1/2 cup

    Oil - 1 tbsp
    salt to taste

    Methi muthia:

    Wheat flour - 4 tbsp
    Gram flour (besan) - 2 tbsp
    Fresh fenugreek leaves (methi) - 1/4 cup washed and chopped
    Oil - 1tbsp
    Salt to taste
    Ginger green chilli paste - 1 tsp
    Turmeric powder (haldi) - a pinch
    Asafoetida powder (hing) - a pinch

    1. Mix all ingredients of muthia and make a dough adding as little water as is required.
    2. Divide the dough into 6-8 portions and make small cylindrical rolls out of it.
    3. Steam these muthia for about 10-15 minutes till they are well cooked- this is if you are using a stove top steamer where the water is brought to a boil and then the steamer with muthias kept inside on the stand. If using the microwave steamer, the cooking time will be much less.
    4. Once done, cool and keep aside.

    For the shaak:
    1. Heat oil in a pan and add mustard seeds, when they pop add the cumin seeds and the asafoetida.
    2. Add the chopped vegetables except the peas, ginger chilli paste, dhana jeera powder and turmeric powder. Saute for 3-4 minutes , then add 2 cups of water and bring to a boil, simmer and cook covered till the vegetables are cooked and the dish is almost dry.Halfway through add the fresh peas to the dish.
    4. Add the coconut,coriander, muthias and cook for 2-3 minutes - if using frozen peas, then add the peas at this stage.
    5. Serve hot with chapatis or rice.


    Thursday, January 17, 2008

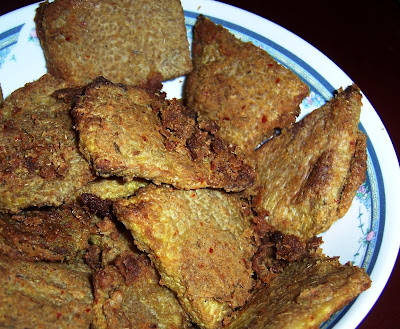
    Roasted Yam Squares (Karunailkizhangu Varuval)


    Yam (karunaikizhangu in Tamil, chenai in Malayalam, suran in Marathi or zaminkand in Hindi) is what we call it, but it is actually Elephant foot yam (Amorphophallus campanulatuss) - a member of the aroid family. See pics here


    Yam, a starchy tuber, which is a member of the Dioscorea family, is very different from elephant foot yam and is popular in Latin America and Africa. It's name is derived from the African word "njam or djambi" which means "to eat". Pics and more info on this here.

    To further complicate matters, not only do we call elephant foot yams as just plain "Yams", but those in the US refer to sweet potatoes as Yams! More on the differences here.


    Now that I have cleared up that part (more for me actually, since I had my own confusion going on the difference between chenai and karunaikiliangu!), lets get on to the important stuff - eating!


    Elephant yam, I have found, is restricted to specific cuisines in India. Even in Tamil Nadu where it is widely available, many people don’t like it too much and avoid eating it.

    Some times when peeling the thick skin of this root vegetable, the back of the hands may itch and this puts off many people. I believe, after cooking yam for so many years, that the itching is not common and is restricted to certain types of yam or their quality. A safe way to avoid this is to apply a bit of coconut oil on the hands before peeling and handling it.
    Some people recommend boiling it in tamarind extract so that one doesn't suffer from itchiness of the tongue or throat - which is also supposed to happen with this vegetable, something I haven't experienced.


    The best way to buy yam is to ask the vendor to cut about ¼ - ½ a kilo from a full yam – the cut portion should be white and moist. It can be stored outside the fridge but is best consumed within 2 days of being cut, else it will dry out. The cut portion will discolour a bit due to oxidation, but that can be sliced away before cooking. It should be cooked thoroughly before eating since it contains calcium oxalates.

    Cooked the right way, the vegetable tastes delicious – I like it best when it is a bit crispy on the outside and soft on the inside.
    MIL’s recipe is what gets done in our house – I don’t feel the need to change a thing. Yam is cut into thick squares and cooked in a ground masala paste before being slow cooked on a tava till crisp – I finish it off under the grill – consumes less oil and I still get a crispy exterior.

    The masala with fennel in it adds the most delicious touch to this dish.


    Roasted Yam Squares


    Ingredients:
    Elephant Yam / Karunaikizhangu / Suran – ½ kg

    Masala
    Fennel seeds (Saunf) – 1 tbsp
    Red chillies – 4-5
    Grated coconut – ¼ cup

    Oil – 2 tbsp

    Salt to taste


    Method:
    1. Peel thick skin of yam with a sharp knife and wash well to remove any traces of mud.

    2. Cut the yam into thick 2 “squares – about ¼ of an inch thick.

    3. Boil the yam slices in a large vessel of water with a pinch of turmeric and half tsp salt till half cooked – about 5-6 minutes. If it cooks too long it will break when it is cooked again with the masala.

    4. Drain water and keep aside. Grind the ingredients of the masala paste with a little water to make a thick paste.

    5. Take a wide non stick pan, heat 1 tbsp of oil in it, add mustard seeds – when they pop add the curry leaves and the masala paste. Fry for about 3-4 minutes.

    6. Add the par boiled yam squares to the pan and mix carefully till the paste coats them well.

    7. Add salt and cover and cook for about 5-6 minutes till the yam is just cooked. Do not stir too much; the pieces might break.

    8. Once the yam pieces are cooked, take a oven proof pan and lightly grease it, arrange the yam pieces on it in one layer and drizzle ½ tbsp oil over them.
    Grill in a pre heated oven at 180C for about 7 minutes; then remove, turn over the slices, drizzle ½ tbsp of oil and grill again for another 5-6 minutes till both sides are brown and crisp.

    9. Alternatively, arrange the yam pieces on a heavy griddle and cook them over a low flame till they are brown and crispy, drizzling oil 1 tsp at a time as needed.

    10. Serve warm as an accompaniment with rice and sambar.


    Thursday, December 6, 2007

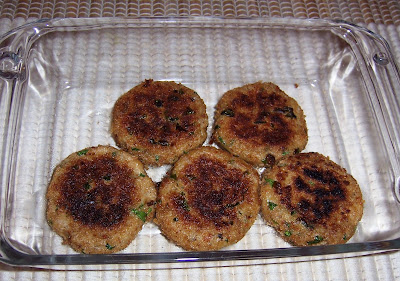
    Raw Banana Cutlets

    While the coconut tree is often described as “kalpavriksha” (wish fulfilling tree), I think of the banana tree as the real kalpataru, with almost every part being of some use.

    The ripe fruit liked by most people and probably one of the cheapest fruit available in India, is one of the first foods fed to babies being weaned and is enjoyed by children and adults alike. The raw fruit is cooked – mostly in South Indian cuisine – and eaten like a vegetable.

    Ripe or raw, the fruit is packed with Vitamin B, Vitamin C and potassium while having a high proportion of fibre too and a very low fat and sodium content. It is used by people to gain weight as well as lose weight. It can help constipation as well as help in stopping diarrhea.

    Maybe a fruit of contradictions, but is also a ceremonial fruit and the neivedyam (ritual offering) to the Gods, whether on festive occasions or for daily prayer, always includes it.
    Pics above and alongside are from wikipedia
    The flower too is cooked; vazhapoo poriyal (foogath) and vadais are quite popular in Tamil cuisine, though I hated the whole process of plucking and cleaning the flowers which used to make my hands so sticky – that no amount of scrubbing with buttermilk or Teepol (does that even exist now?) used to get them clean.


    The tender core of the banana stem is also cooked (vazhathandu poriyal) and is supposed to be very beneficial for the kidney. In fact, the juice of the stem is recommended by even mainstream allopathy doctors for flushing out kidney stones.

    The banana plant (often mistaken for a tree because of its tall stem) is still one of the first plants to be planted in the backyard of a house in South India. The leaves are used on festive occasions as plates for the traditional meal to be served on (completely eco friendly!) and also to adorn the threshold or puja room. No wedding preparation begins without the banana stem, complete with the flower and a bunch of unripened fruit hanging from it, being first tied to the entrance of the hall where the ceremony will take place.
    The leaves were also used till recently, to carry packed food while travelling; in cooking they are used to wrap and steam food, a process which imparts a distinct flavor to the dish cooked in it.

    The banana plant is also a source of fibre which has been long used in production of traditional textiles and yarns, most notably in Japan. Banana fibre is also used in making banana paper usually for artistic purposes. More on banana here

    Plaintains are a starchier and coarser variety of the same genus but are different from bananas. For a delightful discourse on the differences between bananas and plantains, look here and images and more info at IFR

    There was a phase some years back when I was obsessed with cutlets, I used to try all kind of cutlets – my poor guests didn’t know what they were eating half the time, but they used to put on their bravest smiles and reach for the plate being waved in their faces!
    So amid, the arvi (sticky potato) tikkis and rajma patties there came a time when there appeared raw banana cutlets. This was one of the cutlets which didn’t make one wonder what it was made of – the starchiness inherent made it taste a lot closer to potatoes than the others.

    I initially followed a recipe from Sanjeev Kapoor, but over time I have just followed my own preferences and made it with whatever is convenient and at hand. I usually add crushed roasted peanuts and stay away from the “potato to bind”, since it’s not that difficult to shape them and keep them from falling apart by using some breadcrumbs or flour.

    This recipe goes to Weekend Herb Blogging – which is being hosted this week by Simona @ Briciole


    Raw Banana Cutlets


    (Makes 5-6 cutlets)

    Ingredients:
    Raw Bananas – 2 medium sized
    Flour (all purpose/whole wheat) – 2 tbsp
    Bread Crumbs – ½ cup
    Cumin powder – 1 tsp
    Chilli powder – 1 tsp
    Peanuts – roasted and crushed – ¼ cup
    Coriander leaves – handful – cleaned and chopped
    Amchur (raw mango) powder – ¼ tsp or 1 tsp lemon juice
    Salt – to taste
    Oil – to shallow fry or grill

    Method:
    1. Pressure cook the raw banana for 4-5 whistles (15 minutes approx) till it is cooked. Just about 1/4 cup of water in the vessel is enough.
    2. Cool and peel the skin, mash the bananas with fingers or back of a fork.
    3. Add the chopped coriander leaves, chilli powder, cumin powder, amchur and salt. Mix well and then add 1 tbsp of flour and ¼ of the bread crumbs.
    4. The mixture should come together in your hands, if it sticks, add some more flour a tsp at a time till you are able to shape cutlets with your hand.
    5. Shape about 6 equal cutlets, roll them in the remaining bread crumbs and keep aside.
    6. Heat a tava (griddle) and add about 1 tbsp oil to it, arrange the cutlets on the tava. Drizzle about a tsp of oil over the cutlets and cook them on a medium flame for about 3-5 minutes, turn them and cook for another 3 minutes, drizzling another tsp of oil if necessary.
    7. Alternatively, you can grill them in a pre heated oven at 180C for about 5 to 7 minutes on each side, smearing oil on both sides before putting them in.
    8. Serve warm with mint chutney.

    Saturday, December 1, 2007

    Vegetable Kurma (Mixed vegetables in Coconut gravy)

    This is one of my favourite recipes – loved it when my mother used to make it, loved MIL’s version and now I have mine too. I hate the ones served in fast food joints in Chennai, they are an apology to what this creamy spicy dish should taste like; watered down sweetish versions with sad looking vegetables in an oily gravy! Not to mention that they serve miniscule portions (which may be a good thing in a way) barely enough to mop up about half an idiyappam or a piece of appam.

    What this dish should taste like is a nice mix of spicy flavours tempered by the coconut added to the masala, the thick gravy a combination of the coconut paste as well as the boiled potatoes adding their own starchiness to it. The other vegetables (I don’t add more than 2 or 3) like beans, carrot, cauliflower or peas bring out the the rest.

    Why am I going on about some dish which is not even something gourmet or unusual? Well, just because I guess; just because I can never have enough of it, love trying out other versions of this and maybe because you hardly ever get to eat it outside of home.

    I also love the traditional combination of Idiyappam-Kurma ; Idiyappam is steamed rice noodles and another favourite of mine. Because it is a bit time consuming to make, it used to make a rare appearance while growing up which made it all the more attractive. Now of course, you get the instant versions, just soak the dried noodles in hot water for 5 minutes and they are ready! We usually have this combo for breakfast.

    For the real thing, take a look at Viji's post on Vcuisine for step by step instructions to soft fluffy idiyappam. This particular recipe is posted on May 14th, 2007.

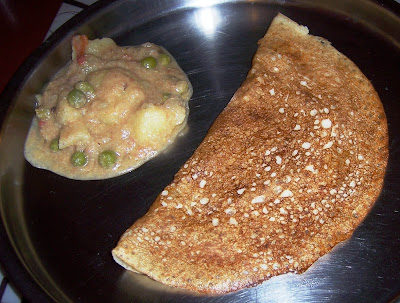
    One evening though, we wanted a light dinner so opted for dosais (rice flour pancakes) instead of the usual rice. And I thought the kurma would be a good accompaniment. I guess I just needed an excuse! So dosai kurma it was – and it was so delicious we dumped the resolve of a light dinner and went on and on with the dosais till the batter ran out!

    Some versions of kurma have whole spices like clove and cardamom ground into the masala paste, I don’t prefer doing that because of the strong flavor it imparts, which then seems to mask everything else. But try that route if you hate biting into a clove by mistake.


    Also, some versions add coconut milk at the end, this one doesn’t.

    Recipe for dosai batter here


    Vegetable Kurma


    Dosai and Kurma

    Ingredients:

    Potatoes – 4 boiled, peeled and cubed
    Mixed vegetables (choose 2 from cauliflower, carrot, beans, peas) – 1 cup chopped
    Onions – 1 large sliced
    Tomatoes – 1 large chopped roughly
    Clove – 2
    Cinnamon stick – 1 “
    Masala paste:
    Coconut – grated ½ cup
    Green chillies – 3-4
    Cumin – 1 tbsp
    Ginger – 1 “piece
    Garlic – 3 cloves

    Method:
    1. Grind the ingredients of the masala paste till smooth adding just as much water as is needed.
    2. Heat the oil in a pan and add the cloves and cinnamon to it, when they change colour, add the onions and sauté till translucent.
    3. Add the masala paste to the oil and fry for about 3-4 minutes, add a splash of water if required so that it doesn’t stick to the pan.
    4. Meanwhile cook the chopped mixed vegetables in very little water till just done. They will cook further in the kurma so don’t overcook.
    5. Add about 300-350ml of water to the pan and bring the mixture to a boil, add salt, cover and let it simmer on medium flame for 3-4 minutes.
    6. Uncover, add boiled potatoes, tomatoes and cooked vegetables to the curry and cook for another 5-7 minutes on low till all the ingredients blend together and the curry thickens.
    7. Check the salt and spice and if you need a bit more spice, you can add a pinch of garam masala powder before taking it off the flame.
    8. Serve with idiyappams,dosais,idlis or chapatis.