Monday, December 12, 2011
Parippu Vadai / Masala Vadai (Crispy Spiced Lentil Fritters) for Terra Madre - Slow Food Day
Sunday, November 13, 2011
Bisibele Huli Anna (One Pot Meal of Spiced Rice, Lentils and Vegetables)
I was introduced to this beautiful dish in MIL's home - she had learnt it while living in Bangalore when FIL was posted there in the 70s. This is a dish from Karnataka and she explained to me that Bisibele Huli Anna in Kannada literally meant -" piping hot lentils, tamarind and rice". Hubby loves this one pot meal and MIL is an expert at turning this out in the rice cooker at short notice for guests, for a meal which receives a lot of praise.
There is an interesting anecdote I have regarding this dish. In the early days of our marriage, sometimes when I was tired at the end of a long day I would ask hubby as to what he would like to eat he would say "why don't you just cook Bisibele Bhath"? It puzzled me why someone who was usually looking to save me from spending too much time in the kitchen, suddenly asking me to make something which is a lot more work than normal. I figured out after a long time that he thought that Bisibele Bhath was just sambar and rice cooked together - which was of course much easier wasn't it? sorta like making khichdi?!! I had to explaint to him that it was much more complicated than that and actually involved grinding a spice mix from scratch.
Talking about the spice mix - I disagreed a lot with MIL about the spice mix she uses and finally after doing a bit of research and cooking the dish a few times, came to a mix of spices which I feel is the best tasting for this dish. I basically don't like it too heavy on the whole spices like cinnamon and cloves and tone them down taking care not to tone it down so much that the dish tastes bland - it has lentils and rice after all as the main ingredients, so don't want it becoming just a plain khichdi. I'm also particular about the vegetables I use and don't agree with MIL's tendency to put in whatever's at hand - including bottle gourd (dudhi/lauki) and wax gourd (parwal) sometimes! I tend to stick to carrots, beans, peas and potatoes. I know - shocking for someone who otherwise substitutes with such ease!
What my MIL excels at is the exact ratio of lentils, rice, tamarind and spice mix - it took me sometime to get that right so as to not end up with a stodgy dish or worse, one that had too much tamarind or was too spicy. I now realise that its quite easy to make it as long as one breaks it down to its components - the dal and rice cook together and then cooked again with the spices, tamarind juice and vegetables till it all melds into a beautiful symphony of flavours and a delicious one pot meal.
We had this for Sunday lunch along with these Crispy Potatoes or Urulai Roast - another speciality of MIL's. We were joined by our neighbours from upstairs for lunch that day so the company made it an even nicer meal.
Just a reminder that I have a Giveaway on my blog and its the last couple of days to participate - so hurry over and leave a comment to win a beautiful cookbook!
Rice - 1 cup
Tur Dal (Arhar/Tuvaram parripu) - 3/4 cup
Tamarind - small lime sized ball soaked in a cup of water
Vegetables - diced carrots, beans, potatoes, peas - 2 cups
Oil - 1 tbsp
Ghee - 1 tbsp and some more to serve
salt to taste
turmeric powder - 1/2 tsp
Coriander leaves
Spice Mix:
Red chillies - 4-5
Coriander seeds - 1 tbsp
Cumin seeds - 1 tsp
Methi seeds - 1/4 tsp
Black Pepper - 1/2 tsp
Cinnamon - 1
Cloves - 2-3
1 tsp chana dal
1 tsp urad dal
1/2 cup grated coconut
Tempering:
Mustard - 1 tsp
Hing (asafoetida) - pinch
Curry leaves - 5-6
1. Cook the rice and lentils together with the turmeric, in a pressure cooker - use a little more water than usual so they are cooked well and a little mushy.
2. Meanwhile roast all the ingredients for the spice mix, except the coconut, in a tsp of oil and then add the grated coconut at the end and roast for 2 minutes more. Cool and grind to a fine paste.
3. Extract the tamarind juice and keep aside.
4. In a heavy bottomed pan, add the ghee and oil and when hot, add the tempering ingredients. When the mustard pops, add the spice mix and vegetables and fry.
5. Sprinkle some water and cover and cook till the vegetables are par boiled.
6. Then add the cooked rice and lentils, one cup of water as well as the tamarind juice and salt and bring to a boil. Lower flame and simmer for about 10-12 minutes till well blended but still runny and not dry. Add some more water if needed.
7. Serve hot with a drizzle of ghee on top. Garnish with coriander leaves.
Friday, October 21, 2011
Diwali Bhakshanam Series - I - Thenkuzhal & Mullu Murukku
I rarely post recipes of Indian sweets and savouries because they seem so subjective to me. A lot of Indian sweet making is about perserverence and picking up a few tips rather than sticking to recipes to the letter, as in case of many Western recipes. The success to making Indian sweets lies in not getting caught up in the debate about one string or two string consistency but rather to get a natural feel of things by making them again and again. Even if only once a year - the next year will be a bit better than the previous one because of one more thing you found out for yourself.
This year since I'm home and have the time (but alas not the energy and so have had my trusty Tara to help out with the actual stirring/making/squuezing out), I decided to involve my 6 year old so that she gets a feel of all the traditional Tamil sweets and savories which she wouldn't get to see otherwise in Delhi. I also decided to post the recipes with a few tips of what I have learnt over the last 12 years I have been making these on and off. I don't profess to be an expert but just making these again and again is what seems to have helped me in getting things right.
I will be posting these dishes and their recipes over the next 5 days - hopefully, those of you who need a slight nudge will find these posts helpful to kickstart your Diwali preparations. While store bought is always convenient and time saving, it would be a little sad if we didn't make an effort to preserve just a few of our traditions!
This post introduces the favourite Tamil savoury Thenkuzhal - literally meaning tubes of honey - and Mullu Murukku. These are fried savoruy snacks with a lovely crunch to them - made out of rice flour and split green gram lentil flour. The proportions and ingredients are what my Mom uses - haven't changed anything since it all works perfectly fine as it is. And please Use Butter.
2 cups - rice flour
1/2 cup - urad dal (split black gram) flour
Butter - 5 tbsp (I used unsalted butter, if you use salted butter, check the quantity of salt)
Cumin seeds - 1.5 tsp
Asafoetida - 1/4 tsp
Salt - 1level tsp (approximately)
Water - I ended up using about 250ml of water totally, but added it very gradually so as to not end up with a sticky mass.
1. You could buy urad dal flour readymade from the store - but if you don't get it (which I don't here), lightly roast 1 cup of split black gram till it barely changes colour (this takes about 8-10 minutes). If you roast it too much, you might not get the almost cream colour of this particular svaoury snack and it might turn out a bit darker. Which is fine - you can always keep it in mind and do it the next year!
2. Mix the rice flour, urad dal flour, cumin seeds and asafoetida in a large bowl. Melt the butter till just liquid and then mix into the flour gradually. Add the salt - its always better to add a little less and then increase it after tasting the dough. Mix till all the ingredients come together.
3. The dough may just about be able to come together but not able to hold shape. Start adding the water a little at a time and knead into a soft, pliable dough. At this stage, you can leave it a little bit firmer than what is actually needed and then add some more water to each batch just before being pressed out.
4. Divide the dough into 4-5 portions, each just enough amount to fit into the murukku press. Keep the rest aside covered by a damp cloth so that it doesn't dry out and work with one portion at a time.
5. Grease insides of the mould. Take one portion of the dough and add about a tbsp of water (if needed), put into the murukku press. Use the plate which has plain holes in it.
6. Press down on a oiled quarter plate or even a greased plastic sheet - it should be easy to press out and the shapes should form easily. If you are finding it difficult to press out the dough, then remove the portion and add one or two tbsp of water to it and try again till you come to a stage where it becomes easy to press out the thenkuzhal shapes. It doesn't matter if the shapes don't come out into an exact round shape - as you keep pressing it will become easier to control.
7. Meanwhile, heat oil in a heavy bottomed kadhai/wok - test the temperature by putting a small bit of pressed dough into the oil, it should rise to the top. If not wait for some more time. Keep the flame on medium low at all times. A high flame will cause the thenkuzhal to brown fast without cooking inside.
8. When the oil is hot enough, slide the pressed out shapes from the plate/plastic sheet onto your hand and then slide it slowly into the hot oil, taking care not to drop it from a height,else the oil might splash on to your hands. Put in a few more or as much as the pan can accomodate without overcrowding.
9. When it rises to the top, flip over and fry for a few more minutes - till the bubbling of the oil stops and the thenkuzhal is cooked through. Its fine if it feels a little soft inside, it will harden a bit as it cools. Wait for the first batch to cool and eat one to check the salt and consistency. Accordingly adjust the seasoning if needed and correct the frying time for the next batch.
10. Press out the remaining portions as well in the same manner. (and keep getting better and better at it each time!)
1/2 cup - urad dal (split black gram) flour
Butter - 5 tbsp (I used unsalted butter, if you use salted butter, check the quantity of salt)
Cumin seeds - 1.5 tsp
Asafoetida - 1/4 tsp (hing)
Ajwain seeds - 1 tsp (omam/bishops weed)
Salt - 1level tsp (approximately)
Water - I ended up using about 280ml of water totally, but added it very gradually so as to not end up with a sticky mass.
1. You could buy urad dal flour readymade from the store - but if you don't get it (which I don't here), lightly roast 1 cup of split black gram till it barely changes colour (this takes about 8-10 minutes). If you roast it too much, you might not get the almost cream colour of this particular svaoury snack and it might turn out a bit darker. Which is fine - you can always keep it in mind and do it the next year!
2. Mix the rice flour, urad dal flour, cumin seeds and asafoetida in a large bowl. Melt the butter till just liquid and then mix into the flour gradually. Add the salt - its always better to add a little less and then increase it after tasting the dough. Mix till all the ingredients come together.
3. The dough may just about be able to come together but not able to hold shape. Start adding the water a little at a time and knead into a soft, pliable dough. At this stage, you can leave it a little bit firmer than what is actually needed and then add some more water to each batch just before being pressed out.
4. Divide the dough into 4-5 portions, each just enough amount to fit into the murukku press. Keep the rest aside covered by a damp cloth so that it doesn't dry out and work with one portion at a time.
5. Grease the insides of the mould. Take one portion of the dough and add about a tbsp of water (if needed), put into the murukku press. Use the plate which has a star shaped hole in it.
6. Press down on a oiled quarter plate or even a greased plastic sheet and make a spiral shape - it should be easy to press out and the shapes should form easily. If you are finding it difficult to press out the dough, then remove the portion and add one or two tbsp of water to it and try again till you come to a stage where it becomes easy to press out the spiral shapes. As you press it will become easier to control and make the spiral shape needed for this murukku.
7. Meanwhile, heat oil in a heavy bottomed kadhai/wok - test the temperature by putting a small bit of pressed dough into the oil, it should rise to the top. If not wait for some more time. Keep the flame on medium low at all times. A high flame will cause the murukku to brown fast without cooking inside.
8. When the oil is hot enough, slide the pressed out shapes from the plate/plastic sheet onto your hand and then slide it slowly into the hot oil, taking care not to drop it from a height,else the oil might splash on to your hands. Put in a few more or as much as the pan can accomodate without overcrowding.
9. When it rises to the top, flip over and fry for a few more minutes - till the bubbling of the oil stops and the murukku is cooked through.Wait for the first batch to cool and eat one to check the salt and consistency. Accordingly adjust the seasoning if needed and correct the frying time for the next batch.
10. Press out the remaining portions as well in the same manner till all the dough is used up.
Wednesday, October 12, 2011
Vadai Curry (Fried Lentil Dumplings in a Coconut and Fennel Spiced Curry)
The flavour of the curry as well as the vadais depend on the addition of fennel seeds (saunf). MIL roasts whole spices and grinds them into the spice paste, but that's too strong a flavour for me. I prefer tempering the curry with the whole spices instead and also adding a dash of garam masala powder.
Also, one could steam the vadais (and call them urundais - dumplings- instead of vadais!) and then put them into the curry - but really, since we don 't make this very often I find it worthwhile to have the fried vadais when I do make it. The taste of the crisp lentiil vadais soaked in the curry is absolutely amazing. Not to mention that we get to eat the crunchy vadais on their own for a snack!
I made this for lunch on a Saturday and served it with rice and then we had the leftovers with idlis the next morning. Idlis and vadai curry is a classic combination and hard to beat.
P.S I have made a few additions to the widgets on my blog - a long overdue Search button which many had been asking for. Also, a book list of the books I have been reading - I know there are many avid book readers out there and I know we are always looking out for some good recommendations. Feel free to mail me to check on any book you see in my list, I will be happy to share my impressions of the book. There are also widgets for some of the most popular posts on this blog as well as Subscribe via email button at the bottom. Do let me know if you have any feedback on the blog. Thank you!
For the Vadai
Chana Dal (Bengal Gram Dal) - 1 heaped cup, soaked for 1.5 to 2 hours
Fennel seeds (saunf) - 1 tsp
Onion - 1 small, finely chopped
Curry Leaves - 8
Dried red chillies - 3-4
Salt
Oil to fry the vadais
For the Curry
Masala paste:
Coconut - 3/4 cup grated
Green chillies -2-3
Fennel Seeds (saunf) - 1 tsp
Cinnamon - 1 stick
Cloves - 4
Onion - 2 small chopped
Tomatoes - 2 chopped
Green chillies - 2 slit
Ginger Garlic paste - 1 tsp
Chilli powder - 1/2 tsp
Turmeric powder - 1/4 tsp
Coriander powder - 2 tsp
Garam Masala powder - 1/2 tsp
Coriander leaves chopped - 2 tbsp
salt to taste
Oil - 1 tbsp
1. For the vadais, grind the chana dal along with the red chillies, saunf and salt. Grind to a coarse consistency adding minimal water and do not make into a fine paste. It is fine if there are pieces of lentil showing. Add the finely chopped onions and curry leaves into the batter and mix well.
2. Heat a deep wok with oil in it - enough to cover the vadais when they are fried. Shape the vadais into small balls and deep fry in batches on a medium high flame, till golden brown and crisp. Drain on absorbent paper and keep aside.
3. For the curry, grind the ingredients for the spice paste finely.
4. Heat oil in a pan and add the cinnamon and cloves followed by the chopped onions - fry till transparent and then add the ginger garlic paste and the green chillies and fry for 2 minutes.
5. Put in the chopped tomatoes, red chilli powder, turmeric powder, coriander powder and fry for 5-8 minutes till tomatoes are pulpy and the spices are fried.
6. Add the freshly ground spice paste, salt and one cup of water, bring to boil and then simmer gently for about 15 minutes.
7. Add the garam masala powder and some water if too thick, adjust salt and then add the fried vadais to the curry - simmer for 3-4 minutes and then turn off the heat. Garnish with coriander leaves.
8. Serve with rice or as an accompaniment to idlis or dosais.
If you would like to steam the lentil batter instead of frying them, simply shape into balls, place on an idli steamer and steam (in a pressure cooker without the weight or in a large vessel) for 15 minutes till they are cooked and look a little shiny on the outside. Add to the curry as mentioned in the recipe.
You could also use a mixture of tur dal and chana dal in the lentil batter or only tur dal (pigeon pea lentils)
Monday, November 1, 2010
Lemon Rasam (Elumichai Rasam)
Simmer gently and add the lemon juice once you have taken it off the flame. A mild tempering of asafoetida and mustard and a generous sprinkling of coriander leaves and you have a beautiful rasam ready.
Wednesday, March 24, 2010
Moogachi Usal (Stir Fried Mung Sprouts) - Blog Bites #1
In India, the first loud sound that babies hear is probably the pressure cooker! I realised this when I saw the startled expression my daughter had when she was 9 months old and sitting in her high chair, when she heard the pressure cooker whistle (we had an open kitchen in that house). To make sure she didn't bawl in fear, we immediately laughed and said "cooker" - thats how one of the first words she spoke was "cookah".
The pressure cooker is also probably the first kitchen appliance we learn to cook with - rice and dal were the basics that I learnt when I was in college. On the days Mom was tired after a long day teaching at school, she would ask me to keep the rice and dal; she would then only have to complete the tempering and prepare a vegetable side dish, once she was rested.
Moong Dal and Rajma were the first non-South Indian dishes I learnt to cook (even before sambar and rasam!) - courtesy my Punjabi room mate when I was living on my own and doing my post-grad degree. It was so good that I used to polish off 2 bowls of dal even before dinner was ready. And this with our very limited kitchen facilities - we didn't even have a mixer/blender.
So, I just had to participate in Nupur's first edition of her new event Blog Bites which is dedicated to Cookers - Pressure cookers, Rice cookers and Slow cookers. There are so many of my own favourite recipes I make in the cooker that it was going to be even more difficult to pin down one from another of the many blogs I frequent.
Well I did and it was from one of my favourite browsing places when I am wracking my head for something to cook - Meera's Enjoy Indian Food - it is so evident that she does "Enjoy Indian Food"!. She is positively prolific in her posts and I love the wide variety of dishes she shared with us - especially the Maharashtrian and Gujarati dishes which I love and miss a lot.
So, I picked this recipe for Moogachi Usal - a traditional Maharashtrian stir fry made with sprouts - something I haven't made for a long time. I usually make sprouts into a salad - but since I tasted this recently on my trip to Kolhapur, I remembered that I really missed having this simple, nutritious dish. The only thing different from the recipe was that I used mixed sprouts - mung as well as moth beans (turkish gram).
Thursday, January 14, 2010
Happy Pongal 2010!
Wishing a very Happy Pongal to everyone! or Makar Sankranthi / Lori depending on which part of the country you come from.
This was our meal this morning - Sakkarai pongal (Gur sweetened rice), Vadai (lentil fritters), Kadambam Sambar (Sambar with 5 vegetables), Ven Pongal (Lentil and rice lightly seasoned with ginger, pepper and cumin seeds) and coconut chutney. It was probably the coldest Pongal I have celebrated and we did full justice to the hearty meal. Managed to get sugarcane as well as fresh turmeric and banana leaves to have our meal on and that made it all so much nicer.
My four year old seems to have caught on to the fact that festivals in India involve food and dressing up - so she promptly asked for her pavadai chattai (traditional Tamil dress). I brought out a Navvari instead - a traditional Maharashtrian sari which a dear friend recently gifted - and she wore that bright green sari over all her layers of sweaters and tights - a sight indeed!!
The boiling over of the new rice while making pongal signifies prosperity and happiness in our lives. Both are simple dishes and use green gram split lentils along with rice cooked together and then finished with a lovely tempering. The ven pongal tempering has cumin seeds, crushed black pepper and cashews.
The sambar is a special one because the flavours of all the vegetables give it a unique taste - quite different from the one we make on a daily basis. I used radish, pumpkin, broad beans, drumstick and okra. Went perfectly with the ven pongal and the vadais.
The sakkarai pongal has gur/vellam (jaggery) added to the cooked rice and lentils and then cooked down till it comes to a nice thick consistency to which cashews and raisins are toasted in ghee and then added. Some people add a pinch of cooking camphor (karpooram) but we both don't like it, so I just omit that.
Do email me if you would like any of the recipes - I would be glad to share them.
Wishing all my readers a lovely year ahead - may your cup of happiness brim over!
Friday, August 14, 2009
Parripu Payasam for Janmashtami - Lentil & Coconut Milk Dessert
For those of you who celebrate Janmashtami or Krishna Jayanthi – hope you have a joyous celebration! I am not a very ritualistic person, so celebrations at our home are usually more about having faith and giving thanks and rather than adhering to the actual rituals to the T. The story of Krishna’s birth tells us that he was born at midnight, so celebrations in Tamil Nadu usually happen the evening before…..but yesterday being a working day and today being the holiday in the North, it was more convenient for us to do the small pooja this morning.
I was glad I decided to do that, since I could spend all that time with my 4 year old daughter and answer every question of hers – from the garland of flowers, to polishing the silver lamp, to making the cotton wick, pouring oil into the lamp, drawing the rangoli, making the small “padhai” or Krishna’s feet leading from the door to the pooja room, telling her how I made the glass painting of Krishna. I guess rituals like these are more about family traditions for us and bind us together in yet another way….atleast for me it brings me closer to my family as much as it does to God.
The traditional offering for this festival that I remember when I was growing up, was “seedai” – small round balls of rice flour dough, delicately spiced (as well as sweetened) and deep fried to crisp, crunchy balls. None of that today, no time to make and nowhere to buy near our home – this is when I miss Grand Sweets in Chennai! And of course, there has to be white butter – the Makhan Chor’s favourite – and milk as well. We had freshly churned butter at home but that was more coincidence than planning! My daughter and I both enjoy eating “white” butter on our toast and I manage to collect enough cream over 3 weeks to get a bowlful.
Since hubby was working and I wanted to have the pooja before he left, I made a simple Parippu Payasam for the neivedyam. Payasam refers to a milk based sweet which is made in South India – also called Kheer in the North. It is usually a creamy dessert made with milk which has been thickened and sweetened and has either vermicelli or sago or rice added to it with raisins and other dryfruits.
Parippu Payasam is quite different in that it is made with lentils (mung dal) which have been roasted and then cooked till soft and then finished with jaggery and coconut milk. What made this version even more special was that I made it with jaggery which I had brought back with me from my last field trip to the cane fields of Uttar Pradesh. I was presented a box of jaggery “mithai” – basically very good quality jaggery which was cut into squares and had loads of almonds and pistachios in it. I had never seen anything like that before! There was no way I was going to have it the way it was recommended by the kind gentleman – “100gm everyday like a sweet - good for health”!
So, I used it to sweeten the payasam – the dry fruits were a nice addition, I would have usually just fried raisins and cashews in ghee and added it to the payasam, but the almonds and pistachios gave a nice crunch to the creamy consistency.
Parippu Payasam
1 cup moong dal split
1.5 cups thick coconut milk
1 cup grated jaggery
1 tsp elaichi powder (cardamom powder)
1 tbsp raisins and cashew nuts
1 tsp ghee
1. Roast the moong dal for about 5 minutes on a low flame till it gives out a nutty fragrance taking care it doesn't burn.
2. Cook the dal in a heavy bottomed pan in about 4 cups of water (just enough) till soft and can't hold its shape.
3. Then add the grated jaggery to it and half a cup more of water if needed so that it melts.
4. Put in the coconut milk and cook on a very low flame for about 4-5 minutes, taking carre it doesn't split.
5.Meanwhile, fry the raisins and cashewnuts in ghee and then add to the payasam along with the elaichi powder and remove from heat.
6. Serve warm or cold.
Sunday, July 5, 2009
Udipi Sambar

One of the things I missed most when I moved out of Mumbai was something I had taken for granted all those years when I was growing up - Udipi restaurants. They dotted the landscape, especially the King's Circle and Matunga neighbourhood where we lived, and we loved the food they dished out. Clean, efficient and cheap - these were places we went to whether we wanted an early morning South Indian breakfast on a Sunday morning or a pav bhaji in the evenings. College saw us practically camped in one of these places as our burgeoning appetite never matched our wallets - we enjoyed their paper dosais and masala uttapams, their thick milkshakes and cold juices.
Anand Bhavan was a particular favourite of my Dad's for their rasam wadas, while I preferred the AC Udipi Cafe. Mom loved the South Indian "meals" at the Udipi place near Matunga station - unlimited food for Rs. 40!. Shree Sundars came much later when I had just started my degree in Podar and it became an instant favourite with our gang. Then there were the die hard fans of Mani's behind Ruia college where they literally drank the chutney! What is your favourite Udipi place to eat in Mumbai?
When I moved to Chennai and ate my first idli outside of home at Saravana Bhavan - I didn't like it! Because they didn't have the Udipi sambar to go with it, nor the flat, large, coarse idlis. The sambar at the eating places in Chennai were almost like what we made at home - there was no tantalising hint of sweetness at the edges nor was there coconut in the masala. The sambar at Udipi restaurants have their own fan following - on Sunday mornings in Anand Bhavan we found it amusing to see people coming and ordering plates of idlis and dosais as take away; they would bring those steel many-tiered dabbas to fill up extra "sambhur"!
It was then that I got hold of this recipe and whenever the urge struck, I would make Udipi Sambar at home. I love this sambar and often serve it with idlis or dosai or just with rice for lunch. Its the jaggery and the coconut which make all the difference. I used drumsticks and small onions - but feel free to substitute with pumpkin, ash gourd or even just small onions alone.
Everytime I go back to Mumbai, I make it a point to visit our old haunts. A visit to Udipi itself is on my travel list, but don't know when that will happen. This month though we are likely to have a virtual food tour of Udipi & Mangalore courtesy this month's RCI theme - Udipi & Mangalorean cuisine - being hosted by Sia of Monsoon Spice.
This event was originally the brainchild of Lakshmi of Veggie Cuisine.

Ingredients:
Tur dal - 1/2 cup (cooked in 3-4 cups water in a pressure cooker till soft, then whipped or mashed till smooth)
Tamarind - small lime size ball soaked in 1 cup water and pulp extracted
Small onions - 10-12, soaked and peeled
1 tsp jaggery
1-2 drumsticks, chopped into 2-3" batons
Masala paste:
1/4 coconut grated (fresh)
1/2 tsp fenugreek seeds (methi)
1/2 tsp urad dal seeds
1.5 tsp coriander seeds (dhania)
dried red chillies -6
curry leaves - handful
1 tsp oil
Roast all ingredients, keeping the coconut and curry leaves to the last few minutes. Cool and grind to a paste
Tempering:
mustard seeds (rai) - 1 tsp
urad dal seeds - 1tsp
green chilli - 1 slit
curry leaves - handful
asafoetida (hing) - pinch
2 tsp oil
Method:
1. In a heavy pan, add the oil and when it is hot the tempering ingredients. Saute the onions and then add the drumstick pieces and cook in half a cup of water till just tender.
2. Pour in the tamarind pulp, salt to taste and jaggery - add 1.5 cups water and bring to a boil. Lower flame and simmer for about 10-15 minutes till the raw smell disappears.
3. Add the mashed dal and the masala paste and simmer for another 5 minutes, adding some more water if it is too thick.
4. Transfer to a serving dish and serve with idlis.
Wednesday, June 3, 2009
Lentil Coriander Soup
Most people seem to have a love-hate relationship with soups. There are the keen aficionados who love everything from the fiery Tom Yum to the nostalgic "sweet corn" soup. And then there are the nay sayers who consider it "diet" food or even "patient" food! I fall into the former category and love trying out different soups. There was a time in my life though when I had only clear soups for almost a year, so that pretty much kept me off soups for the next two years when I actually started eating solid food.But now I'm back to experimenting both at home and when I'm out - the Tom Yum at The Kitchen in Delhi's Khan Market is absolutely amazing as is the Roasted Pumpkin Soup in Chennai's Eden. I particularly like noodle soups and other one pot meal soups like this one made with beans. I recently tried the Laksa at a new restaurant in Delhi called Tasty Tangles and it was so good we ordered seconds - the coconut milk was just right - not too creamy and spiced just right!
Speaking of coconut milk brings me to the subject of this post - a lovely lentil soup made just a little creamier with some coconut milk and flavoured with lots of coriander. This was one half of a typical soup and salad meal at home - going through my posts I realised that we tend to do these a lot especially during summer when the thought of a full meal is just too oppressive.
I paired the lentil soup with a quasi-Caesar salad - chicken,peppers and bread croutons roasted together with olive oil and herbs but served without the all important mayonnaise dressing - I instead tossed it with a simple vinaigrette. The combination made a very nice meal - lots of protein from the chicken and the lentils and the crunchiness of the bread croutons going wonderfully with the creamy soup.
This lentil soup uses red lentils (masur dal) cooked together with ginger and garlic. I didn't bother blending it in a processor and instead just mashed them with the back of the ladle and mixed in the coconut milk before returning it to the stove. Lots of coriander really lifts this soup, so don't skimp!
This Lentil Coriander soup goes to No Croutons Required - that amazing soup and salad event hosted by Lisa and Holler. This month's event focuses on leaves! "We are looking for a soup or salad that features leaves. Think spinach, watercress, kale, swiss chard, salad leaves, herbs ... Go crazy! If it's leafy, then add it!" says Holler.

Ginger - 1 inch piece whole or grated
Garlic - 6 cloves
Green chillies - 2 whole, slit
Tomato - 1 chopped
Onion - 1 chopped fine
Oil - 1 tbsp
Thursday, February 5, 2009
Amti - Ruchira style
Another version of one of my favourite dishes - I have waxed eloquent on the joys of simple, Maharashtrian home cooking and for those who wonder what all the fuss is about, do try this once. Amti, in all its lentil cloaked goodness is at once comforting and delicious. Maybe it's my sambar craving South Indian roots, maybe its my Mumbai upbringing eating varan bhath at my neighbour's house - whatever it is - I loove amti!Ruchira - the cookbook, as I have mentioned in this post, is very inspiring to the cook who has experimented and just wants to come back to some good 'ol home cooking! So, I had to try this version of amti when I picked up the book - and I wasn't disappointed.
The flavours were absolutely amazing - simple, clean yet carrying that indescribable aroma of goda masala mixed with tamarind. Perfect with some hot polis or even just rice and bhindi bhaji (okra stir fry). Goda masala is usually home made in Maharashtrian households but Bedekar and some other local brands in Mumbai make a decent mix too.
This dish goes to this month's edition of Monthly Mingle - Healthy Family Dinners - being hosted by Michelle of What's Cooking. Monthly Mingle is originally the brainchild of Meeta of the amazing blog What's for Lunch Honey.
adapted from Ruchira by Kamlabai Ogale
Marble sized piece of tamarind soaked in 5 tbsp of water
1 tsp chilli powder
1 1/2 tsp goda masala
1/2 tsp grated jaggery
Tempering:
Mustard seeds - 1/4 tsp
Asafoetida - pinch
1/2 tsp turmeric powder
1 tsp oil
8-10 curry leaves
Garnish
grated fresh coconut
Chopped fresh coriander leaves
1. Cook the dal in plenty of water in a pressure cooker till soft. Whisk the dal a bit.
2. Heat the oil in a pan and add the mustard, when they splutter add the green chilli, curry leaves, asafoetida and turmeric powder.
3. Add the cooked dal, the jaggery, salt, goda masala and the tamarind juice. Bring to a boil and reduce flame and simmer for 10 minutes.
4. Add the grated coconut and coriander leaves and remove from flame.
Thursday, September 4, 2008
Moong Dal - Chilkewali (Split mung lentils with skin)

Moong (also called mung or green gram) is one of the most popular lentils in and also native to India. Widely used in other Asian cuisines too (munggo or monggo in Philippines and đậu xanh in Vietnam.) this lentil goes by the name moog, paasi payirru, hesaru bele and pesalu in different states in India.
It is known to be the most easy to digest lentil - especially the split lentil - and is often one of the first weaning foods given to babies. A rich source of protein, it is also used in recipes for people recovering from illnesses since it is light on the stomach.
In our kitchen the yellow split lentil without the skin (moong dal) is used atleast twice a week - moong ka cheela and pongal for breakfast, dals and kootu for our meals and a spoonful thrown in to thicken and nourish some soups. It is a versatile lentil and I find it takes on different flavours - from garlic to cloves - very easily.
But this recipe uses the split moong dal with the skin on (Moong dal chilka) and I find it to be a refreshing change from the usual skinless version. It has more character to it and retains its own flavour instead of blending in namelessly into the dish du jour. This recipe is a very simple one with a simple tadka of onions, tomato and garlic. Perfect with hot phulkas and can even hold its own with rice.

Split Moong dal with skin (green gram) - 3/4 cup
Onion - 1 chopped fine
Tomato - 1 big chopped fine
Garlic - 2-3 cloves chopped fine
Chilli powder - 1/2 tsp
Cumin powder - 1/2 tsp
Turmeric powder - 1/4 tsp
Asafoetida (hing) - pinch
Oil - 1 tsp
1. Cook the moong dal with skin in a pressure cooker in 3 cups of water. Cook along with turmeric powder.
2. Drain the stock and reserve.
3. Heat the oil in a kadai, add the asafoetida and garlic and fry for half a minute.
4. Add the onions and saute for about 3-4 minutes till translucent.
5. Add the chilli powder and cumin powder and cook for another 3 minutes.
6. Add the tomatoes and fry for 3-4 minutes till they turn just soft.
7. Add the cooked moong dal, salt and as much as stock as you prefer.
8. Bring to boil, simmer for 5 minutes and remove from flame.
9. Serve hot with chapatis or steamed rice.
Sunday, July 13, 2008
Amti (Daal - Maharashtrian style)

I have mentioned before how Amti was one of my favourites while growing up in Mumbai. This midly flavoured lentil dish is so simple but at the same time so satisfying! And ever since I got my hands on some Goda masala, it's been wonderful to be able to make this at home and have a delightful variations to all the dals and parrupu kootus we make at home.
This time I made Chincha-goola-chi Amti (Daal with tamarind and jaggery) borrowing the Cooker's recipe.
Have you visited the Cooker's delightful blog? - simple and satisfying is what it is, just like the amti I made. I guarantee you that any recipe you would pick up would not have more than 5-8 ingredients at the most, and definitely not more than 10! I tried her cupcakes for my daughter's birthday and they were perfect in everyway.

So what better place to choose from than her blog for this month's edition of MBP (Monthly Blog Patrol) where the theme is Less is More. MBP was started by Coffee of Spice Cafe and July's MBP is being hosted by Nupur of One Hot Stove. Nupur has specified that the theme means that the recipes chosen must have only five ingredients or less.
Check here for this recipe from the Cooker which has just the minimum number of ingredients with maximum taste!. The tamarind and jaggery give a distinctive taste to this dish while goda masala leaves you wondering what the smoky flavour is....
Tuesday, February 5, 2008
Weekend Breakfast Blogging - Adai Avial
Now, reinvention isn't a bad thing, but it was great to taste the original which was much more crisp and spicy and tasted soo much better - the slathering of white butter (see pic)
and chunks of jaggery helped of course, items we don't see much of, at our place.Anyway, once I was back, I decided to go back to Mom's original recipe one Sunday; and since we didn't have anything much planned that day, decided to make Avial to go along with it - one of hubby's favourite combinations.
Avial is a mixed vegetable stew which is common to both Tamil Nadu and Kerala, though if you ask me, it originated in Kerala and then seeped into Tamil Nadu via Palakkad....
The Kerala version is much drier than the Tamil version and I have also seen versions where the curd is added just before serving it, so that it doesn't sour the dish.
I tend to make this dish according to the menu involved - if it's part of a main meal, then I cook it drier and with the veggies chopped bigger. If it's more of a gravy accompaniment (like with adai) then I make it with more liquid and also with the veggies a bit smaller.
The vegetables itself are a matter of debate.....I remember both MIL and my mother insisting that one shouldn't use "English vegetables" and stick to "naatu" (local or desi) vegetables as far as possible.
So, for me that means no cauliflower and peas. Bhindi or okra as well as bittergourd are definitely a no-no due to their texture and taste. Some people also avoid colocasia (arvi) but I like a few pieces. I usually like to add drumstick, raw bananas, elephant yam,carrots (I know , I know English veggie - but I like the colour it adds to the dish!) and ash gourd (pushnikai).
But go with what you like....after all its the combination of different veggies with the coconut and yoghurt which gives its delicious taste.
Adai in itself is a protein packed dish with a healthy combination of rice and lentils. This when combined with the mixed vegetables in a coconut and yoghurt curry makes it a complete meal and gives a great start to the day.
(The traditional blob of home made butter is best kept for children who will burn it off!)
I am sending this combo to Weekend Breakfast Blogging which is the brainchild of Nandita of Saffron Trail. It's being hosted this month by Suganya of Tasty Palettes and the theme this month is Healthy Eats. "Meals that are balanced and include various different food groups like fruits, vegetables, whole grains, low-fat dairy products, etc are welcome", she says.
Raw rice - 1 1/2 cups (you can also use parboiled rice)
Combine equal quantities of urad dal,chana dal and tur dal to make one cup
(chana dal = bengal gram lentil,tur dal or arhar dal = split pigeonpea lentil, urad dal = split white lentil)
Red chillies - 4-5
Black peppercorns - 1/2 tsp
Cumin seeds (jeera) - 1 tsp
Grated coconut - 1/4 cup
Curry leaves - 10-12
Onions - 2 medium finely chopped
Hing - pinch
1. Soak the rice and dals in water overnight or for 4-5 hours.
2. Drain the water and grind along with the red chillies, peppercorns and cumin to a coarse paste, without adding too much water.The batter will be thick with pieces of dal not fully ground. This gives crisper adais.
3. To the batter add grated coconut, curry leaves, hing and salt. Add the chopped onions to the batter just before making the adais.
4. Heat a non stick griddle or a dosa tava and pour one ladle of the batter; spread gently into a medium circle which will be a bit thick. Make a small hole in the centre so that it cooks evenly.
5. Drizzle half a tsp of oil all around the adai and cook on a medium high flame for about 3-4 minutes, once it becomes golden brown on the bottom flip it over and cook the other side for another 2-3. minutes.
6. Serve hot with avial or jaggery on the side.

2 cups of chopped vegetables (thick fingers) from the following - elephant yam, sticky potato or potato, carrot, raw banana, ash gourd (pushnikai), drumsticks.
Grated coconut - 1/2 cup
Green chillies -4
Cumin seeds - 1 tsp
Grind the above into a paste and mix with half a cup of thick yoghurt which has been beaten with a spoon.
Curry leaves - 5-6
Coconut oil - 1 btsp
Method:
1. Pressure cook the vegetables with about half a cup of water and a little salt, for just one whistle (5 minutes) so that it is cooked but not mushy.
2. Add the coconut yohurt paste and curry leaves to the cooked vegetables and gently heat the mixture and simmer for about 5 minutes till the chillies lose their rawness. Adjust the salt and turn the flame off.
3. Drizzle the coconut oil over the stew and serve hot with adais.
Monday, January 28, 2008
Mullangi Sambar (Radish Sambar)
But since I liked it so much, it was a matter of time till I finally found the right way.....or rather I found out what I liked.
I like it with onions and a tomato in it, lots of coriander;not too thick but at the same time with enough dal to make it satisfying. Not too sour but the tang should be there.
.........and most of all I love eating the vegetables in it - small onions (shallots/chinna vengayam),drumsticks and radish (mullangi) are the best. In that order.
Most people don't really like radish, let alone in a sambar - but for some reason I love that those white discs take on the flavour of the sambar completely and when you bite into them - they just dissolve in your mouth.
The sambar prepared on festival days? that's awesome too ; the mixed vegetables (usually an odd number- 5 or 7) gives this a whole new flavour.
Idlis in our house are almost never made without sambar to accompany them. There's something about the rice and protein mix I think which just completes this meal for us and makes it so satisfying.

I make mini idlis sometimes and it's pure heaven to drown them in the sambar and then eat them.
I know people who mash the idlis into sambar - enuff said!
And I remember people who would walk into Anand Bhavan in Mumbai on a Sunday morning with tiffin carriers and pack 3-4 huge dabbas of "samburr" for about 4 plates of idlis.
Well, I'm sure they still exist....as do the sambar haters ;). So let's agree to disagree and try to figure out it's origins.
I have been trying for sometime now, to find out how this has become such a staple of South Indian food (in all its myriad forms, be it Pulungari, Huli, Pulusu or Pitlai). There don't seem to be many explanations for it (atleast in the limited research I have done).
The basic premise is that sambar in it's present day form is a recent addition to Tamil cuisine - maybe about the 19th century. Chillies and tomatoes came to India quite late in the day, and the original cuisine in Southern India used pepper and curd/mango in their preparations. Tur dal was not a South Indian pulse, it was moong dal (green gram) which was predominantly used.
I found this article by Dr Padmini Natarajan - The Story of Sambar - which speaks of the Maratha king Sambhoji who ruled over Thanjavur (Tanjore). Like a true son of the soil, he liked his amti, a lentil based dish which uses kokum - a fruit, the pulp of which is used as a souring agent in Maharashtrian and Konkani cuisine. However, there was no kokum available one day and since he used to like cooking, he substituted it with tamarind pulp. That when paired with the tur dal created a new dish - named Sambar after him.
Though it sounds like an urban legend, she goes on with a fascinating (to nerds like me atleast) discussion on the various versions it takes in the four Southern states and how it has evolved.
Well, its present day avatar is certainly something we can be proud of....

Ingredients:
Tuvar Dal (Arhar,tuvaram paruppu,split pigeon pea lentil) - 3/4 cup or 150gm - cooked with 4 cups water and 1/4 tsp of turmeric, in the pressure cooker till mushy, about 3 whistles and 5 minutes on a low flame.
Tamarind extract - about 1 cup from a lime sized ball soaked in warm water for half an hour
Radish - 1 medium, cut into thin discs and cooked separately, till just tender
Sambar powder - 2 heaped tsps
Chilli powder - 1 tsp (optional - the sambar powder I am currently using isn't too spicy since it has more dal in it than store bought ones)
Coriander(dhania)powder - 1 tsp
Onions - 1 medium sliced
Tomato - 1 medium chopped into 4-6 pieces
Coriander leaves - 1/4 cup chopped
Talimpu or tempering:
Mustard seeds (rai/kadugu) - 1 tsp
Urad dal - 1/2 tsp
Asafoetida powder (hing)- pinch
Curry leaves - 2 tbsp washed
Oil - 1 tbsp
Salt to taste
Method:
1. Heat oil in a wok or kadai, add the mustard and wait till it splutters, then add the urad dal, the hing and when the urad turns brown, add the curry leaves.
2. Add the onions and saute till soft - 2-3 minutes, then add the tamarind extract diluted with 250 -300ml water, bring to boil and let simmer covered for about 15 minutes.The raw smell of tamarind should have disappeared.
3. Add the tomatoes, cooked radish, sambar powder, chilli powder, coriander powder and salt and let simmer for another 8-10 minutes.
4. In the meanwhile, whisk the cooked tur dal till smooth; add to the simmering sambar and bring to boil. Simmer for another 5 minutes till the flavours come together, add the chopped coriander and remove from flame.
Serve with idlis,dosais or rice.
Friday, January 25, 2008
Homemade sambhar powder and home cookin'
For me atleast, its the contentment which I look forward to when I eat something made at home - that kind of satiation is always missing when eating outside. Now, I don't go looking for that feeling when eating out, so why come and try to sell me something you don't have a hope of ever recreating?!
Like homemade masalas.....that taste is so unattainable that the manufacturers shouldn't even try to replicate it.
They start with a handicap - masalas made at home vary from family to family depending on their traditional recipe.....so even on the off chance that they do manage to satisfy one set of people, there's no way everyone is going to be happy!
Its been a very long time since I ground sambar masala at home - what with our packed schedules and work days, it just doesn't seem possible to make the effort to go through all that roasting and grinding.
I do make rasam powder since no one seems to come even close to what we look for in a rasam powder, but the sambar powder brand we were using seemed to be good.
Until l I went home this time and my mother made her sambhar powder specially for me and Dad packed it all up for me to take back. The delicious sambhar we have been making since then,has woken me up to what "homemade" is all about.
It's about the handpicked ingredients, where we know the quality of each of them - the coriander seeds, the red chilly variety, the proportion of dals.
Its about the care taken to make sure each one of them is roasted separately, for the right time till the kitchen is filled with the overpowering smell of spices each on giving out their own aroma and oil.
And then taking the mixture to the nearby mill, where it is ground under eagle eyes.....to just the right texture.Perfection.
Ingredients:Dry Red Chillies - 1/4 kg
Coriander seeds (Dhania) - 1/2 kg
Tuvar Dal (arhar dal or split pigeon pea lentils) - 150 gms
Chana Dal (Bengal gram lentil) - 75 gms
Raw Rice - 25 gms
Black peppercorns (milagu)- 10 gms
Fenugreek seeds (methi/vendhiyam) - 25 gms
Method:
Roast all the ingredients separately. The methi and pepper should be roasted very lightly.
Grind to a powder and store in a tightly lidded container.

The Makings of a delicious meal - mixed vegetables cut for avial, mochai,coriander and tomato for sambar and brinjal for a dry vegetable
Every meal I had at home was just perfect, whether it was the pudina thogayal, kootu, rasam and rice. Or Sambar, avial, kathirikai curry and curd rice. Or the chapati, dal and cabbage porial. Or the crisp adais with butter and jaggery. Now that's home cookin'.
The meals I cook at home don't come close to this, because my memories are made of what I have grown up eating for 25 years, not the past 10 years.
And as everyone knows, memories are stronger than imagination! :)
Wednesday, December 5, 2007
JFI December - Tur Dal - Uniquely South Indian
Well, when I looked at Linda’s blog shouting out excitedly that she was hosting Jihva this month and the theme was Tur Dal – there were no second thoughts! I just had to participate in this event…….I love this lentil and in fact it’s been the one constant factor in my cooking and eating, no matter where I have been.
At home, sambar, plain dal with a simple tempering of mustard, Rasam made with tur dal water – all these were staples. When I went down south on holidays as a child, I was amused that we were given a small scoop of dal at the very beginning of the meal – “where is the rest of it?!” I would think, forgetting that the sambar and paruppu usli (steamed ground lentils with beans) to come all had it in varying proportions.
My next door neighbors were Maharashtrians and I used to often eat with their children who were my friends; varan bhath (dal rice) with thoop (ghee) was a given and absolutely comforting.
While in college, I practically lived at my best friend’s house and their Konkani daali thoy is something I make even today. Later when I lived with 3 flat mates, tur dal in all its myriad forms became a staple at our PG digs, easy to make and great to eat. The aspiring model who was a Punjabi made these daals which were so delicious that I used to polish off two bowls even before dinner.
Tur dal/arhar dal/split pigeon peas/tuvaram paruppu, sambar paruppu – this should be made our national dal – like one of those national integration slogans. “Ek Daal hain hum” *snort*
Though I have been waxing poetic on dals, for this event I couldn’t decide what to make, there were so many choices!
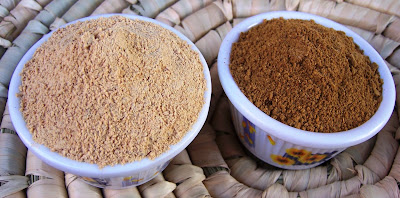
Finally (and barely making it to the event) I decided to make traditional podis; paruppu podi and rasam podi – not the usual gravy accompaniments, but something quite uniquely South Indian. We were running out of both and there weren’t any grocery shops in Delhi that I knew of, where I could pick up good quality podi.Podi means powder, and Paruppu Podi refers to a ready-to-eat powder which is made out of dal and spices; roasted and powdered and then stored for use whenever needed. It is usually eaten with steamed rice and ghee or sesame oil. Probably the first version of convenience food!
Since I was on a roasting roll and since it also had tur dal in it, I also made Rasam powder (see some great recipes for rasam here, here and here) which when made at home tastes very
different from the one you get packaged, not to mention that it also has tur dal as a main ingredient.The roasting is the key to this; I roast each ingredient separately on a low flame, taking care to see that they are taken off the flame as soon as they change colour and give off a nice smell. You can also do this in the oven.
The ingredients for paruppu podi and the proportions vary according to each family/region’s recipe, so this is the one which worked for me after trying out various proportions. Try a few recipes out so that you can decide on which one you like.
I like the coriander and cumin to dominate in my Rasam powder, while in the dal powder the pepper quantity is the only adjustment I made to Mom’s recipe. So, what’s your preference?
Ingredients:
Tur dal (split pigeon peas) – 1 cup
Dried red chillies – 4
Black peppercorns – 1 tsp
Garlic – 7-8 flakes
Oil – 1 tsp
Method:
1.Heat oil and roast each ingredient separately, till they change colour and are evenly roasted. This takes approximately about 2-3 minutes for each ingredient.
2.Let cool completely and grind to a coarse powder, adding salt to taste at the final round of grinding. Store upto 3 months in a tightly lidded container.
3.We have this with steamed rice, and sesame oil or ghee. Some dal or hot Rasam added to the rice makes it even more delicious.

Ingredients:
Tur dal – 1/3 cup
Dried red chillies – ½ cup
Coriander seeds – 1 cup
Cumin seeds - ¼ cup
Black peppercorn – 1tsp
Fenugreek seeds (methi) – 1 tsp
Mustard seeds – 1 tsp
Washed and dried curry leaves – ¼ cup
Oil – 1tsp
1. Roast all the ingredients separately, till they change colour and are evenly roasted.
2. Cool completely and then grind to a smooth powder. Store in a tightly lidded container.