Sunday, July 5, 2009

Udipi Sambar


One of the things I missed most when I moved out of Mumbai was something I had taken for granted all those years when I was growing up - Udipi restaurants. They dotted the landscape, especially the King's Circle and Matunga neighbourhood where we lived, and we loved the food they dished out. Clean, efficient and cheap - these were places we went to whether we wanted an early morning South Indian breakfast on a Sunday morning or a pav bhaji in the evenings. College saw us practically camped in one of these places as our burgeoning appetite never matched our wallets - we enjoyed their paper dosais and masala uttapams, their thick milkshakes and cold juices.
Anand Bhavan was a particular favourite of my Dad's for their rasam wadas, while I preferred the AC Udipi Cafe. Mom loved the South Indian "meals" at the Udipi place near Matunga station - unlimited food for Rs. 40!. Shree Sundars came much later when I had just started my degree in Podar and it became an instant favourite with our gang. Then there were the die hard fans of Mani's behind Ruia college where they literally drank the chutney! What is your favourite Udipi place to eat in Mumbai?

When I moved to Chennai and ate my first idli outside of home at Saravana Bhavan - I didn't like it! Because they didn't have the Udipi sambar to go with it, nor the flat, large, coarse idlis. The sambar at the eating places in Chennai were almost like what we made at home - there was no tantalising hint of sweetness at the edges nor was there coconut in the masala. The sambar at Udipi restaurants have their own fan following - on Sunday mornings in Anand Bhavan we found it amusing to see people coming and ordering plates of idlis and dosais as take away; they would bring those steel many-tiered dabbas to fill up extra "sambhur"!

It was then that I got hold of this recipe and whenever the urge struck, I would make Udipi Sambar at home. I love this sambar and often serve it with idlis or dosai or just with rice for lunch. Its the jaggery and the coconut which make all the difference. I used drumsticks and small onions - but feel free to substitute with pumpkin, ash gourd or even just small onions alone.

Everytime I go back to Mumbai, I make it a point to visit our old haunts. A visit to Udipi itself is on my travel list, but don't know when that will happen. This month though we are likely to have a virtual food tour of Udipi & Mangalore courtesy this month's RCI theme - Udipi & Mangalorean cuisine - being hosted by Sia of Monsoon Spice.
This event was originally the brainchild of Lakshmi of Veggie Cuisine.

Udipi Sambar


Ingredients:

Tur dal - 1/2 cup (cooked in 3-4 cups water in a pressure cooker till soft, then whipped or mashed till smooth)
Tamarind - small lime size ball soaked in 1 cup water and pulp extracted
Small onions - 10-12, soaked and peeled
1 tsp jaggery
1-2 drumsticks, chopped into 2-3" batons

Masala paste:
1/4 coconut grated (fresh)
1/2 tsp fenugreek seeds (methi)
1/2 tsp urad dal seeds
1.5 tsp coriander seeds (dhania)
dried red chillies -6
curry leaves - handful
1 tsp oil

Roast all ingredients, keeping the coconut and curry leaves to the last few minutes. Cool and grind to a paste

Tempering:
mustard seeds (rai) - 1 tsp
urad dal seeds - 1tsp
green chilli - 1 slit
curry leaves - handful
asafoetida (hing) - pinch
2 tsp oil

Method:
1. In a heavy pan, add the oil and when it is hot the tempering ingredients. Saute the onions and then add the drumstick pieces and cook in half a cup of water till just tender.
2. Pour in the tamarind pulp, salt to taste and jaggery - add 1.5 cups water and bring to a boil. Lower flame and simmer for about 10-15 minutes till the raw smell disappears.
3. Add the mashed dal and the masala paste and simmer for another 5 minutes, adding some more water if it is too thick.
4. Transfer to a serving dish and serve with idlis.

Sunday, June 28, 2009

Chawlichi Amti

My love for amti has been much discussed in these posts - Kaatachi amti, Chincha goola chi amti, Ruchira' recipe for Amti - so you would definitely know how much I love this simple Maharashtrian based dish which has so many variations. This post is about yet another version of amti - but different from the others in the sense that it uses legumes instead of lentils and also that it has a very nice coconut based masala used in it.

The original recipe by Sanjeev Kapoor used sprouted black chickpeas (kala watana) - I am a bit puzzled about where I got this recipe from since it is in my book of handwritten recipes whereas I own most of SK's books. Maybe the Konkani cuisine cookbook he wrote (which I didn't buy because I though - and still do - that his forte lies in North Indian cuisine) has this recipe which I picked up from some magazine?

I adapted this recipe by using blackeyed peas to make it and we loved it the first time I made it - so I have continued doing this and it's become a regular part of our menu now. I alternate this recipe between the Punjabi lobia rassa and the Tamil Karamani kozhambu so that we don't get bored of having this bean. The use of fresh and dried coconut really differentiates this curry while garlic and tamarind round off the wonderful combination of flavours.

Sending this lovely bowl of goodness to this month's edition of My Legume Love Affair - the Twelfth Helping of the food event which is being hosted by Annarasa and was originally conceived by Susan - The Well Seasoned Cook.


Chawlichi Amti
(adapted from Sanjeev Kapoor's recipe for Kale Watanyachi Amti)

Cooked Black eyed peas (Chawli/lobia/karamani)- 1.5 cups
Masala
1 Onion - peeled and sliced
Copra (grated dry coconut) - 1/4 cup
Garlic - 5 cloves

Freshly grated coconut - 1/2 cup, ground to a paste
2 onions, finely chopped
Asafoetida (hing) - pinch
Chilli powder - 2 tsp
Coriander powder - 1 tsp
Cumin powder - 1 tsp
turmeric powder - 1/2 tsp

Tamarind - marble sized, soaked in 1/2 cup water and pulp extracted
Garam masala powder - 1 /2 tsp
salt to taste
jaggery - 2 tsp grated (optional)
coriander leaves - 1/4 cup, chopped

1. Heat 1 tsp oil, saute sliced onions till translucent (about 3-4 minutes), add the copra and garlic cloves and saute another 3-4 minutes. Cool and grind to a fine paste.
2. Heat 1 tbsp oil in a pan, add the finely chopped onions and hing and saute on high heat till the onions are golden.
3. Add the masala powders (except the garam masala powder) and the cooked black eyed beans and mix well.
4. Pour in some hot water to cover, add salt and bring to boil. Cover and cook on a low flame for about 8 minutes.
5. Add the copra onion paste, tamarind pulp,jaggery and the fresh coconut paste; cook another 5 minutes.
6. Add the garam masala powder, coriander leaves and serve with rice or rotis.

Sunday, June 21, 2009

Baked Lemon Sole with Spring Onions and Cherry Tomatoes


This absolutely beautiful baked lemon sole with spring onions and cherry tomatoes is a must-try recipe which I highly recommend. I adapted it from Jamie Oliver and it turned out succulent, light and packed with flavour. While the recipe doesn't call for it, I marinated the fish fillets (the original recipe was for whole fish) in a mixture of lemon juice, fresh coriander, green chillies, ginger and garlic pounded together - somewhat similar to this recipe I made earlier. I served the fish over some stir fried chill garlic noodles - awesome! This gorgeous beetroot apple salad on the side and the meal was complete.

We liked it so much, that I repeated the menu for my birthday dinner - replacing the noodles with a baked rice which also went very well with it. The best part about this recipe is that it doesn't take any time at all - apart from the marination, the actual cooking takes about 15 minutes. If you like your fish to have those nice grill marks, you could grill it on a hot griddle for about 5 minutes and then bake it in the oven for the remaining 10 minutes.

Feel free to experiment with other kinds of fish like sear if you prefer; also, you can substitute the cherry tomatoes with chopped tomatoes.

Baked Lemon Sole with Spring Onions and Cherry Tomatoes
(adapted from Jamie Oliver)

Ingredients:

Sole fillets, cleaned - 1 kg (about 6 pieces)
Marinade: Pound together
1 cup coriander leaves, cleaned and washed
1 tbsp lemon juice
3 green chillies, chopped roughly
1" piece of ginger chopped
5-6 garlic cloves
Olive oil - 1 tsp
salt to taste

Marinate the fillets in the above pounded mixture for about an hour.

Cherry tomatoes - 1 cup, halved
garlic
5 cloves of garlic, peeled and finely sliced
6-8 spring onions, finely sliced (reserve about 1/2 greens chopped)
1 tbsp dried oregano
Red wine vinegar - 1 tbsp
2 lemons - grated zest and juice
1/4 cup black olives, chopped
1/2 cup coriander leaves, chopped
4 olive oil
salt to taste
freshly crushed black pepper - 1 tbsp

1.In a bowl add the cherry tomatoes, sliced garlic, oregano, spring onions, vinegar, salt, pepper, 2tbsp olive oil and the zest and juice of 1 lemon to it.
2. Mix well and spread over the bottom of a large baking dish or tray.
3. Place the marinated fish fillets on top of the spring onion mixture. Preheat the oven to 200ºC.
4. Now add the olives, chopped coriander, juice and zest of the second lemon to the bowl that the tomatoes were in. Add the remaining 2 tbsp olive oil and then divide this mixture between the fish, placing an equal amount on top of each filler.
5. Cook in the preheated oven for 12 to 15 minutes. You can grill the fish briefly on a griddle before baking it.

Sunday, June 14, 2009

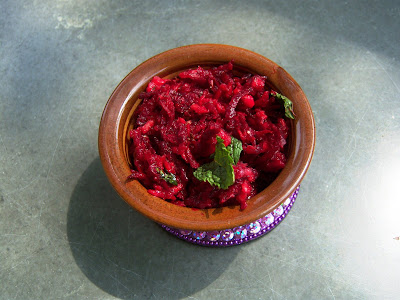
Beetroot Apple Salad


Beetroot is one vegetable which I think is better off raw or just steamed rather than done to death by overcooking. I love this beetroot porial we make - crunchy and juicy with a light tempering, my daughter loves it and so does this blogger's cutie pie 3 year old, as we found out when Arch visited with us last week!

This recipe is a lovely combination of beetroot and apples - an adaptation of Jamie Oliver's recipe for a Crunchy Raw Beetroot, Pear and Feta salad. I dropped the feta, substituted the pears with apples and grated the beetroot and apples instead of cutting them into thin strips. The dressing was a very simple lemon oil dressing I spiced up with a dash of tabasco to give it that zing.

I paired this with another lovely recipe from Jamie Oliver -a baked Lemon Sole which I served over some chilli garlic stir fried noodles. This turned out to be such a lovely meal that I made it again for my birthday dinner, minus the noodles. Arch missed it by a day and was served the leftovers for lunch the next day ;)


Beetroot Apple Salad

2 beetroots, peeled and grated
2 apples, peeled and grated
3-4 tbsp mint leaves

Juice of half a lemon
salt (sea salt if available)
1 tbsp olive oil
Freshly crushed black pepper -1/2 tsp
2-3 drops of Tabasco sauce

Toss the beetroot and apples with the dressing, adding some more lemon juice if needed. Garnish with mint leaves and serve cold.

Tuesday, June 9, 2009

Grilled Chicken with Caesar Salad Dressing

This is the quasi Caesar salad which I had mentioned making along with the Coconut Lentil Soup I posted last week. The classic Caesar salad usually has a dressing of olive oil, mustard, Worcestershire sauce and egg mixed together with mashed anchovy fillets and tossed with a bread croutons and lettuce topped with grated parmesan cheese. Culinary lore tells us that this salad dates back to the 1920s when it was created by an Italian chef called Caesar Cardini and it was meant to be tossed right at the table - it apparently still is done like that with a lot of flair in a few restaurants in New York.

I have seen a lot of Caesar salads with chicken here in India - apparently it is not part of the original recipe. This particular recipe is so loosely adapted from the original that if it changed anymore it would be like a well worn sock!
But I do have some expert backing on this - I vaguely remember Jamie Oliver roasting bread croutons and chicken together before tossing it with a Caesar salad dressing. My version of course deviates from even his version in that, I didn't use anchovies, pancetta or creme fraiche and instead roasted some vegetables as well along with the chicken. So - suffice to say - this is a grilled chicken salad! :)

The chicken infused the bread croutons with its juices while roasting and it was absolutely great to bite into those crisp squares. Instead of using a raw egg in the dressing, I coddled the egg - which is basicaly means boiling the whole egg in water for not more than 45 seconds. I was also liberal with the garlic and herb and it ended up making a great meal with the combination of the soup to start with and a bowl of watermelon to finish.

Grilled Chicken Salad

Whole Wheat Bread - 3 slices cut into 1/2 " cubes.
300gms chicken breast sliced and marinated in:
- 1 tbsp lemon juice, 1 tsp olive oil and salt to taste
2 tbsp olive oil
1 onion peeled and cut into squares
1 bell pepper cut into squares
1 tbsp dried herbs
3 cloves garlic chopped
Lettuce leaves, washed,dried and torn - 2 cups
5 tbsp Grated Parmesan cheese

Dressing:
1 clove garlic finely chopped
3 tbsp lemon juice
1 tsp Worcestershire sauce
1 tsp mustard (Dijon is preferable)
1 egg coddled (boiled in water for 45 seconds and cooled)
5 tbsp olive oil
1 tbsp freshly ground pepper
salt to taste

1. Combine the marinated chicken pieces with the bread cubes, 2 tbsp olive oil, onion and pepper squares, herbs and salt.
2. Roast in a pre heated oven at 180C for about 15-20 minutes till the chicken is cooked and tender and the bread is crisp.
3. For the dressing , mix Worcestershire sauce, lemon juice,minced garlic, salt, crushed pepper and mustard.Crack the coddled egg and whisk into the other ingredients. Add the olive oil slowly while continuing to whisk constantly so that it doesn't separate.
4. Arrange half the chicken pieces and half the bread croutons in a bowl and toss with half of the dressing. Add the remaining salad and the remaining dressing and toss again.
5. Put in the torn lettuce and toss again. Sprinkle the grated cheese on top and serve warm or cold.

I make sure never to serve raw or undercooked eggs to children; pregnant women too should be very careful while eating dressings which may contain raw eggs.

Wednesday, June 3, 2009

Lentil Coriander Soup

Most people seem to have a love-hate relationship with soups. There are the keen aficionados who love everything from the fiery Tom Yum to the nostalgic "sweet corn" soup. And then there are the nay sayers who consider it "diet" food or even "patient" food! I fall into the former category and love trying out different soups. There was a time in my life though when I had only clear soups for almost a year, so that pretty much kept me off soups for the next two years when I actually started eating solid food.

But now I'm back to experimenting both at home and when I'm out - the Tom Yum at The Kitchen in Delhi's Khan Market is absolutely amazing as is the Roasted Pumpkin Soup in Chennai's Eden. I particularly like noodle soups and other one pot meal soups like this one made with beans. I recently tried the Laksa at a new restaurant in Delhi called Tasty Tangles and it was so good we ordered seconds - the coconut milk was just right - not too creamy and spiced just right!

Speaking of coconut milk brings me to the subject of this post - a lovely lentil soup made just a little creamier with some coconut milk and flavoured with lots of coriander. This was one half of a typical soup and salad meal at home - going through my posts I realised that we tend to do these a lot especially during summer when the thought of a full meal is just too oppressive.
I paired the lentil soup with a quasi-Caesar salad - chicken,peppers and bread croutons roasted together with olive oil and herbs but served without the all important mayonnaise dressing - I instead tossed it with a simple vinaigrette. The combination made a very nice meal - lots of protein from the chicken and the lentils and the crunchiness of the bread croutons going wonderfully with the creamy soup.

This lentil soup uses red lentils (masur dal) cooked together with ginger and garlic. I didn't bother blending it in a processor and instead just mashed them with the back of the ladle and mixed in the coconut milk before returning it to the stove. Lots of coriander really lifts this soup, so don't skimp!

This Lentil Coriander soup goes to No Croutons Required - that amazing soup and salad event hosted by Lisa and Holler. This month's event focuses on leaves! "We are looking for a soup or salad that features leaves. Think spinach, watercress, kale, swiss chard, salad leaves, herbs ... Go crazy! If it's leafy, then add it!" says Holler.


Lentil Coriander Soup

Red lentils - 3/4 cup (soaked for 15 - 30 min)
Ginger - 1 inch piece whole or grated
Garlic - 6 cloves
Green chillies - 2 whole, slit
Tomato - 1 chopped
Onion - 1 chopped fine
Oil - 1 tbsp
Coconut milk - 1 cup (I use fresh, but canned is fine too)
Coriander leaves - 1/2 cup chopped
salt to taste
freshly crushed peppercorns - 1 tsp
Method
1. Heat the oil in a heavy bottomed pan or in a pressure pan.
2. Add the ginger, garlic and green chillies and saute 1 min. Then add the finely chopped onions and fry for 3-4 minutes. Once transluscent add the tomato and fry for a further 2 minutes.
3. Add the soaked dal, 6-7 cups of water and cook on the stove till soft and mushy; or pressure cook for 2 whistles.
4. If there is excess water, drain it off and reserve and mash the dal with the back of spoon taking care to remove the slit green chillies and the ginger piece (if not grated). You can also run this through the food processor after cooling it.
5. Add back the reserved lentil stock and the coconut milk to get the consistency you want. Put in the chopped coriander, salt and crushed pepper and simmer gently on low, for about 3-4 minutes taking care not to boil.
6. Serve warm.

Monday, May 25, 2009

Lemon Chicken & Cauliflower Pilaf


The dog days of summer are here and planning meals is even more of a chore now - the only thing one feels like having is lots of cold water, buttermilk and a chilled glass of beer. Can't survive on that though, so one has to think of something to eat. Cold soups, chilled salads, cold pasta, curd rice - after exhausting all the permutations and combinations I was quite stumped for our Sunday evening meal. So out came my go-to book in these situations - Good Food's 101 Healthy Eats. And to make it even easier, I plonked it down in front of Hubby and asked him to pick!

Lemon Chicken & Cauliflower Pilaf is what he asked me whether I could rustle up - he couldn't have picked anything easier than that! Chicken breasts cooked along with long grained rice and cauliflower and beans - a one pot meal. My neighbourhood guy delivered the chicken breasts in half an hour in which time I cut the onions and vegetables and soaked the rice. The whole meal was done in a a little over an hour.

I modified it to suit our palate which needs a little more spice than the recipe called for. Some whole spices in the tempering along with some slit green chillies and half a tsp of red chilli powder and it was just right - not too spicy and not too bland. I also marinated the chicken breasts for about half an hour - I just can't seem to bring myself to cook chicken without marinating it first, it seems to make all the difference to the dish.

This one pot meal is just the ticket for when you are pressed for time and don't have the energy to fuss - the taste is absolutely delicious - that balance between comfortingly familiar and still refreshingly different. This dish goes to this month's edition of Meeta's Monthly Mingle - Ravishing Rice Recipes being hosted by Nags of The Edible Garden

Lemon Chicken & Cauliflower Pilaf


4 Boneless chicken breasts (the recipe asked for skin on, I prefer skinless)
1 1/2 cups basmati rice
1 cube chicken stock dissolved in 4 1/4 cups water
1 cup cauliflower florets
1 cup beans, cut into 2 inch pieces

1 tbsp oil
2 green chillies slit
1'' cinnamon stick
3 cloves
1 bay leaf
1 large onion, sliced thin
1/2 tsp turmeric powder
1 1/2 tsp curry powder (I used sambar powder)
1/2 tsp red chilli powder
1 cup coriander leaves, stalks separated and kept aside
1 lemon, halved anc cut into slices
salt to taste

1. Clean the chicken and marinate in 1 tbsp lemon juice and a tsp of salt for about half an hour.
2. Soak the basmati rice in water for half an hour.
3. In the meanwhile, slice the onions, chop the cauliflower and beans.
4. Heat oil in a heavy bottomed pan, add the whole spices and then the slit green chillies. Saute for 3 minutes , then add the sliced onions and saute 5 minutes till transluscent.
5. Put in the marinated chicken and fry on high, keeping each side for about 4 minutes till it browns just a bit.
6. Add the turmeric powder, the sambar powder and the chilli powder and finally the rice and fry for 3-4 minutes.
7. Add the vegetables, the salt, lemon slices, coriander stalks and the chicken stock. Bring to boil, then turn down the flame and simmer after covering the pan with a tight fitting lid.
8. Cook for about 10-12 minutes, stirring just once in a between - the rice will be cooked but separate and the chicken will be tender.
9. Garnish with coriander leaves and serve with a tomato raita.