

Wishing everyone a very Happy New Year - may we have peace and happiness!
My resolutions for this blog (considering I don't seem to have any different ones for my personal life!) are to post regularly and improve my photography and presentation. AND most important - cook some new dishes, discover new recipes and hone my baking skills!
Happy cooking!!
Subscribe To
Saturday, December 29, 2007
Saturday, December 22, 2007
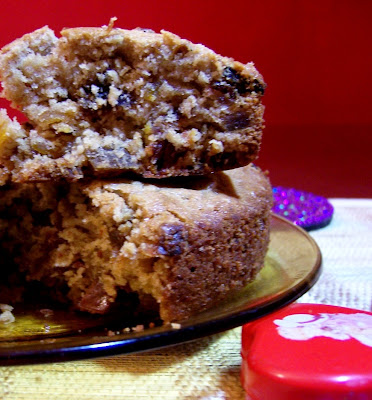
Christmas Cake

Fruit cake jokes are a dime a dozen around this time in the syndicated cartoon strips and growing up I didn't really get the humour, since I loved fruit cakes and the home baked ones I did get to have were delicious!
When I started making them though, the "hard as rock" and "don't drop it on your foot" jokes really scared me - what if mine turned out like that!
I needn't have worried; I discovered that baking fruit cakes is easier than the usual cakes since they are heavier and are not expected to rise as much. So no "gently folding in the flour into the beaten eggs" and "no beating the eggs for eternity"......the ingredients are mostly brought together and combined with a light hand.
The only thing to take care of is that, since this is a dense cake, it is better to bake it a lower temperature for a longer time.
And as for the dried fruits - well, that's the best part - you can pretty much use your favourites and leave out what you don't like! It's even better if you can manage to soak the fruits in some good alcohol about 3-4 weeks in advance, and the cake tends to moisten up because of the fruits in it and tastes really good the more time it is kept.

This recipe was given to me by a dear friend of mine in England - we have never met but our online correspondence over the past 6 years has brought us closer than we would have ever imagined. She is a wise warm and caring woman and I hope to meet her some day.
The first time I made this was for a close friend - Christmas was always at her place but that year she was in her last trimester of pregnancy and I thought she could do with some Christmas cheer.
This year I made it for her again - we land up at her place on Christmas Day next week and will be staying with them for a bit. So as they celebrate their first Christmas with their baby, this cake will bring with it our best wishes for their wee one and a great year ahead.
This is the adapted recipe, the original contained sherry, black treacle and a few other ingredients which I have changed to my taste and availability.
It is a lovely moist cake and the flavours of the dried fruits as well as the cinnamon lingers on and makes this a beautiful way to end a lovely festive meal.
Christmas Cake

Ingredients:
Eggs - 3 plus 1 white
Unsalted Butter - 125 gms
Flour - 125 gms
Soft brown sugar - 125 gms
Mixed Dry Fruit chopped - 350 gms (choose from currants,sultanas,raisins, dates, fig, apricot)
I used equal quantities of currants,raisins, dates,apricots and plums
The dry fruits were soaked 3-4 weeks in advance in about 1/4 cup of dark rum (brandy can also be used)
Rind of half of a lemon or orange -I used orange peel.
Chopped cherries - 30gm
Ground almonds - 30gm (Toasted in the microwave for about 90 seconds and then ground)
Whisky or brandy - 1 tbsp
Golden syrup - 1 tbsp
Cinnamon powder - 1 tsp
1. Grease an 8" tin and lightly sprinkle flour on top.Preheat the oven to 180C or 350F.
2. Cream the butter and sugar. Beat the eggs and white and add to the creamed butter and sugar.
3. Sift the flour and cinnamon powder together and add slowly to the egg mixture and combine with a light hand.
4. Add the whisky and golden syrup to the mixture and then all the dried fruit,orange peel and almond powder. Mix well; the cake batter will be quite thick.
5.Turn the batter into the prepared cake tin and make a small hollow in the centre.
6. Bake at 180 C for about 45-55 minutes or till a skewer inserted into the centre comes out clean.
This cake goes to :
A Fruit a Month - Dry Fruits, hosted by Latha and Lakshmi over at The ‘Yum’ Blog
and to
dear Sunita @ Sunita's World for this month's edition of Think Spice - Cinnamon.
Friday, December 21, 2007
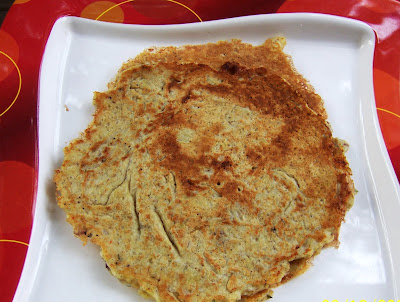
Jacque Pepin's Potato Lace
My book of handwritten recipes says I wrote this recipe down from Women's Day - definitely something I got from the circulating magazine library in Chennai. It was all hit and miss what you would get each month under the category of "Foreign publications"! But atleast you would get a wide variety of magazines to read each week at a fixed monthly rate.....I have yet to come across something like that in other cities.
This is a really nice pancake recipe for those lazy Sunday mornings when you feel like having something more substantial than an omelet but a little less daunting than brunch.
Some potatoes, onions, eggs and flour and you're set. This recipe is by Jacque's Pepin, a native of France who became a widely respected chef starting out at age 13 as an apprentice in the family restaurant. He was extremely popular in America with his TV shows and cookbooks.
You can see the original recipe here and also here where it also mention's the fact that this was the recipe his mother used in her restaurant! So, maybe it should be called Jacque Pepin's Maman's recipe....

Potato Lace
Recipe adapted from Jacque Pepin's recipe
Ingredients:
Onions - 2 large
Potatoes -4 peeled
Eggs - 3 small
Flour - 3 tbsp
Coriander - 1/4 cup washed and chopped
salt - 1 tsp
Freshly crushed black peppercorns - 1 tbsp
Oil - to shallow fry the pancakes
1. Puree onions in a blender.
2. Shred potatoes in a grater using the bigger holes. Use a potato ricer if possible. S
queeze out as much of the moisture out of the potatoes as possible, using paper towels if needed. Removing the moisture removes the starch also, and that makes the pancakes crispy.
3. Mix the flour, eggs, grated potatoes, pureed onions, chopped coriander, salt and pepper in a bowl till well blended. The batter will be thick but of dropping consistency, add a tsp of milk if needed.
4. Take a deep nonstick skillet, pour about 1 tbsp oil and heat it.
5. Pour about 3 tbsp of batter in the skillet and spread immediately with the back of a spoon like a dosai, as thin as possible. It will have tiny holes and jagged edges.
6. Cook over medium heat for about 1/2 a minute to 1 minute on each side till crisp. Serve immediately.
7. Make the remaining pancakes in the same way, 1 tbsp of oil should be able to take care of a batch of 3-4 pancakes.
These need to be eaten immediately while they are still crisp to get the best taste.
Tuesday, December 18, 2007
Chollia Aloo (Fresh Chickpeas and Potatoes)

Fresh Chickpeas(Kabuli Chana) or Hara Chollia / Green Garbanzo Beans is something I have only heard of and read in recipe books. Until I came to Delhi.
Last week as I went about the local market, I saw a packet of this and asked the vendor what it was, he said "Chollia" and a light went off in my head!
It's funny, but having seen only dried chickpeas all my life, I had to actually introduce the concept in my head of chana being something else before they were dried!I had never thought of them being fresh and like peas before.....
Nutrition wise though, they are as packed with phosphate, folates, folic acid,calcium, vitamin B and iron as their dried counterparts. They are low in fat, calories and sodium and high in dietary fibre. Read more here.
So, here I was the next morning, with the fresh green chickpeas in front of me, and not a clue about what to do - too little time in the morning to start a marathon search on the internet and the only recipe I had in my books,called for paneer. Which I didn't feel like having for lunch that day.
I figured I couldn't go wrong with potatoes, so that's what got cooked - Chollia Aloo....don't need to say much about this simple recipe, except that the green chickpeas tasted so much different from dried chickpeas and made the dish really delicious!
Chollia Aloo

Ingredients:
Hara Chollia (Green Garbanzo beans/ Fresh Chickpeas) - 1 cup
Potatoes - 4-5 medium sized, boiled and peeled
Tomatoes - 3-4 medium chopped fine or pureed
Onions - 2 big finely chopped
Ginger garlic paste - 1 tsp
Turmeric powder - 1/2 tsp
Chilli powder - 1 tsp
Coriander powder - 1 tsp
Cumin seeds - 1 tsp
Oil - 1 tbsp
Garam masala - 1/2 tsp
Chopped coriander - 1/4 cup
Salt to taste.
Method:
1. Dice boiled potatoes.
2. Heat oil in a kadai (wok) and add cumin seeds, when they change colour, add the onions and saute till golden.
3. Add ginger garlic paste and fry for 1 minute, then add the turmeric powder,chilli powder and coriander powder and fry for 2-3 minutes.
4. Add tomatoes and fry on a low flame for about 6-8 minutes, constantly stirring so that it doesn't stick to the bottom. Add half a tsp of oil if it still sticks. The mixture should come together and leave the sides of the pan and be almost brown in colour - but NOT burnt.
5. Now, add 1 cup of water, salt, the potatoes and the chollia and bring to a boil. Cover and simmer on low flame for about 3-4 minutes.
6. Check seasoning and gravy consistency, adding upto 1/2 cup water.
7. Add the garam masala. simmer 1 minute,then add the chopped coriander; remove from the flame and pour into serving dish.
8. Serve hot with rotis.
Sunday, December 16, 2007
Winter Warmer Casserole
Delhi's winter is really kicking in and I can't get over how cold it is! It makes me crave for hot soups and hot meals. Don't fancy spending too long in the kitchen either and too many dishes mean that one cools before the other comes to the table. Solution - a one pot meal - steaming hot straight from the stove/oven to the table!
So I set about looking for a one pot recipe and came across casseroles - something which I wanted to make for a long time but didn't seem to find a suitable recipe.I would read recipes for "Green Bean Casserole" and realize that there was actually just green beans in it with some milk and butter and some soup straight out of a soup can all baked together....we are so used to having vegetables cooked in a variety of ways with spices and tempering that this concept was a bit difficult to understand. But this time I was determined to make this dish my own.
I have a cookbook called "50 and Holding Ozark Cookbook " - sent by a dear friend in the US. It has all sorts of recipes in it, all contributed by the members of the 50 and Holding Club and the community of Climax Springs, Missouri. It is divided into different sections, with blank pages at the end of each section for you to make notes on; at the back of the book in addition to the glossary of cooking terms, there are nutrition and calorie tables, a table for cooking vegetables showing the way to prepare each vegetable(wash,cut,peel etc),cooking time; cuts of meat and serving portions according to weight and a very interesting table on what herbs and spices to use for cooking various vegetables and meats in different ways.
While most of the recipes are traditional American dishes and local homestyle cooking and include such doozies as "how to cook 'coon", I really enjoyed reading this book and all its tips and notes! None of the recipes had more then 10 ingredients and most recipes were about 10-15 lines long
Well, anyway,all of the vegetarian casseroles in it were accompaniments and not one pot meals. So I read through the cabbage casserole, the corn casserole and the winter vegetables casserole....and then I improvised.....
......and this is what I came up with - a hearty one dish meal which incorporated some cooked rice, pasta sauce out of a jar (which I needed to finish because I didn't like it enough to use in pasta), potatoes, cabbage,cauliflower,green garbanzo beans,sweet corn soup from a can (which I got free with something and will never use otherwise), cream cheese, milk and lots of crushed black peppercorns. Come to think of it, maybe it would be better to call this dish "Pantry Clean up"!
The rice really made this substantial without the heaviness of the usual baked pasta dishes.
Cream cheese can be substituted with sour cream or even cheese spread.
Pasta sauce can be replaced with tomato puree (about 4 tbsp should do).
Milk is optional and I added it to make sure the whole dish remained moist and did not dry out.
Try other vegetables like mushroom,spinach, peas,peppers and even fresh sweetcorn - they should do well in this dish.
If you don't fancy whole cabbage leaves in the dish, shred the leaves after cooking.
Winter Warmer Casserole

Ingredients:
Potatoes - 4 medium peeled and sliced thinly
Onion - 1 big sliced
Cabbage - 4 whole big leaves washed well
Hara Chollia (Green garbanzo beans) - 1/2 cup parboiled
Sweet corn soup (tinned) - 1 cup
Cauliflower - 1 cup florets
Cooked rice - 1 cup (preferably a day old)
Pasta Sauce - 6 tablespoons (Or use tomato puree 4 tbsp)
Chilli powder - 1 tsp
Cumin powder - 1/2 tsp
Mixed dried herbs - 1 tsp
Salt to taste
Olive oil - 1 tbsp
Cream cheese - 5 tbsp
Milk - 1/4 cup (optional)
Freshly crushed black peppercorns - 2-3 tbsp
Method:
1. Take the sliced potatoes and put them into boiling water in a large vessel with a tsp of salt in it. Cook for about 5 minutes, then add the whole cabbage leaves and press till they are immersed in the water and cook another 5 minutes. Check whether the potatoes and cabbage are just cooked. Drain the water and keep aside.
2. Heat oil in a pan and add the garlic and then the onions, saute for 5 minutes till the onions are transluscent.
3. Add the chilli powder and cumin powder, then the capsicum,cauliflowers and parboiled chollia and stir fry on high for 3-4 minutes till they are just cooked. Add the pasta sauce/tomato puree at this stage and cook for a couple of minutes more.
4. Add the cooked rice and sweet corn soup,mix well and cook further for 3-4 minutes, then add the dried herbs, salt and 1 tbsp of crushed peppercorns. Turn off the flame and keep warm.
5. Take a casserole or an oven proof dish and lightly grease the insides. Take two of the cabbage leaves and place it at the bottom side by side covering as much of the dish as possible.
6. Place half the potato slices over the cabbage leaves in a single layer. Roughly spread about 2.5 tbsp of cream cheese over the potato slices.
7. Spoon the entire cooked rice and sweet corn mixture over the potato slices.
8. Place remaining potato slices in a single layer over the rice mixture.
9. Spread the remaining cream cheese over the potato slices and cover with the other 2 cabbage leaves
10. Pour milk over the whole mixture and sprinkle 1 tbsp of the crushed pepper all over.
11. Bake in a pre heated oven for about 30 minutes at 180C / 350 F.
12. Serve hot with bread or on its own.
Thursday, December 13, 2007
Celebration? - chocolate of course!

What better way to celebrate a decade of togetherness than with chocolate! I made this lovely Chocolate Rum cake from Jugalbandi; first time I was making a vegan cake and I was amazed at how delicious it tasted. Very chocolatey and rich.
No one who tasted it believed me when I said it didn't have flour or eggs in it!
I halved the proportions of the original recipe. Other than that I didn't change a thing. It didn't rise as much as it should have, so if you change the proportions you might want to be a bit careful. But it was just a bit denser but not chewy and otherwise tasted great.
The perfect ending to a lovely day.
Tuesday, December 11, 2007
Brinji (Vegetable Fried Rice in Coconut milk)
There are some recipes which I learnt from my MIL, like this one here, which are staples in hubby’s extended family – either everyday ones or special ones for close family gatherings (read minimum 50 people!).
Some of them are traditional recipes from her maternal home while others are popular Tamil recipes – not necessarily hoary and traditional, but just ones which are made in many Tamilian homes irrespective of where the family is from. Someone tastes the dish, likes it and asks for the recipe – soon it becomes a favourite in their home. And then before you know it; it’s on your local cookery show on TV!
This recipe is something like that. I hadn’t ever heard of it growing up in Mumbai. But in Chennai I came across many versions of it – and it didn’t matter what community they were from, so I had to assume that this is one of those rootless dishes, so to speak – all the more unique and flavourful for that!
Birinji or Brinji is basically a mixed vegetable pulao, the difference being that it has coconut and spices ground into it and fried; the rice is then cooked in the spice paste and coconut milk which gives it a creamy flavor. Which is why I think of it as a fried rice and not a pulao.
Don’t confuse this with the “Thengai saadam” or Coconut rice which is made down South, no, not the one with grated coconut and tempering made on festival days, but the one which is tempered with whole spices and then cooked in coconut milk. No other masala, no vegetables, nothing else to intrude on the creamy coconut flavor. This one is different.
I tried to figure out the etymology of the name…….but didn’t get very far. Some people say that the name comes from “birinji elai” – the Tamil word used for Tej Patta – a spice similar to Bay leaf used to flavor this dish. But I don’t think that’s correct. If anything I would think that the spice got the name from the dish! Very much a chicken and egg situation….
I did find this reference to birinji though; in a discussion on the etymology of rice and where it originated, the author of the article refers to “birinji” or “brinji” as being the Persian word for rice.
Another article on the Kirghitz tribe in Afghanistan refers to a dish they have called Shier brinji – which is boiled rice in milk.
So I’m assuming that the word we now use for this dish, originally referred to the rice used in the dish – probably a basmati kind of long grained rice which came from the North. If anyone has more interesting or authentic information on this, do let me know!
Whatever the origin, this dish is one surefire way of making an ordinary day a festive occasion. MIL turns this out perfectly each time she has guests over, making it in her electric rice cooker in a largish quantity and it’s always a hit.
I don’t wait for guests to stop by – a Sunday afternoon at home is reason enough to have this delicious dish; some pickle, pachadi, papad and we’re good.
Brinji/Birinji

Ingredients
Basmati rice – 1½ cups
Onions – 2 peeled and sliced
Mixed vegetables – 1 ½ cups cut into fingers (potato, carrot, beans, peas, capsicum)
Coconut milk – 2 cups (1 half of a medium sized coconut)
Cloves – 2
Cardamom – 2
Cinnamon – 1 “piece
Tej patta (similar to bay leaf) – 1
Oil – 2 tbsp
Salt – to taste
Spice Paste:
Grated coconut – ½ cup
Green chillies – 4
Ginger – 1 “piece
Garlic – 4-5 cloves
Coriander leaves – ¼ cup packed tightly
Mint leaves – handful
Cumin seeds – 1 tsp
Method
1. Soak the rice in 3 cups of water for about 10 - 1 5 minutes.
2. Grind the ingredients for the spice paste, adding a little water till it is smooth.
3. Heat the oil in a large non stick wok/kadai and add the cloves, cardamom, cinnamon and leaf. 4. Sauté for 1-2 minutes, then add the onions and sauté till lightly browned.
5. Add the spice paste and fry for another 4 – 5 minutes on a low flame, taking care that it doesn’t stick to the bottom
6. Add the mixed chopped vegetables and fry for 2-3 minutes.
7. Drain the rice and reserve the water. Add the rice to the pan and lightly fry for about a minute. Then measure out the coconut milk, add two cups of the reserved rice water, so that the total liquid equals 4 cups and add to the rice in the pan.
8. Add salt to taste – if you taste the liquid at this stage, it should taste a bit salty; it will be then just right after it is cooked.
9. Bring water to a boil and then cover and cook on medium flame for about 5 minutes. Open, stir the rice gently, cover again and cook on a low flame for another 5-7 minutes.
10.If the rice is cooked after this time and there is still a little more water, uncover and cook on low for about a minute or two till the water dries out.
The rice should be just about cooked when you turn off the flame; it shouldn’t be falling apart since it will cook a little bit more in the residual heat and might turn mushy by the time it is served.
Cover and keep warm till serving time. Garnish with mint leaves and serve with pachadi /raita (yoghurt salad)
Subscribe to:
Posts (Atom)