Showing posts with label potato. Show all posts

Monday, January 3, 2011

Poori Bhaji - Breakfast Heaven


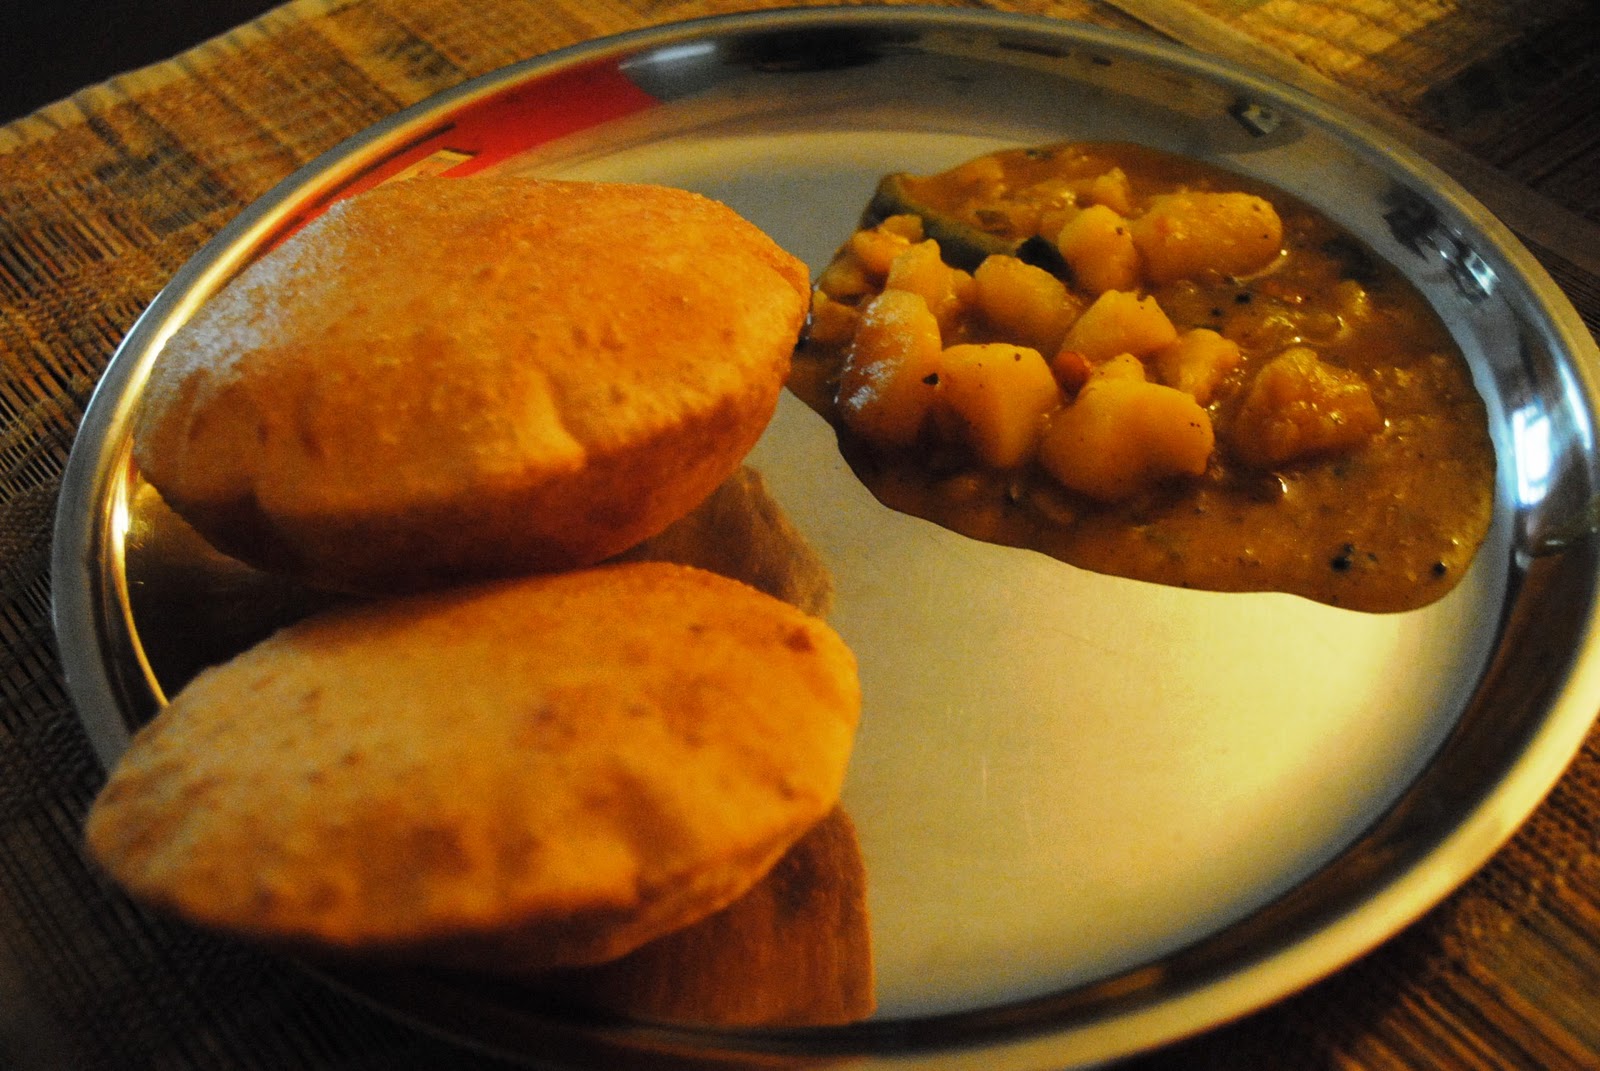
Is Poori Bhaji everyone's weakness? It is in this house atleast. My 5 year old loves her puris....Hubby too goes weak in the knees when he thinks of a plate of poori aloo - yes the bhaji in Poori Bhaji is all about the potatoes isn't it! I don't make it that often because of the deep frying involved - but it usually finds its way to our table about once in two months and especially when we have guests staying with us over the weekend. It is wonderful to have a leisurely breakfast, one puri after the other, ladling some more of the silky, potato gravy to finish up the "last" piece of puri and then having one more puri to finish the "last" portion of gravy! The puffed up puris are light as air and that lulls you into a false sense of comfort; till suddenly you discover you've eaten so much you can't even move from the table! So, you roll over to the couch and lie there in a sleepy torpor.

The winter months are especially nice to have steaming hot puris straight from the kadhai, along with the carb comfort of potatoes cooked in a mild gravy. Add a the weekend edition of your favourite newspaper and you have the recipe for a perfect Saturday morning. I must say this though - having help in the kitchen to make the puris for you so you can have it piping hot (without getting annoyed about how this one turned out flat and that one didn't puff up) is a luxury. I am definitely enjoying it while it lasts!


The potato gravy though I like to make myself - I keep changing the dish depending on what I feel like eating that day. One version is the Tamil one we have grown up eating - a tempering of chana dal, urad dal, green chillies, asafoetida (hing) and ginger. Followed by crumbled, boiled potatoes mixed with turmeric and simmered in water till the starch in it breaks down to make a slightly thickish gravy.And a squeeze of lemon at the end. Then there is the dry bhaji which you get at railway stations and which is what we ate in BB Dadar in Mumbai, growing up - I can still taste that amazing combination of sunshiny yellow potatoes mixed with green chillies and coriander.

The one I made this weekend is a recent favourite - its modelled on a dish I had at my SIL's place - which in turn had been made by her neighbour who is from Bihar. I didn't meet her and my SIL didn't know the recipe, but the version I make now is an approximation based on how it tasted. In this venture, I was helped by Tara - my girl Friday - who is from Jharkhand (the state which was carved out of Bihar). So there is tamarind juice, red chilli powder, dhania powder, onions and kasoori methi. The tempering however, remains the same as the Tamil recipe since we like the crunch of the dals. The gravy turns out with a nice tang to it and the lovely flavour of kasoori methi underlying everything. The tamarind juice melds with the starch in the potatoes and the gravy thickens up quite quickly. It takes just 20 minutes of simmering and its done.


Poori Bhaji

Poori
Atta (wheat flour) - 2 cups
Oil - 1 tbsp to knead,
salt - a biggish pinch
Water - about 3/4th of a cup to 1 cup
Oil - 1.5 cups to fry the puris

1. Mix the atta with the salt and oil (1 tbsp) and then add as much water as needed to fashion a dough which is a little firm. Firmer than the dough for rotis (Indian flat breads).
2. Rest the dough for about 10-15 minutes. It is preferable not to knead the dough too much in advance, it may dry out and absorb too much oil.
3. Pour the oil into a kadhai (wok) and heat - but not till smoking, else the pooris will brown too fast before being cooked and become crisp.
4. Take a small piece of the dough (the size of a small lemon), roll into a smooth ball and flatten with the rolling pin. Roll out to 2.5 to 3 inch disc dabbing a little oil on first - it shouldn't be too thin, but not too thick as well.
5. Slide the poori into the kadai - it should rise to the top - if it doesn't, the temperature of the oil isn't right and it may need to heat up some more.
6. Carefully splash a little of the oil with a slotted spoon, on top of the poori and it will puff up. Turn it over once it is golden brown (about 3 minutes) and then cook the other side as well till it is brown.
7. Remove with a slotted spoon and drain on some tissue paper to absorb the excess oil.
8. Repeat with the rest of the dough - serve piping hot with Aloo Bhaji.

Aloo Bhaji

Potatoes - 5-6 - boiled, peeled and crumbled roughly into medium sized chunks
Tempering 
2-3 tsp oil
Chana dal - 1 tsp
Urad dal - 1 tsp
Hing - pinch (asafoetida)
Green chillies - 2

1 onion chopped
1 tomato chopped into 6 pieces
red chilli pd - 1 tsp
Coriander powder - 1/2 tsp
Turmeric powder - 1/4 tsp
Kasoori methi -  1/4 tsp

Tamarind extract - 1 marble sized ball soaked in 1 cup of water or 1 tsp tamarind paste
salt to taste
Coriander leaves for garnish

1. Heat the oil in a pan and add the tempering ingredients. When the dals turn light brown, add the onions
2. Saute the onions till translucent.  Add the red chilli powder, coriander powder, turmeric powder and kasoori methi and fry for about a minute.
3. Add the tomatoes and fry for half a minute. Pour in the tamarind extract, add salt and the potatoes and bring to boil. Add half a cup more of water and continue simmering for about 15-20 minutes till the gravy thickens, the tamarind loses its sharpness and the potatoes thicken the gravy.
4. Garnish with the coriander leaves and serve hot with pooris.

Sunday, November 28, 2010

Urlaikizhangu Podimaas - Potato Stir Fry


Podimaas is probably the first "grown up" way of eating potatoes that a child is introduced to in Tamil cuisine and it remains a favourite comfort food for me well into adulthood. Podimaas refers to a simple stir fry of potatoes - boiled and then tempered with very few spices (usually green chillies and ginger); a teaspoon of lentils adds the crunch I look forward to in this dish which is otherwise melt-in-the-mouth soft.

For podimaas, the boiled potatoes are usually crumbled by hand till they are a little mashed but not completely. However, I like it when they are in small pieces (not choppped with a knife but roughly done with my hands). Since my daughter pretty much eats the same food we do, I use red chillies instead of green chillies since they are less spicy. Lots of turmeric is important for me -bright yellow is just the way podimaas should be! Different from the golden, crusty version I make at other times.

What is your favourite version of having potatoes?


Urlaikizhangu Podimaas - Potato Stir Fry

4 medium sized potatoes, boiled and peeled.

1 tbsp oil
Mustard seeds - 1 tsp
Chana Dal - 1 tsp
Urad Dal - 1/2tsp
Curry Leave - a few
Dried Red chillies - 2-3 broken (traditionally, one used fresh green chillies)
Ginger - grated/chopped fine - 1/2 tsp

Turmeric powder - 1/2 tsp

Salt to taste
lime juice - a squeeze

1. With your hands, roughly break the boiled potatoes into small pieces; or chop them up.
2. Add the oil to a pan and heat, put in the mustard seeds and when they pop, lower flame, add the chana dal, urad dal, red chillies and curry leaves. When the dals turn goldern, add the turmeric powder and ginger.
3. Add the potatoes and salt and mix well. Stiry fry for about 5 minutes, till it heats through and is mixed well.
4. Remove from flame and add a dash of lime juice. Serve warm with rice and accompaniments like sambar, rasam or kozhambu. Thayir saadam (yoghurt mixed with rice) tastes sublime with this stir fry.


Thursday, July 22, 2010

Warm Potato Salad - Nigella Express


One of the dishes I made for this lunch with friends - I liked the recipe as soon as I saw it in the book Nigella Express - the combination of bacon, mustard and potatoes seemed like a great idea. It helped though that I had bacon at home - its not something I usually have at home.

I used small sized potatoes, but since these were not new potatoes (which have very thin skins), I peeled them after boiling and halving them. I used spring onions instead of scallions and used the greens as a garnish.

I thought that the bacon would make the dish salty and so went easy on the salt, but it turned out a tad on the lower side. Apparently, the crisper the bacon is fried, the saltier it gets - so next time crisper is the way to go. This is comfort food - the lovely taste of potatoes enveloped in the slightly creamy dressing cut with the sharpness of mustard.....

And there will definitely be a next time - I want to try this with a lovely vinaigrette of vinegar, mustard and pine nuts I saw somewhere. Tossed with warm potatoes and bits of spinach - bet it would be wonderful!


Warm Potato Salad


3/4 kg small/baby potatoes
6 spring onions thinly sliced, greens reserved
1 tbsp olive oil
4 slices bacon
2 tsp white wine vinegar
2 tbsp mustard (Colemans)

1. Cook the potatoes with skin in salted water till cooked - 20-25 minutes. Cool, peel and cut in half.
2. Heat oil in a pan and cook the bacon until crisp. Remove and keep aside.
3. In the same pan, saute the onions for about 2 minutes and remove from flame.
4. Add the vinegar and mustard and then the potatoes and mix together. Transfer to a serving bowl.
5. Just before serving, crumble the bacon and mix into the salad reserving some for garnish on top along with the onion greens.

Sunday, January 3, 2010

Chicken Goulash with Mashed potatoes

Goulash or "gulyás" is a Hungarian dish which is somewhere between soup and a stew. Authentic gulyás is usually a beef dish cooked with onions, paprika powder and peppers. Potato or noodles are sometimes added to this to make it a hearty main course. The dish is very different from other European dishes in that it uses caraway seeds (shahi jeera) as well as a relatively high heat quotient. This dish fits in perfectly with my near obsession with one pot meals and our love of spice.

I made this on New Year's Eve - we were confined to the house since hubby was diagnosed H1N1 positive a day before that. I know - shock and awe have followed us whenever someone has heard this news - but frankly I myself know of so many people who have been diagnosed that its turned into a normal flu and probably even lost some of its severity. I was just happy that the symptoms were not severe and that we had been careful to keep him away from us even before he was diagnosed. Fingers crossed that we don't get it - this time atleast!

Anyway, since I knew we would be having a quiet one this year and hubby was otherwise quite normal and did not have any diet restrictions, I started looking for an interesting dinner - something like the one we had last New Year's Eve, which would practically cook itself. Turned to Jamie Oliver - a nice springboard for ideas which I then adapt to our requirements with usually great results. There I found his Pork Goulash recipe which I adapted heavily - chicken instead of pork, no sour cream garnish but creamy mashed potatoes on the side instead, pao instead of rice to accompany the stew and green chillies instead of red, chicken pieces dredged in flour before sauteeing to thicken the stew a bit.

It was a wonderful meal - the red peppers lending a touch of sweetness to the spicy stew, the chicken amazingly tender and the pao a perfect accompaniment to mop up all that liquid goodness. Happy New Year!

Chicken Goulash


Chicken - 400 gms (I had boneless chicken marinated with lemon juice, chilli powder and salt. Whole cut chicken pieces do very well in this dish since it cooks for almost an hour)

Onions - 2 sliced
Green chillies - 2 finely chopped (the original recipe has fresh red chillies)
1 tbsp chilli powder (substitute with mild paprika powder to lower the heat quotient)
1 tsp caraway seeds (shahi jeera)
8-10 fresh basil leaves, torn
2 red peppers, sliced
5 medium tomatoes, chopped
1 stock cube dissolved in 2 cups warm water
fresh coriander leaves - 1 cup chopped
2 tbsp olive oil
salt and pepper to taste

Flour - 2 tbsp seasoned with salt and pepper

1. Dredge the chicken pieces in the seasoned flour till well coated and keep aside. Reserve the remaining flour, if any.
2. Heat the olive oil in a heavy bottomed pan and fry the chicken pieces for about 5 -8 minutes making sure both sides are browned. Remove from the pan and keep aside.
3. Scrape the pan of any browned bits and add to the reserved flour. Mix the stock water into this and keep aside.
4. In the same pan, heat the remaining oil and saute the sliced onions and green chillies till the onions are soft (about 10 minutes).
5. Add the caraway seeds, basil leaves, salt and pepper and saute for a few minutes. Pre heat the oven to 180C
6. Add the sliced red peppers and chopped tomatoes as well as the fried chicken - mix and then add the stock to the pot and bring to boil.
7. If the pot is oven proof and can fit into the oven, you can use the same. Else transfer the stew to an oven proof dish and cook for 45 minutes.
8. Sprinkle fresh coriander and serve with coarse bread and mashed potatoes.


For the mashed potatoes - I boiled 4 big potatoes, peeled and put them through a potato ricer (absolutely amazing for lump-free mash) and then mixed in half a cup of warm milk, a pat of butter, some salt and pepper finished with a dash of lemon juice.

Saturday, November 7, 2009

Baked Chicken with lemon and garlic chives, new potatoes and mint flavoured rice


Do you have those days when you are in a whirl from the beginning to the end? oh sure, you say - most days at my house are like that!
Aah...but do you feel like you enjoyed every minute of it at the end of the day when you are absolutely exhausted? Now, those days are few and far between - the days when the exhaustion is self sought.....that feeling which makes all the tiredness completely worth it.

Yesterday was such a day - the previous evening, my daughter's best friend A, decided she wanted to have a sleepover at our place. It was the end of a long week at work and I had decided to stop to finish my grocery-veggie shopping on the way back home, so it was a bit later than usual when I reached home. But the sight of two 4 year old girls all excited about their sleepover, giggling over dinner, eyes shining at an unexpected sweet treat and chortling away at silly things (like the sound one makes while gargling) was enough to chase those dregs of life away. By the time they had changed into their night clothes, patted Teddy and Pinky and were tucked into bed, they were truly tired and fell asleep in no time.

A's Mom and I decided that since they would anyway be up early (all of us remember how hard it was to sleep on a sleepover!), we might as well make best use of the cool weather and take them on a picnic to Lodhi Gardens - something we do a lot when the weather is nice. So, the day started at 6 30 and soon we were on our way in two cars - it was a foggy day and the grass was wet with dew - but nothing a hot cup of tea and rava idlis and cheese sandwiches couldn't solve. A's baby brother looked placidly from his stroller while the two girls went ga-ga over all the different dogs which get walked here. Perfect beginning to the day!

Reached home at 10am and a quick change of clothes and I was out the door immediately to join a friend at the Dastkar mela - an annual Nature Bazaar I love visiting. We spend a lovely 4 hours browsing through all the stuff they had - from fresh red chilli flakes from Garhwal to grass chatais from Bengal. Grass magazine and cosmetic racks, Andretta pottery, Kumaoni jams and pickles, dried garlic chives, Zatar spice from Altitude, handmade soaps of vetiver and honey milk, a natural dye skirt in indigo with a lovely red and gold border, coconut wood fruit forks, Elephant poo notebooks and board games - these were some of my delightful finds. Hubby joined us at fag end after he had himself finished shopping for a couple of straight backed "chairs" (what do you call chairs which have no arms and just a curved spine for a back?) in the Cottage Industries next door and we stopped for a quick lunch at Saravana Bhavan. Personally I can't stand Saravanas and I had done lunch at the Bazaar itself - home cooked rajma chawal and wadis in paalak gravy with rice from Himachal at one of the food stalls - heaven!

Just an hour to rest then I raced off to my jazz dancing class 2 doors away - 2 hours of sheer energy! we have delightful young teachers who manage to push us through our stretches and exercises and even keep the energy flowing for the remaining half hour of dancing - it was fabulous though unknown parts of my body creaked and groaned at being pushed beyond their comfort zone!!

I came home surrounded with that warm glow of tiredness - to find my brother was in town and my husband had invited him for dinner. Quick marination of some boneless chicken (yaay for yesterday's shopping!), a hot shower and I settled down for some catching up over drinks while I fed my daughter her dinner. Dinner cooked itself while we chatted and I checked on the rice once in the 10 minutes it took to cook and everything was ready in just under two hours.

The grilled chicken I made for dinner was totally spur of the moment - the garlic chives were on top of my list since I had just bought them, so I added them to the marinade of lime juice, crushed pepper, olive oil and red chilli flakes. I cut some new potatoes into wedges and par boiled them; put them in along with the marinated chicken and chicken stock and baked them for half an hour. The rice was just mildly flavoured with mint and spices and cooked on the stove top with bell peppers. The perfect end to a lovely day.

Baked Chicken with lemon and chives, new potatoes and mint flavoured rice

Boneless Breast pieces of chicken - 2-3 (about 350 gm will serve 3 large portions)
4 potatoes, sliced into wedges (skin on)
Olive oil - 1 tbsp
1 chicken stock cube dissolved in 200ml of warm water and combined with 1 tbsp lightly roasted flour
( I used Better than Bouillon onion gravy mixture dissolved in warm water and simmered till thick)
Marinade
juice of 1 lemon
1 tsp dried garlic chives
1 tsp red chilli flakes
1/2 tsp freshly crushed black pepper
1 tbsp olive oil
Coriander leaves - 2-3 tbsp
salt to taste

Rice
1.5 cups basmati rice soaked in 4 cups water
1 bell pepper sliced
1 bay leaf
1 cinnamon stick
1 onion sliced
2 tsp oil
fresh mint leaves - 1 cup
(or dried mint - 2 tsp)

1. Clean the breast pieces of chicken, make small slashes all over with a fork and mix in marinade ingredients. Set aside for atleast one hour.
2. Par boil the potato wedges in cold salted water for 5-7 minutes - they shouldn't be fully cooked. Drain, reserve the water and keep aside.
3. Dissolve the stock cube in 200-300ml of drained water from potatoes.
4. Pre heat the oven to 200C. Toss the potatoes in 1 tsp of olive oil, 2-3 tbsp of the stock and a few teaspoons of the marinade(add a pinch of salt if needed). Arrange in a baking dish
5. Place the marinated breast pieces of chicken on top of the potatoes. (You could briefly brown the chicken breasts on high heat in a pan with 1 tsp of oil - 3-4 minutes each side and then put into the baking dish - I forgot to do it this time)
6. Mix the marinade with the stock and the remaining olive oil and pour over the chicken and potatoes.
7. Bake the dish covered (with aluminum foil) for 30 minutes, you can remove the foil for the last 5 minutes.
8. Meanwhile, Heat oil in a pan and add the bay leaf and cinnamon, fry the sliced onions for about 6-7 minutes till translucent.
9. Add the sliced bell peppers and fry some more (3-4 minutes). Add the soaked rice (reserving the water) and fry for 3 minutes. Then add the reserved water, salt to taste and bring to a boil. Cover and simmer for 10-15 minutes till just done.
10. Serve the baked chicken with the potatoes and rice on the side, spooning some gravy on the top.

Note: If you don't mind having grilled chicken without a sauce, you can avoid the stock altogether, the marinade is enough to keep it moist.

Wednesday, August 19, 2009

Pumpkin & Bean Casserole


Another lovely one pot meal from my trusted Good Food 101 Healthy Eats. As I have said before, the recipes from this book make for quick and healthy weekday meals, at the same time very delicious. There is this Egg curry which is made with spinach, a lovely chicken casserole , a delicious Lemon Chicken & Cauliflower Pilaf each one had that "something different" factor about it which helped break the monotony of our everyday meal.

This casserole recipe has black eyed beans cooked with pumpkins into a lovely stew kind of consistency with herbs and spices and then baked with a lovely topping. The original recipe called for a breadcrumb, walnut and herb mixture, but I couldn't resist going for a mashed potato topping which one usually finds in a cottage pie recipe. Also, I have done the bread crumb topping before for this dish and we found it turned out too dry for our liking....I know I'm probably doing something wrong, but right then the mashed potatoes beckoned! ;) Unfortunately, I didn't take a photograph of the finished dish after it was baked with the lovely crust.

So, if you have been wondering what to do with those black eyed beans in your pantry besides the usual Indian dishes we make; or if you have a hunk of pumpkin sitting in the fridge and don't want yet another bowl of soup - try out this recipe. Some bread on the side to go with it and you are all set.

This casserole of goodness goes to that wonderful event My Legume Love Affair (MLLA) which is the brain child of Susan of The Well Seasoned Cook and this month's edition has come back to her blog after being hosted by many enthusiastic members of our food blogging community.

Pumpkin & Bean Casserole
(adapted from BBC Good Food - 101 Healthy Recipes)


Ingredients:

2 cups cooked black eyed beans (chowli/lobia/karamani)
(Soak approx. 1.25 cups of dried beans in water overnight, drain the water and cook in fresh water in a pressure cooker or on the stove top till tender)

2 tbsp olive oil
Onions - 2 chopped
Garlic cloves - 4 finely chopped
Green chillies - 2 , finely chopped
2.5 cups fresh tomato puree (the original recipe called for passata, you could use store bought tomato puree)
1 " stick cinnamon
3-4 cloves
400ml white wine
400 ml vegetable stock (I used a stock cube dissolved in 400ml warm water in which the beans were cooked)
350 gms pumpkin (kaddu/sitafal/sigappu pushnikai), peeled and cut into 2 " cubes.
red chilli powder - 1 tsp
salt to taste

For the potato topping:
4-5 big potatoes, boiled and mashed (I ran them through a potato ricer)
2-3 tbsp milk
salt to taste
freshly crushed black pepper

Method:
1. Heat the olive oil in a pan, add the onions and saute for 10 minutes till lightly browned. Add the garlic, green chillies, red chilli powder, tomato puree, wine, vegetable stock, salt and pepper and bring to boil.
2. Reduce heat, simmer and cook uncovered for about 20 minutes. Add the chopped pumpkin and cook for another 15 minutes.
3. Pre heat the oven to 180 C, add the beans to the pumpkin and tomato gravy and mix. Transfer the entire pan into a large baking dish or two smaller ones.
4. You can now opt to cover the casserole with the original recipe's suggestion of a crumble mixture (breadcrumbs, walnuts, herbs and oil) or my choice which was a mashed potato topping.
5. Combine the ingredients for the potato topping together and then spoon the topping over the beans casserole carefully, taking care not to press down too hard.
6. Bake at 180C for 20-25 minutes till the topping is golden brown on top. Serve with warm bread.


Tuesday, July 21, 2009

Dad's Spanish Omelette

Sunday breakfasts cooked by Dad were really special. While he was in Iran, he learnt to make a mean Spanish omelet from the Swedish engineers he worked with there. The last time he made this for me was on my birthday 4 years back and he hadn’t lost his touch. It was simply delicious – thick wedges layered with potatoes, stuffed with slowly browned onions and capsicums, topped with cheese. Hmmm… reminds me, I should ask him to make it again the next time he visits.

When I grew up and started reading more about food, I found that in Spain this is called a “tortilla” and is widely served as a snack or a light meal in Spain – especially in Tapas bars. Quite a different concept from the breakfast dish I had always known it as. In Britain it is called Spanish omelet, while in Italy there is a version which is called “Frittata”. They are all flat open faced omelets with a large variation in the fillings and while the bottom is cooked on the stove top, the top is finished in the oven. Read more here.

I made this recently on a Sunday morning (for some reason I can’t wrap my head around making this on any other day! I guess the tradition continues...) Along with the potatoes I also tossed in some sliced sausages and topped it with feta cheese, dried herbs and fresh coriander. The combinations for a frittata are endless - feel free to experiment with bell peppers, mushrooms and any other ingredient you fancy.

Frittata cooking on the stove top

Go easy on the salt if you are using feta cheese since it is naturally salty. Even my daughter gets to share this lovely breakfast because I sprinkle the crushed pepper and some chilli flakes only on 3/4th of the frittata leaving one wedge for her to enjoy.

Frittatas usually use anywhere between 6 to 10 eggs - thats how you get those thick wedges which you can cut. Which is why I usually make these when we have friends staying over with us....makes for a nice brunch of sorts without too much time spent in the kitchen. This time, since it was just the three of us (2.5 actually!), I used 3 eggs. I don't have a smaller non stick pan so I used the normal one which is why it is much thinner than usual.

When making the frittata with 6 eggs or more, I use a round oven proof tin - first on the stovetop and then later in the oven to set the top. This time I put the non stick pan inside the oven - not a good idea at all.
a. Non stick pans are as such a bad idea because of the teflon coating (am trying to find some good cast iron frying pans I can season and use) and one inside the oven isn't a good idea either.
b. I kept in there for about 3-4 minutes, but it might melt the plastic handle of the frying pan.

So, what I'm going to do in future (and would suggest the same for anyone trying this) is to use an oven proof pan which I can also use on the stove top. Think pie pans, roasting tins....

I am sending this recipe on to Family Recipes - the event which brings memories of family, food and fun - the brainchild of Shelby and Laura.

Dad’s Spanish Omelet

Ingredients:

Eggs - 6

Milk - 1 tbsp

salt and pepper to taste

Potatoes - 2, sliced thin and cooked in water for about 8 minutes, till almost done

Mushrooms/sausages/bell peppers - 1/2 cup sliced thin

Red chilli flakes/paprika powder - 1 tsp

Fresh coriander & mint - 1/4 cup chopped

Dried herbs (optional) - 1/4 tsp

Feta cheese - 100 gm

Oil - 1 tbsp


Method:

1. Heat oil in an oven proof tin and arrange the parboiled potato slices at the bottom of the tin and cook each side till golden, about 5 minutes.

2. While that is cooking, beat the eggs and the milk along with the salt and pepper. When the potatoes are almost done, add the mushrooms/sausages/bell peppers to the pan and cook on low for about 5 minutes till they wilt.

3. Pour in the egg mixture and wait till it spread evenly. Sprinkle the fresh herbs, dried herbs, red chilli flakes and feta cheese. Pre heat the oven to 180C

4. After about 2-3 minutes, the egg would have set and the bottom would be almost cooked; Put the tin into the oven (or under the grill) and bake for about 5 minutes till the top is cooked and golden. The cheese will also have melted. Serve warm, cut into wedges along with a hunk of bread on the side.

Tuesday, November 18, 2008

Stuffed Bell Peppers

I know I have been away for too long - this post has been languishing in my drafts for a whole month!! Blame it on work, travel, school admission stress and having a life outside of the blog! To make up - here is a simple but favourite of mine.

This post on stuffed jalapenos triggered a long lost memory of some amazing stuffed capsicums my mother used to make when we had just bought our new OTG (Oven-Toaster-Grill) so many years ago. Then the novelty wore off and with it the oven recipes too. My brother and I loved those cheesy potato stuffed morsels encased in the roasted cup of a capsicum. There is something completely addictive in that combination.....

I instantly abandoned the baingan bharta plan I had in mind for dinner and switched allegiances to the bell peppers instead. Boiled some potatoes, mashed them along with spices, stuffed them into the peppers, topped the peppers with cheese and baked them. In half an hour, there was my childhood memory on a plate - still as delicious as ever! Called my mother and told her about it - she was surprised I even remembered, she says she hardly made it a few times....I wonder what my daughter's favourite memories will be.

I had some stuffing left over so I decided to add some tomatoes - they were good, but not as good as the peppers. Though I know some people like tomatoes better.

I am definitely going to try the recipe with the cheese stuffed jalapenos. The different cheeses and jalapenos may be a bit difficult though, so I might do some tweaking of my own. The egg wash and bread crumbs is a good idea though.

Stuffed Bell Peppers


Bell Peppers (Capsicum) - 6-8 small
Boiled potatoes - 4 medium
Red chilli powder - 1 tsp
Cumin powder - 1/2 tsp
salt to taste
Oil to smear on the peppers
Grated cheese - 1/2 cup

1. Mash the potatoes and mix with red chilli powder and cumin powder and salt.
2. With a sharp knife, cut the tops of the peppers out and scoop out the seeds and stalks from inside without damaging the pepper.
3. Fill the peppers with the potato stuffing and top with grated cheese.
4. Smear the outside of the peppers with oil and then bake in a pre heated oven at 350F or 180 C for about 30 minutes, turning once in between.
5. Its okay if the peppers don't stand upright, if properly stuffed, the stuffing won't fall out.

Sunday, June 29, 2008

Dabeli


One of my favourite street foods while in college in Mumbai, Dabeli or Double Roti or Kutchi Roti was a filling snack and delicious too! A mixture of mashed potatoes, a tangy date and tamarind chutney, spicy garlic chilli sauce and the crunch of pomegranates and peanuts sandwiched between a pav - I haven't had this in about twelve years and it tasted as lip smacking as I remembered!

Meera of Enjoy Indian Food has a variety of food on her blog - Gujarati, Maharshtrian, Parsi - you name it! Love going through her postings and finding familiar food made easy. This recipe is from her blog - we made a meal of it on the weekend for dinner. Next time I hope to bake the pav too - so much better than the ready made stuff.

So here it is then - Dabeli or Kutchi Roti from Enjoy Indian Food. This goes to Monthly Blog Patrolling (MBP) - this month's edition centres on Street Food. MBP was started by Coffee of The Spice Cafe who has now passed the baton to other food bloggers and this one is being hosted by Sia of Monsoon Spice.
Thanks you Sia for extending the deadline to the 30th, what would we tardy bloggers do without that consideration!


Saturday, June 21, 2008

Potato Pasta Soup


A very kiddie friendly soup and definitely comfort food at it's best - this creamy soup is great for a rainy night and for a sore throat which won't accept any solid food but needs some soothing nourishment


Potato Pasta Soup

Ingredients:

Potato - 1 big cubed
Cauliflower - 5-6 big florets
Onions - 2 medium chopped
Garlic - 2 cloves finely minced
Bay leaf - 1
Oil - 2 tsp
Pasta (preferably macaroni or any other small shapes) - 1/4 cup
Vegetable stock - 500ml
Coriander leaves - 1/4 cup
salt to taste
crushed black pepper corn

Wheat flour (or plain flour) - 2 tsp
Butter - 1 tbsp
Milk - 1 cup
Grated cheddar cheese - 4 tbsp

Method:

1. Heat a pressure pan and pour the oil into it, drop the bay leaf and when it changes colour, add the onions and saute till transluscent. Add the garlic and fry 1 minute.
2. Toss in the chopped potatoes and cauliflower, fry for 2 -3 minutes, then add the stock, uncooked pasta and salt and pressure cook for eight - ten minutes (2 whistles and 3 minutes on low).
3. Meanwhile in a heavy bottomed pan, make the white sauce; Melt the butter on a low flame and add the flour, fry for 3-4 minutes till it changes colour, then add the milk slowly stirring constantly to make a smooth sauce without lumps. Take off the pan from the flame in between if needed and cook till it thickens. Then add salt and pepper and the grated cheese, mix till it all melts and comes together. Add a little more milk if it is too thick.
4. When the cooker is cool enough, open it and strain the liquid and keep aside. Discard the bay leaf and remove the pasta and keep aside separately.
5. Blend the vegetables with the reserved soup liquid to a creamy puree adding a little water if needed.
6. Add the pureed vegetables and the pasta to the white sauce and return to the stove again, adjusting the salt as needed. Simmer till the pasta takes on the creaminess of the soup. Garnish with coriander leaves.
7. Set aside portions for kids and mix in freshly crushed black pepper and coriander and serve hot.
Sorry for the poor picture quality, I'm not sure what happened there between editing and loading!!

Monday, March 10, 2008

Urulai Roast (Crisp Golden Potatoes)


It's been a long time since I made this dish - another one of MIL's traditional recipes which is a favourite at home. It was the perfect accompaniment to the Vendakkai Kozhambu with steamed rice, we had for lunch sometime back.

The thing I love about this dish is that its crisp brown crust gives the impression that its a product of many hours of slaving over the stove. That, or a lot of oil. Or both.

Well, the trick to this dish is simple (lots of oil and lots of time in the kitchen over one dish is simply not my style!) - the recipe uses a puree of onion and tomato and that gives the golden brown coating to the potato! Be warned, this is an addictive dish, so don't make it in small quantities.

I am sending this to Sia's Ode to Potato event ; I never did send her a pic of the mutton kurma I sent earlier; didn't get around to making it again....
This classic recipe is just perfect for an ode to the ubiquitous tuber!

Urulai Roast


Ingredients:

Potato - 4-5 big
Onion - 1 big
Tomato - 1 medium
Chilli powder - 1 tsp
Turmeric powder - 1/4 tsp
Coriander powder - 1 tsp
Salt to taste
Oil - 1 tbsp

Tempering:
Mustard seeds - 1 tsp
Curry leaves - 6-7
Urad dal - 1/2 tsp


Method:

1. Boil the potatoes in a pressure cook for 8-10 minutes (2 whistles). Cool, peel and chop into fairly big pieces. The potatoes should be just cooked and not falling apart.
2. Puree the onion and tomatoes in a blender.
3. Heat oil in a non stick pan, add the mustard seeds and when they splutter, add the urad dal , when it changes colour add the curry leaves.
4. Pour in the puree, add the chilli powder, coriander powder and turmeric powder and fry for 6-8 minutes till the tomato onion puree loses its rawness and dries up a bit.
5. Add the chopped potatoes and salt and continue frying on a low flame, taking care not to stir too much, instead jiggling the pan to break them up and turn them.
6. Keep on a low flame for about 20-30 minutes giving it shake once in a while; the puree would have turned a nice reddish brown and crusted each potato piece.
7. Serve warm with steamed rice and sambar or chapattis and dal.

Depending on the type of onion used, this dish could have a hint of sweetness to it.

Sunday, February 10, 2008

Broccoli Soup


The weather just isn't letting up here and we have been having unseasonally cold weather. "Its February!", I want to scream,"Time to put back the sweaters and move around with a light stole, and oh yes! no socks on my feet the WHOLE time!!".

Instead we are stuck with single digit minimum temperatures and its slated to get worse! My daughter, down with a bad cold, was struggling to breathe through her blocked nose....mealtimes quickly turned into a nightmare.

So, what do I do? Plan a week full of soups, runny khichdis and lentil stews.

One of the soups I made was a broccoli soup with potatoes and carrots in it to give it a bit of body and more flavour. I usually add spinach to this soup which makes it a darker green, but didn't have any on hand.
Having been in hot and humid Chennai for such a long time, my soups tend to be as light as possible and so I don't really add cheese - but colder temperatures may warrant some calories, so go ahead if you feel like.

Broccoli is a vegetable related to the cauliflower (it looks like a green version of cauliflower anyway) and a member of the cabbage family. But what I found out was that the stem of the broccoli is much more fibrous than cauliflower, and remains crunchy when cooked.

In Italian , it is known as "Broccollo" which means "Cabbage sprout" and shares the sulphur smell of cabbage and cauliflower, which is released if overcooked.
So, to prevent nutrition loss as well as the smell, it is always better to steam this vegetable for salads and stir fries, so that it is just tender and not mushy.

It is packed with vitamins like A,K,C and riboflavins as well as fiber, calcium and potassium. Besides a huge list of health benefits which include protection against cancer and cardiac disease, it also has anti oxidant properties which help the skin.

While researching foods that would help my digestive system's limited capacity, I also found out that this vegetable supports stomach health by eliminating bacteria responsible for gastritis and ulcers.

Broccoli is no longer as difficult to get in India nor as expensive, and it is a good idea to make it part of your diet, even if just once a month.

This soup is going to "No Croutons Required" which has just been started by Lisa of Lisa's Kitchen and Holler of Tinned Tomatoes. The event is a new monthly soup and salad challenge and this month's theme is Vegetarian Soups and is being hosted by Lisa.

Broccoli Soup


Ingredients:

Broccoli - 7-8 florets
Carrot - 4 tbsp grated
Potato - 1 small grated
Onions - 1 chopped
Garlic - 2 cloves chopped
Bay leaf - 1
Butter or vegetable oil - 1/2 tbsp
Vegetable stock - 350 - 400 ml
salt to taste
freshly crushed black pepper
Cream - 1 tbsp per portion (optional)

Method:

1. Heat the butter or oil in a heavy pan and drop in the bay leaf. Add the onions and saute till translucent, put in the chopped garlic cloves and fry one minute.
2. Add the grated carrot and potato and fry for 2 minutes. Put in the broccoli pieces, saute one minute, then the salt and the stock. Bring to boil and then cover and simmer for about 20- 30 minutes till the vegetables are cooked and soft. Alternatively, you can pressure cook the vegetables at this stage.
3. Strain the water and let cool. Remove the bay leaf, blend the vegetables to a smooth paste and add as much of the strained soup liquid as needed to give it a thick creamy consistency.
5. Pour it back into the pan, adjust the salt and heat through. A dash of cream and a sprinkle of freshly crushed black pepper and it's ready!

Wednesday, January 30, 2008

Mutton (Goat's meat) Kurma

I have no pics of this dish, since by the time I realised that I would like to blog about it(since it turned out much better than I expected) it was all gone.

We don't make mutton* at home that often - make that hardly ever....I can't digest it and hubby avoids red meat. So, I'm not very confident cooking it but I decided on this for lunch with some dear friends, because chicken is currently taboo, what with bird flu blanketing the East of India.

Besides knowing that I wanted to make something South Indian, I didn't have much else to go on. Most of the recipes I had were North Indian or dry preparations. Finally, since the earlier idea was to make a vegetable kurma I decided to make the kurma with the goat's meat.

The vegetable kurma gave way to Thalagam which was amazingly delicious and again - no pics because, again, nothing left to click! Thanks Nandita for that wonderful recipe!

And, since I didn't want to lose this recipe (which I surely won't remember the next time I make it) of mine, I'm blogging about it. The pics will come the next time I make it.....

* Mutton in India is used to refer to both goat's meat and sheep's meat, though the dictionary meaning of mutton refers only to sheep's meat.

I don't like pressure cooking either meat or chicken, because I feel the gravy (especially if it is a coconut based one ) tends to split and loses its consistency and creaminess. The marination helps in cooking it well on the stove top itself.
If you would like to pressure cook this dish, it could be done at step 4, instead of simmering it. 2-3 whistles(10 -12 minutes) should be enough since otherwise, the potatoes might get too mushy. Once the pressure drops, continue with the rest of the steps.

Sia from Monsoon Spice has just posted about a one-off event she is hosting called "Ode to Potato" - 2008 is the International Year of the Potato and she would like to give this unassuming tuber it's due.

I would like to send this dish to her event; for me it was the potatoes in this dish which really grounded it,made it more flavourful - absorbing all the spices and willingly lending it more body and flavour (especially since I wasn't eating the mutton ;) )

Mutton Kurma

Ingredients:

Goat's meat or lamb - 400gms cleaned and cut into 1 " pieces
Onions - 1 big sliced
Tomatoes - 2 medium chopped
Potatoes - 3 medium peeled and chopped into big pieces

Marinade:
Turmeric powder (haldi) - 1/2 tsp
Yoghurt - 2-3 tbsp whisked smooth
salt - 1/2 tsp

Marinate the meat pieces in the above marinade for atleast 1 hour.

Wet masala paste:
Ginger - 2 " piece
Garlic - 6 cloves peeled and chopped
Green chillies - 3-4 chopped

Grind all the three to a paste with little water


Roasted masala paste:
Red chillies - 3
Dhania - 1 tbsp
Saunf (fennel seeds) - 1 tbsp
Fenugreek seeds (methi) - 1/4 tsp
Grated coconut - 1/4 cup

Roast all the ingredients keeping the coconut to the last and then grind to a smooth paste with a little water

Tempering (tadka):
Mustard seeds - 1 tsp
Curry leaves (karipatta) - 8-10

Oil - 2 tbsp

1. Heat the oil in a wide bottomed pan, add the mustard and when it splutters add the curry leaves.
2. Put the sliced onions in and saute till brown (about 5 minutes). Add the ginger, garlic and green chilli paste and saute for 2 minutes. Add the marinated meat pieces and the chopped potatoes and fry on high heat for about 8-10 minutes stirring constantly.
3. Then add the chopped tomatoes and salt and fry for about 10 minutes till the tomatoes turn pulpy.
4. Add about 2 cups of water and a little salt (there will be some salt in the marinade, so be careful) bring to boil, cover and simmer for about 45 minutes till the meat is well cooked.
5. Add the roasted masala paste with another cup of water(if too thick), adjust the salt, cover and simmer for 10 minutes till the gravy takes on a creamy consistency.

Serve with steamed rice or chapattis


Sunday, January 20, 2008

Shaak - Winter Vegetables Gujarati style


Growing up in Mumbai, and particularly in an area where there was a predominantly Gujarati population, I ate a lot of Gujarati food - especially in school; my friend's dabbas were the most delicious ones on the block.
And unlike most of us who carried our lunch boxes packed in the morning, theirs would usually arrive steaming hot during lunch time, delivered by a dabbawalla or a family member.

What with my Dad being a complete foodie, we were also treated to visits to Thakkers in Central Mumbai, where their unlimited thalis were the most sumptuous meals one could imagine. They would lovingly ply us with those rotlis (small sized chapatis) topped with a generous spoonful of ghee, accompanied by a variety of daals, kadhis and shaak, till we could hardly breathe.
In summer there would be the dreamy aamras - golden mango pulp from the freshest Alphonso mangoes - to go with fluffy puris. This for me was even more coveted than the shrikhand (sweetened hung curd) which usually accompanied the puris.

And trains.....yes, trains were an unlikely place, but thats where we got our annual dose of Gujarati snacks, pickles and travel food, when we visited my grandparents down South.

The journey used to take a good 2-3 days then, and while we had lime rice, curd rice, tamarind rice and potatoes packed to last us for about a day and half surviving on station food and (awful) train "meals" after that, the Gujarati families we met (and became instant friends with their kids sharing Amar Chitra Katha comics and video games!) used to seemingly come prepared to feed the entire compartment for the next 4 days!

There was farsaan - theplas, khakras et al accompanied with chundo and green chutney, complete meals of rotlis and dry shaak, and of course sweets. What's not to like! especially since after a point the only way to entertain children in closed compartments is to ply them with food and hope that they sleep it off!

Gujarati cuisine comes from the NorthWestern state of Gujarat and is mainly vegetarian. It changes a lot from the coastal regions to the dryer interior regions, but the cuisine on the whole is centred around wheat breads,pulses and lentils, yoghurt based preparations and seasonal vegetables cooked with spices - either lightly steamed or shallow fried. Many of the dishes have a hint of sweetness to them, but there is a misconception that all Gujarati food is sweet. Sweets are much liked and along with snacks provide for a huge number of interesting regional recipes. While some of them are deep fried, there are also quite a few snacks which are steamed and very tasty. Read more about Gujarati cuisine here and more recipes on one of my favourite blogs; she hasn't posted in a while and I'm hoping she can come back soon....

Its been a long time since I cooked any Gujarati food....I remember cooking a lot of it when I got married and I used to miss the dhoklas, khandvi etc of Mumbai. I even made undhiyu once for Tamil New Year instead of the traditional 7 vegetable sambar, much to the consternation of MIL :)

I came across this recipe of Tarla Dalal recently and given that it seemed to be perfect for the winter vegetables available now, I set about making it with a few alterations.

Initially it sounded a lot like the famous dish Undhiyu - but it's a lot less complicated; the veggies don't need to be stuffed. I haven't come across this dish anywhere else though, atleast not by the name Panchkutyu Shaak - though it says its a traditional Gujarati recipe.

Purple kand in Delhi doesn't seem to be common and I substituted with elephant yam or suran.
Broad beans which are in season,instead of french beans also seemed like a good idea.
I added raw bananas to the recipe and used one big potato instead of baby potatoes and omitted the sugar in the recipe.
I also did not deep fry the muthias, preferring to steam cook them as in this recipe.

The dish with its mix of vegetables cooked together in the spice mixture tasted delicious; in some ways it could be compared to an avial, but it was bursting with a lot more flavour and the dhana jeera powder gave it a very distinctive taste.

Shaak - Winter Vegetables Gujarati Style


Ingredients:
Elephant yam or suran peeled and cubed - 1/2 cup
Broad beans - 1/2 cup cut into 3-4 pieces each
Ridge Gourd (turai/Peerkangai) peeled and sliced thickly - 1/2 cup
Peas - 1/2 cup
Raw Banana peeled and sliced thickly - 1/2 cup
One big potato - peeled and cubed - 1/2 cup

Tadka:
Cumin seeds (jeera) - 1 tsp
Mustard seeds (rai) - 1 tsp
Asafoetida (hing)- a pinch

Grind to a paste - 3 green chillies and 2 ' piece of ginger (cut down on chillies to lessen spiciness)
Reserve 1 tsp for muthia.

Dhania jeera powder (a staple in Gujarati kitchens) - 2 tsp
I used 1 tsp of jeera (cumin) powder and 2 tsp of dhania (coriander) powder

Turmeric powder - 1/4 tsp

Grated coconut - 1/2 cup
Chopped coriander - 1/2 cup

Oil - 1 tbsp
salt to taste

Methi muthia:

Wheat flour - 4 tbsp
Gram flour (besan) - 2 tbsp
Fresh fenugreek leaves (methi) - 1/4 cup washed and chopped
Oil - 1tbsp
Salt to taste
Ginger green chilli paste - 1 tsp
Turmeric powder (haldi) - a pinch
Asafoetida powder (hing) - a pinch

1. Mix all ingredients of muthia and make a dough adding as little water as is required.
2. Divide the dough into 6-8 portions and make small cylindrical rolls out of it.
3. Steam these muthia for about 10-15 minutes till they are well cooked- this is if you are using a stove top steamer where the water is brought to a boil and then the steamer with muthias kept inside on the stand. If using the microwave steamer, the cooking time will be much less.
4. Once done, cool and keep aside.

For the shaak:
1. Heat oil in a pan and add mustard seeds, when they pop add the cumin seeds and the asafoetida.
2. Add the chopped vegetables except the peas, ginger chilli paste, dhana jeera powder and turmeric powder. Saute for 3-4 minutes , then add 2 cups of water and bring to a boil, simmer and cook covered till the vegetables are cooked and the dish is almost dry.Halfway through add the fresh peas to the dish.
4. Add the coconut,coriander, muthias and cook for 2-3 minutes - if using frozen peas, then add the peas at this stage.
5. Serve hot with chapatis or rice.


Friday, December 21, 2007

Jacque Pepin's Potato Lace

My book of handwritten recipes says I wrote this recipe down from Women's Day - definitely something I got from the circulating magazine library in Chennai. It was all hit and miss what you would get each month under the category of "Foreign publications"! But atleast you would get a wide variety of magazines to read each week at a fixed monthly rate.....I have yet to come across something like that in other cities.

This is a really nice pancake recipe for those lazy Sunday mornings when you feel like having something more substantial than an omelet but a little less daunting than brunch.

Some potatoes, onions, eggs and flour and you're set. This recipe is by Jacque's Pepin, a native of France who became a widely respected chef starting out at age 13 as an apprentice in the family restaurant. He was extremely popular in America with his TV shows and cookbooks.

You can see the original recipe here and also here where it also mention's the fact that this was the recipe his mother used in her restaurant! So, maybe it should be called Jacque Pepin's Maman's recipe....


Potato Lace
Recipe adapted from Jacque Pepin's recipe
Ingredients:

Onions - 2 large

Potatoes -4 peeled

Eggs - 3 small

Flour - 3 tbsp

Coriander - 1/4 cup washed and chopped

salt - 1 tsp

Freshly crushed black peppercorns - 1 tbsp

Oil - to shallow fry the pancakes

1. Puree onions in a blender.

2. Shred potatoes in a grater using the bigger holes. Use a potato ricer if possible. S

queeze out as much of the moisture out of the potatoes as possible, using paper towels if needed. Removing the moisture removes the starch also, and that makes the pancakes crispy.

3. Mix the flour, eggs, grated potatoes, pureed onions, chopped coriander, salt and pepper in a bowl till well blended. The batter will be thick but of dropping consistency, add a tsp of milk if needed.

4. Take a deep nonstick skillet, pour about 1 tbsp oil and heat it.

5. Pour about 3 tbsp of batter in the skillet and spread immediately with the back of a spoon like a dosai, as thin as possible. It will have tiny holes and jagged edges.

6. Cook over medium heat for about 1/2 a minute to 1 minute on each side till crisp. Serve immediately.

7. Make the remaining pancakes in the same way, 1 tbsp of oil should be able to take care of a batch of 3-4 pancakes.

These need to be eaten immediately while they are still crisp to get the best taste.

Tuesday, December 18, 2007

Chollia Aloo (Fresh Chickpeas and Potatoes)


Fresh Chickpeas(Kabuli Chana) or Hara Chollia / Green Garbanzo Beans is something I have only heard of and read in recipe books. Until I came to Delhi.

Last week as I went about the local market, I saw a packet of this and asked the vendor what it was, he said "Chollia" and a light went off in my head!

It's funny, but having seen only dried chickpeas all my life, I had to actually introduce the concept in my head of chana being something else before they were dried!I had never thought of them being fresh and like peas before.....

Nutrition wise though, they are as packed with phosphate, folates, folic acid,calcium, vitamin B and iron as their dried counterparts. They are low in fat, calories and sodium and high in dietary fibre. Read more here.

So, here I was the next morning, with the fresh green chickpeas in front of me, and not a clue about what to do - too little time in the morning to start a marathon search on the internet and the only recipe I had in my books,called for paneer. Which I didn't feel like having for lunch that day.

I figured I couldn't go wrong with potatoes, so that's what got cooked - Chollia Aloo....don't need to say much about this simple recipe, except that the green chickpeas tasted so much different from dried chickpeas and made the dish really delicious!


Chollia Aloo


Ingredients:

Hara Chollia (Green Garbanzo beans/ Fresh Chickpeas) - 1 cup

Potatoes - 4-5 medium sized, boiled and peeled

Tomatoes - 3-4 medium chopped fine or pureed

Onions - 2 big finely chopped

Ginger garlic paste - 1 tsp

Turmeric powder - 1/2 tsp

Chilli powder - 1 tsp

Coriander powder - 1 tsp

Cumin seeds - 1 tsp

Oil - 1 tbsp

Garam masala - 1/2 tsp

Chopped coriander - 1/4 cup

Salt to taste.

Method:
1. Dice boiled potatoes.

2. Heat oil in a kadai (wok) and add cumin seeds, when they change colour, add the onions and saute till golden.

3. Add ginger garlic paste and fry for 1 minute, then add the turmeric powder,chilli powder and coriander powder and fry for 2-3 minutes.

4. Add tomatoes and fry on a low flame for about 6-8 minutes, constantly stirring so that it doesn't stick to the bottom. Add half a tsp of oil if it still sticks. The mixture should come together and leave the sides of the pan and be almost brown in colour - but NOT burnt.

5. Now, add 1 cup of water, salt, the potatoes and the chollia and bring to a boil. Cover and simmer on low flame for about 3-4 minutes.
6. Check seasoning and gravy consistency, adding upto 1/2 cup water.
7. Add the garam masala. simmer 1 minute,then add the chopped coriander; remove from the flame and pour into serving dish.

8. Serve hot with rotis.

Sunday, December 16, 2007

Winter Warmer Casserole

Delhi's winter is really kicking in and I can't get over how cold it is! It makes me crave for hot soups and hot meals. Don't fancy spending too long in the kitchen either and too many dishes mean that one cools before the other comes to the table. Solution - a one pot meal - steaming hot straight from the stove/oven to the table!


So I set about looking for a one pot recipe and came across casseroles - something which I wanted to make for a long time but didn't seem to find a suitable recipe.I would read recipes for "Green Bean Casserole" and realize that there was actually just green beans in it with some milk and butter and some soup straight out of a soup can all baked together....we are so used to having vegetables cooked in a variety of ways with spices and tempering that this concept was a bit difficult to understand. But this time I was determined to make this dish my own.


I have a cookbook called "50 and Holding Ozark Cookbook " - sent by a dear friend in the US. It has all sorts of recipes in it, all contributed by the members of the 50 and Holding Club and the community of Climax Springs, Missouri. It is divided into different sections, with blank pages at the end of each section for you to make notes on; at the back of the book in addition to the glossary of cooking terms, there are nutrition and calorie tables, a table for cooking vegetables showing the way to prepare each vegetable(wash,cut,peel etc),cooking time; cuts of meat and serving portions according to weight and a very interesting table on what herbs and spices to use for cooking various vegetables and meats in different ways.

While most of the recipes are traditional American dishes and local homestyle cooking and include such doozies as "how to cook 'coon", I really enjoyed reading this book and all its tips and notes! None of the recipes had more then 10 ingredients and most recipes were about 10-15 lines long


Well, anyway,all of the vegetarian casseroles in it were accompaniments and not one pot meals. So I read through the cabbage casserole, the corn casserole and the winter vegetables casserole....and then I improvised.....


......and this is what I came up with - a hearty one dish meal which incorporated some cooked rice, pasta sauce out of a jar (which I needed to finish because I didn't like it enough to use in pasta), potatoes, cabbage,cauliflower,green garbanzo beans,sweet corn soup from a can (which I got free with something and will never use otherwise), cream cheese, milk and lots of crushed black peppercorns. Come to think of it, maybe it would be better to call this dish "Pantry Clean up"!


The rice really made this substantial without the heaviness of the usual baked pasta dishes.


Cream cheese can be substituted with sour cream or even cheese spread.

Pasta sauce can be replaced with tomato puree (about 4 tbsp should do).

Milk is optional and I added it to make sure the whole dish remained moist and did not dry out.

Try other vegetables like mushroom,spinach, peas,peppers and even fresh sweetcorn - they should do well in this dish.

If you don't fancy whole cabbage leaves in the dish, shred the leaves after cooking.


Winter Warmer Casserole

Ingredients:

Potatoes - 4 medium peeled and sliced thinly

Onion - 1 big sliced

Cabbage - 4 whole big leaves washed well
Hara Chollia (Green garbanzo beans) - 1/2 cup parboiled

Sweet corn soup (tinned) - 1 cup

Cauliflower - 1 cup florets

Cooked rice - 1 cup (preferably a day old)

Pasta Sauce - 6 tablespoons (Or use tomato puree 4 tbsp)

Chilli powder - 1 tsp

Cumin powder - 1/2 tsp

Mixed dried herbs - 1 tsp

Salt to taste

Olive oil - 1 tbsp

Cream cheese - 5 tbsp

Milk - 1/4 cup (optional)

Freshly crushed black peppercorns - 2-3 tbsp

Method:

1. Take the sliced potatoes and put them into boiling water in a large vessel with a tsp of salt in it. Cook for about 5 minutes, then add the whole cabbage leaves and press till they are immersed in the water and cook another 5 minutes. Check whether the potatoes and cabbage are just cooked. Drain the water and keep aside.

2. Heat oil in a pan and add the garlic and then the onions, saute for 5 minutes till the onions are transluscent.

3. Add the chilli powder and cumin powder, then the capsicum,cauliflowers and parboiled chollia and stir fry on high for 3-4 minutes till they are just cooked. Add the pasta sauce/tomato puree at this stage and cook for a couple of minutes more.

4. Add the cooked rice and sweet corn soup,mix well and cook further for 3-4 minutes, then add the dried herbs, salt and 1 tbsp of crushed peppercorns. Turn off the flame and keep warm.

5. Take a casserole or an oven proof dish and lightly grease the insides. Take two of the cabbage leaves and place it at the bottom side by side covering as much of the dish as possible.

6. Place half the potato slices over the cabbage leaves in a single layer. Roughly spread about 2.5 tbsp of cream cheese over the potato slices.

7. Spoon the entire cooked rice and sweet corn mixture over the potato slices.

8. Place remaining potato slices in a single layer over the rice mixture.

9. Spread the remaining cream cheese over the potato slices and cover with the other 2 cabbage leaves

10. Pour milk over the whole mixture and sprinkle 1 tbsp of the crushed pepper all over.

11. Bake in a pre heated oven for about 30 minutes at 180C / 350 F.

12. Serve hot with bread or on its own.


Sunday, November 18, 2007

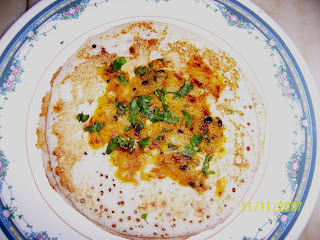
Masala Uttapam (Savoury stuffed rice flour pancakes)

When I was in the first year of degree college in Mumbai, there opened this Udipi restaurant in Matunga called Shri Sundars. Matunga and King’s Circle in Central Mumbai is filled with Udipi joints, some of them which have been there for decades, so a new one opening in that area was just another addition to the clutter. But as we discovered during the three years we frequented it (and I use this term loosely, “lived there” would be more like it!), the restaurant came up with dishes which were quite unusual in terms of Udipi restaurants then which were almost identical in terms of their menu and appearance. Except for Ananda Bhavan idlis…mmm….but that’s another story.

Spring Roll dosa, Chowmein Dosa and some other really wacky sounding dishes filled the menu card of Sundars (we dropped the Shri almost instantly!). Of course there was the usual idli, sambar, medu wada, mysore masala dosa which were really good, but what attracted us at first were these unusual items. Soon we were regulars there - the place was clean, the waiters soon knew us by sight (and hardly got any tips) and the prices didn’t hurt our bare pockets and purses.

And what one of our gang of 8 would definitely end up ordering, was the Masala Uttapam – something I loved and had never tasted till then. I still remember that dish – uttapams stuffed with a delicious potato masala and always, always topped with a juicy slice of tomato embedded right in the centre. I recreated this dish from memory, not sure if this is what they do since it wasn’t as brown and the masala wasn’t exactly stuffed, but it tasted just right to me.

I guess nostalgia wears rose coloured glasses but this place, with all its memories of the fun times I had with my friends, holds a special place in my heart. P & G, I will always remember you guys, ordering one paper roast dosa since that’s all the pocket money you had (or maybe because you were just plain cheapskates!) and then each would begin eating from one end, so whoever ate faster would get more of the dosa! This recipe is for you and the rest of our gang.


Masala Uttapam
Ingredients:

Dosa batter – 400ml (preferably a day old or a little sour)
1 cup rice, 1/3rd cup urad dal –soak rice and dal together in water with a tsp of fenugreek seeds for about 5-6 hours. Drain the water and keep aside, grind in a mixie or grinder till you get a smooth batter. Add the drained water little by little and as much as is needed. The batter finally should be smooth and neither too thick and nor too thin. Transfer to a large vessel with space for it to double after fermentation, add1/2 tsp salt and mix well. Keep overnight and by morning it should have risen to the top.

Potato masala
Boiled potatoes – 4, peeled and mashed
Turmeric powder – ½ tsp
Onions – 2 chopped fine
Green chillies – 3 chopped
Mustard – 1 tsp
Curry leaves – 6-8 leaves
Chana dal – 1 tbsp
Urad dal - 1 tsp
Oil – 2 tsp for the potato masala and more for making the uttapams
Coriander – 1/2 cup chopped

Method:

1. Heat 2 tsp oil in a kadai and add mustard, when it splutters add the chana dal and urad dal and stir for 2 minutes till golden. Add the curry leaves and green chillies and sauté for 2 minutes, then add onions and fry till transparent.
2. Add the turmeric powder, salt and mashed potatoes and fry for another 4-5 minutes, add chopped coriander and take off flame. Cool.
3. Keep the dosa batter ready , heat a non stick tava till just warm, smear some oil on it and then pour a ladleful of dosa batter on it; spread the batter from inside to outside but not too thinly. It should be thicker than what one would do for a dosa.
4. Immediately take a big spoon of the potato masala and carefully spoon it onto the still uncooked uttapam in a smaller circle, taking care not to disturb the batter. Press down with a spatula till well embedded in the batter. All this should be done on a low flame.


5. Increase the flame to medium high and circle the uttapam with about a ½ a tsp of oil. Let it cook for 2-3 minutes till the underside is golden brown and then flip over with a spatula and press down. Cook for another minute and then remove from tava.
6. Serve hot with coconut chutney and sambar.