Showing posts with label besan(chickpeaflour). Show all posts

Monday, October 24, 2011

Diwali Bakshanam Series - III - Ribbon Pakoda


This is the third in my series of posts this week on Diwali sweets and savouries. The first post was on Thenkuzhal and Mullu Murukku. Ribbon Pakoda is another universal favourite and I love this slightly spicy, crunchy snack. The main difference from the first two savouries is that we use Chickpea flour (besan) and rice flour instead of rice flour and split green gram flour. The murukku press uses the flat line shaped discs and there is also a bit of chilli powder added to the flour. So this snack is a lovely golden brown in colour.

Ribbon Pakoda


2 cups - besan (chickpea flour)
1 cup - rice flour
Melted Butter - 5 tbsp (I used unsalted butter, if you use salted butter, adjust the quantity of salt)
Sesame seeds - 1.5 tsp
Asafoetida - 1/4 tsp
Red chilli powder - 1 tsp
Salt - 1 level tsp (approximately)
Water - I ended up using about 250ml of water totally, but added it very gradually so as to not end up with a sticky mass.


1. Mix the rice flour, chickpea flour, sesame seeds and asafoetida in a large bowl. Melt the butter till just liquid and then mix into the flour gradually. Add the salt - its always better to add a little less and then increase it after tasting the dough. Mix till all the ingredients come together.
3. The dough may just about be able to come together but not able to hold shape. Start adding the water a little at a time and knead into a soft, pliable dough. At this stage, you can leave it a little bit firmer than what is actually needed and then add some more water to each batch just before being pressed out.
4. Divide the dough into 4-5 portions, each just enough amount to fit into the murukku press. Keep the rest aside covered by a damp cloth so that it doesn't dry out and work with one portion at a time.
5. Grease the insides of the murukku press. Take one portion of the dough and add about a tbsp of water (if needed), put into the murukku press. Use the plate which has a star shaped hole in it.
6. Press down on a oiled quarter plate or even a greased plastic sheet - it should be easy to press out and the shapes should form easily. If you are finding it difficult to press out the dough, then remove the portion and add one or two tbsp of water to it and try again till you come to a stage where it becomes easy to press out the ribbon shapes. It doesn't matter if the shapes don't come out into an exact round shape - as you keep pressing it will become easier to control. Don't press out too much at one time since it will take time to cook.
7. Meanwhile, heat oil in a heavy bottomed kadhai/wok - test the temperature by putting a small bit of pressed dough into the oil, it should rise to the top. If not wait for some more time. Keep the flame on medium low at all times. 
8. When the oil is hot enough, slide the pressed out shapes from the plate/plastic sheet onto your hand and then slide it slowly into the hot oil, taking care not to drop it from a height,else the oil might splash on to your hands. Put in a few more or as much as the pan can accomodate without overcrowding.
9. When it rises to the top, flip over and fry for a few more minutes -  till the bubbling of the oil stops and the ribbon pakoda is cooked through and a golden brown in colour. Wait for the first batch to cool and eat one to check the salt and consistency. Accordingly adjust the seasoning if needed and correct the frying time for the next batch.
10. Press out the remaining portions as well in the same manner.

Wednesday, October 14, 2009

Rava Laddoo and 7 cup Barfi - Diwali is here!


The festive season started early this year and it seems like we hardly celebrated Dasera and its already Diwali. Life's been a whirlwind this past month - we had friends from Chennai staying with us during the Dasera holidays. The next weekend saw us making a quick dash to Mumbai - in the space of 2 days we caught up with my brother's family, surprised my best friend, met a dear friend who had come down from Oz for the holidays and had a reunion with my CA gang! No wonder then Diwali practically crept up on me and gave me a big surprise.

Its my third Diwali this year, in Delhi, and I am already complaining how its not "cool enough"! I have also become a veteran at shopping for gifts (something we never did in Mumbai and Chennai) at the Diwali melas. Launched an assault on the most popular one (Blind School Mela) at 10 30 in the morning when it was still empty and was done by 12.30!!


The festive mood crept in only a couple of days back - that too it had to be kick started into full gear by wearing a saree to work in the morning the day before Dhanteras! So when I came back after battling shopping traffic on the way home, I was surprised to find myself in the mood to make some sweets. So, after putting my daughter to bed and in the midst of dinner, I made my favourite first - rava laddoos. There's something about a well made rava laddoo - soft ball of sweet powdery goodness - which never fails to satisfy me. I don't like the moong dal laddoos and besan laddoos as much.

Then when they were done, my mind went back to the conversation I had with my cousin on the way back home - she told me about a sweet she was making this year. It's called 7 cup barfi apparently, because it has 7 cups of ingredients - all the same measure. I was quite intrigued by it since I hadn't heard of such a sweet before. I usually make mysore pak so I decided to try this one instead. Was too late to call her, but the measures she told me had stuck in my head so I made it on that basis. 1 cup ghee, 1 cup gram flour, 1 cup coconut, 1 cup milk and 3 cups sugar (I used 2.5 cups and it was still quite sweet).

This is a good barfi to try as a beginner - I should have started with this instead of the mysore pak I tried the first time itself....the ingredients are all supposed to be mixed together and then cooked down to the barfi stage. I decided to roast the gram flour before mixing though, just to be on the safer side.
Make sure you add the other ingredients only after you mix the gram flour with the milk completely, till well blended and smooth without any lumps. The cooking takes about 30 minutes on a medium flame stirring constantly. The mixture will come together and leave the sides of the pan and become very thick. When scooped with a spatula or spoon it will not drop easily from it. Put of the flame at this stage and stir a few secs more before pouring into a greased tray.

For those who fear the whole "mithai/bakshanam" making process - try these recipes. They are simple and took me just an hour to make both. BUT if you, like me, are a miserly user of ghee and sugar, be warned that I disconnected that part of my brain and went ahead and used a whole cup of ghee in each of these recipes. Past experience has shown that rock hard roundels and squares are not what you want on Diwali!

Wishing you a very Happy Diwali!!


Rava Laddoo


Semolina (sooji / rava) - 2 cups
Sugar - 1.5 cups
Ghee - 1.5 cups (melted)
Cardamom (elaichi) - 4-5
1/4 cup raisins and cashews

1. Add 2 tsp of the ghee to a heavy pan and lightly fry the cashews ansd raisins for about 3 minutes - the raisins will plump up and the cashews will turn light brown. Remove and keep aside.
2. Add 2 more tsp of ghee to the pan and lightly fry the rava for about 5 minutes on a low flame, constantly stirring. A light aroma of roasted rava is enough and it shouldn't turn brown.
3. Transfer the rava to a plate where it can cool.
4. Remove the cardamom seeds and mix it with the sugar and grind in a mixie till almost powdered.
5. Add the cooled rava to the mixie and grind till the sugar is completely powdered and the rava is still a little bit coarse.
6. Remove from the mixie into a separate dish.
7. Take a large plate - take about one third of the rava and add the warm, melted ghee in tablespoons to the rava - roughly a little less than half a cup should do. You can always add some more later if needed.
8. Take about 2 raisins and half a cashew for each laddoo and combine it with the rava and melted ghee and make small balls. If the mixture has too much of ghee, add a bit of the rava sugar mixture.
9. Once this is done, repeat with another one third of the rava and another measure of ghee and then again with the last portion of rava and some more ghee.

Don't panic if the laddoos are not formed well, just add a wee bit of warm ghee and it should come together.

7 Cup Barfi

Chickpea flour (besan) - 1 cup
Freshly grated coconut - 1 cup
Milk - 1 cup
Ghee - 1 cup
Sugar -3 cups ( I used 2.5 cups)

1. Roast the gram flour in a tsp of ghee for 3-4 minutes and cool. Mix into the milk till well blended and without lumps.
2. Mix the rest of the ingredients with the milk and besan, transfer to a heavy bottomed pan and cook on a medium flame.
3. After approximately 20 minutes, the mixture will start leaving the sides and become quite porous and semi solid. When scooped up with the spatula, it will not drop easily - at this stage when it starts coming together, remove from flame and pour into a greased tray and flatten with the back of a greased cup.
4. Cut into diamond or square shapes after a few minutes and let cool completely.

A quick search on the net told me that this is quite a popular sweet with many variations for the ingredients of the 7 cups! Take your pick and sweeten up your Diwali celebrations!

Friday, May 16, 2008

Mixed Vegetable Kadhi

This is a spin on the classic Kadhi Pakoda. I am not a fan of fried stuff floating in liquid - whether it is dahi wadas or vadai curry, but I do love yoghurt based dishes. So, it was a matter of time before I appropriated this dish and made it my own.

I love the flavours the vegetables bring to the plain yoghurt and the best part of it is of course the tempering ingredients. They lend an unmistakable touch to the dish and I think there must be some culinary link based on either Ayurvedic or similar principles between the yoghurt based dishes made in different parts of India.

Otherwise, how does one explain the dhania and methi seeds ground into the Mor Kozhambu of the South appearing in the tempering of the Punjabi Kadhi and Gujarati kadhi (only the methi there though), the mustard and hing in the tempering of these dishes and of course the thickening of the yoghurt with gram flour (besan) in kadhi and the chana dal(bengal gram dal) ground into mor kozhambu.

Maybe thats where the saying "Ab dudh ka dudh or paani ka paani ho jayega" originated - they were referring to yoghurt all along! :0)

But coming back to topic - there is a reason yoghurt based dishes are found in almost all regional cuisines of India. Curd or yoghurt is traditionally known to have cooling properties - a much prized quality during the heat of an Indian summer.

But besides this there is a nutritionally sound reason for including curd in our day-to-day diet. The lactose (natural sugar) found in milk when allowed to ferment into curd, changes to lactic acid - a factor which enhances the absorption of calcium by the body.

Tempering (tadka/baghar/thalimpu/poppu) is an intrinsic part of Indian cooking and imparts a distinctive flavour to any dish. Do you know its other benefits?
  • The hing (asafoetida/perungayam) used to temper dals makes it easier to digest protein heavy pulses and avoid flatulence.
  • Certain vitamins are only soluble in fat and require a medium for release - e.g vitamin A found in carrots and the carotene in curry leaves(karuvupellai/karipatta).
  • Essential fatty acids required by the body are found in the vegetable oils used for tempering as also in mustard and urad dal.
So, the next time someone at home complains about the tadka smell remind them of the good it does (the tadka, not the smell!).


Mixed Vegetable Kadhi

Kadhi went well with peas pulao and stuffed eggplant


Ingredients:

One cup chopped mixed vegetables - I use any three to four of these vegetables- carrot, beans, capsicum, yam, peas, potato

2 cups yoghurt - whisked smooth
2 cups water
One tablespoon gram flour (besan)

salt to taste
turmeric

Tempering:
Oil - 2 tsp
Coriander seeds (dhania) - 1 tsp
Fennel seeds (saunf) - 1 tsp
Fenugreek (methi) - 1/4 tsp
Mustard seeds (rai) - 1 tsp
Red chillies - 2
Asafoetida(hing) - a pinch

Method:

1. Mix the water with the curd and whisk till smooth. Take a little of the mixture and mix in the gram flour so that there are no lumps. Combine this with the rest of the diluted yoghurt along with salt and tumeric.
2. Take a large pan and add the yoghurt mixture and heat on a low flame.
3. Meanwhile take a smaller wok and heat the oil for tempering. Add the mustard seeds and when they pop, add the fennel seeds, methi seeds, dhania seeds, red chillies and hing. Saute 1 minute
4. Add the chopped vegetables to the tempering and saute for 2 minutes, then cook on a low flame for another 5 minutes till almost cooked.
5. Transfer the tempered vegetables to the simmering yoghurt mixture and continue cooking on a low flame for another 10 minutes till it thickens and the besan is completely cooked.
6. Serve with chapatis or rice.

Tuesday, December 4, 2007

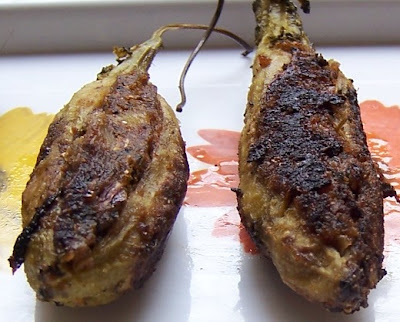
Stuffed Bitter Gourd (kahaani mein twist)


Bitter Gourd (Pavakkai in Tamil, Karela in Hindi) is a vegetable that very few people like. But those who do, seem to like it with a passion. And in some psycho babble analysis that I have done, I have reached the conclusion that most peoplewho do like this bitter vegetable were those who were, as kids, encouraged to eat everything that was served.


Like this friend of mine who grew up in a joint family; there used to be at least 4-5 vegetables prepared for every meal, to meet everyone’s preference! Till date, he doesn’t eat eggplant, mushrooms, sticky potato and a couple of more vegetables.


I can just hear my mother laughing out loud if someone had suggested that to her! She had it hard enough trying to rustle up 3 meals a day while bringing up two kids and managing a full time teaching job and home, without having to think of different dishes for the 4 of us!


I used to hate adai – a rice and lentil pancake - as a child (without even trying it), and while I was never forced to eat it, the alternative which was offered every single time adai was made was aval (beaten rice) soaked in milk and sugar. It was edible, but not terribly interesting. Soon I decided to try adai and I came to love those crisp pancakes with a blob of home made butter on them. Maybe Jessica Seinfeld could try that instead of sneaking beet into chocolate cakes and spinach into brownies!

Of course there are exceptions to any theory, especially to theories based on a population of what? 20 people?! There are friends who eat every other vegetable quite happily, except for bitter gourd because they just don’t like the bitterness. I think it is more of an acquired taste (like beer ;)) , and where others find this vegetable bitter , tender gourds when cooked the right way, seem to me to have a really nice flavor, quite different from other vegetables.


Anyway, my mother loved bitter gourd in all its forms and her enthusiasm for it infected us too – we used to wait for the tamarind based curry (pavakkai kozhambu), the stir fry (varuval) and Pavakkai Pitlai (bitter gourd in spicy lentil gravy). Ok before you start thinking we had a freaky childhood straight out of The Adams Family, let me clarify that this was only when we were about 10 and 17 respectively, and able to actually try new things and develop a taste for them.


Stuffed bitter gourd was not made very often since it was a bit more labour intensive. Once I started cooking though, I prepared this quite regularly, since I liked trying out different stuffings. There was one with potato, another one with roasted coconut and spices ground into a paste……the easiest one was with onions, besan (chickpea flour) and spices – fried in a little bit of oil and then stuffed into the gourds.


Whatever be the preparation, I usually peel the skin of the bitter gourd and then cook it, since that removes a lot of the bitterness. My girl Friday T who helps with my daughter, told me that they never peeled the skin in her village in Jharkand and she used to then make a vegetable stir fry out of just the peel which I would have discarded; brave soul, not to mention wise, since most of the nutrition would be in the skin I guess.

So when I decided to make the stuffed version this time, she suggested that we use the peel in the stuffing. Now that seemed really interesting if a bit daunting! Ok, make that frightening....but I'm a foodie after all, drawn irresistibly to a twist in tried and tested recipes - true indications that any notions of sanity need to be left at the door. So I did.
The filling really tasted great with this new addition and it wasn't "it's HimeshReshammiya-plug-your-ears-you're-going-to-be-tortured-kind-of-bitter" like I thought it might be.
Ok, this is the point when people usually start shifting in their chair and looking around for excuses to leave - my evangelical sessions on recipes....so I won't say more - try it out for yourselves you non believers! :)


Stuffed Bitter Gourd

Ingredients

Bitter Gourd – 6 small washed and peeled(the gourds should be dark green, not very big and with no signs of ripeness like yellow or white patches). Reserve about 4 tbsp of the peel.
Oil – 2 tbsp
Turmeric – ½ tsp
Salt – to taste

Filling:
Onions – 2 medium, chopped fine
Besan (Chickpea flour) - 3 tbsp
Reserved peel of bitter gourd marinated in a tsp of salt for 15 minutes – 4 tbsp
Chilli powder – 1 tsp
Cumin powder – 1 tsp
Lemon juice – 1 tbsp
Salt
Oil – 1 tsp

Method
1. Slit the bitter gourds slightly, just enough to scoop out the insides (seed and pith), if the seeds are very big then the gourd is too ripe and will be bitter.
2. Take a vessel of water and boil the slit gourds in it, adding ¼ tsp of salt and ½ tsp of turmeric. Boil the gourds till half cooked, do not overcook them since they will cook again with the stuffing. Keep aside to cool.
3. Wash the marinated peel in water and keep aside.
4. Meanwhile, heat a non stick pan and roast the besan and roast on a low flame till the colour changes and you get a nice aroma. Remove the besan from the pan and keep aside.
5. Add one tsp of oil to the same pan, heat it and then add the onions. Sauté till translucent, add the washed peel, chilli powder, cumin powder and salt and fry for about 3-4 minutes.
6. Add the roasted besan and fry for another 2-3 minutes. Remove from flame and add the lemon juice. Let cool a bit and divide into 6 portions.
7. Take the cooled bitter gourd and stuff it with the onion mixture, taking care not to open the slits too wide. In case the slits have opened too wide while cooking in water or stuffing, use some clean string to tie them up. The string to be cut and discarded before serving.
8. Return the pan to the flame, heat 2 tbsp oil in it and add the stuffed gourds to it. Fry on a low flame for about 10-15 minutes, stirring carefully from time to time. Make sure all sides are evenly browned and the gourds are cooked through.


Alternatively, the stuffed gourds can be brushed with oil and cooked in an oven at 180 C for 15 minutes, rotating them in between so that they are evenly browned on all sides.